Inventory

Featured Articles
Steps for Creating a Kit Go to the top of the screen to the +Button > Product and enter the Title
Updating Quantities: The Batch Inventory Module You can get to this part of the system by clicking o
Steps for Creating a Kit Go to the + button in the upper left and click Product and enter the Title
Steps for Creating a Package of Bundled Products Go to Inventory > Packages. Click the + New Pack
Your Departments, Categories, and Vendors are elements of the system you need to have in place befor
In this article you will learn how to add Gift Cards into the system, how to use them as a means of
If you have multiple Locations set up in Rain POS, each with its own unique inventory database, you
You can get to this part of the system by hovering over Inventory on the left and then clicking on t
You can get to this part of the system by clicking on the Inventory area in the blue Admin Toolbar a
You can get to this part of the system by hovering over Inventory on the left and then clicking Bin
You can get to this part of the system by going to Inventory > Products. Editing Products in Bulk
This version of the Add New / Edit Product page is more than just a visual overhaul. We have combed
You can get to this part of the system by clicking on Inventory > Services. The Services Page The
Find and Work With Your Products On-Screen You can get to this part of the system by logging into th
Vendor Consignment Overview Some Rain POS system clients work with Vendors who allow them to sell go
Understanding the Work Order Process You can get to this part of the system by hovering over Modules

All Inventory Articles

Helpful Blogs

Take a look at some creative ways to level up what you do.
How To Start a Boutique Retail Store: 6-Step Guide

Lorem ipsum dolor sit amet, consectetur adipiscing elit. Ut et massa mi.

image - 2025-04-28T114828.689
How To Start a Boutique Retail Store: 6-Step Guide

Lorem ipsum dolor sit amet, consectetur adipiscing elit. Ut et massa mi.

image - 2025-04-28T114835.188
How To Start a Boutique Retail Store: 6-Step Guide

Lorem ipsum dolor sit amet, consectetur adipiscing elit. Ut et massa mi.

Flexible Serialized Inventory
With the Flexible Serialized Inventory feature, you are able to see and use inventory from your other store Locations if needed. This can be useful if you are running an event where you have inventory from multiple stores present.

Once you have turned on Flexible Serialized Inventory, whenever you go to choose a serial number for a rental, you will have the option of viewing serial numbers from your other Locations for the item in question, as pictured below. 

fs 1

If you choose to use a serial number that is not from the Location you are currently logged into, the following warning will pop up:

fs 02

The item's Location is changed at this point to your current Location. If you end up not completing the use of the item, you will need to do a manual Transfer of the item back to the original Location, if that is what you prefer. 

If you do use the item, once the process is complete, the contract or sale will be at your current Location and will proceed as normal.
Product Variants & Styles Training Video


Add Products in Bulk by Spreadsheet

The bulk product management system is currently facilitated by spreadsheet uploads. These spreadsheets need to be in the most basic spreadsheet format, CSV (comma separated values), which is a data file type that any spreadsheet program can open. Because of its simple data format, you cannot have special formatting, such as formatted text (bold, italic, bullet points, etc.) or macros in the saved files. For more information on how to work with spreadsheets in our system, please click here . It is strongly recommended that you read the linked article before you start working with this part of the system, due to the technical nature of this kind of work.

Steps for Adding Products in Bulk

  1. Go to Inventory > Bulk.
  2. In the Spreadsheets drop-list, click on Add New Products.
  3. Click the Download link to the right, then open the file in your spreadsheet program. If you do not have a spreadsheet program, you can use the app built into Google Docs if you have a Google account. You can also download Open Office, which includes a very capable spreadsheet program, and the whole suite is free from openoffice.org.

  1. When you open the spreadsheet, you will see only the first row has header titles for each column, and there is not yet any other data in the spreadsheet. If you see product data below row 1, you have opened a previous Add New Products spreadsheet, and you need to close it and open the new download. If you work from an older file, you risk duplicating products.
  2. You are required to enter one or more Category ID s (Column A: it will be a number, and you can see your list by clicking View Category IDs on the Inventory > Bulk page). You're also required to enter a Product Title and Short Description. The other fields will either set themselves to default values or the data can be added later, manually. See the reference key below for info about the different columns of the spreadsheets, what data needs to be entered, and more details including examples.
  3. You will likely want to enter ID Numbers, such as SKU, UPC, and/or Manufacturer ID. Also, you can enter your Price information and the Cost that you pay per unit so that data is in the system from the start. You will also want to enter your starting Inventory for the products so that is in the system from the beginning. For the other columns, you can go to whatever level of detail you like, specifics are below in the reference key if you need more information.
  4. Save your spreadsheet, and you will want to keep it in CSV format. If working in Excel, it will pop up a warning indicating that you will lose advanced functionality if you save to CSV and are you sure you want to save in that format. Always click Yes to that warning.
  5. Go back to Inventory > Bulk and in the Spreadsheet list, click Add New Products, then click Upload. Find the file you saved to your computer, and click the Upload button. The system will tell you the file has been uploaded successfully once it is done.

Please Note: It is a good idea to keep your uploads to 3,000 line items or less. The system may time out if you upload more than that at once.


Add Products to Categories

Steps for Adding Products to Categories

  1. Go to Inventory > Products , and find the product you want to work with, then click to open it, or create a new one.
  2. Go to the Website Settings tab on the left.
  3. In the Category area near the top, click the Category Drop-list.
  4. In your list of Categories, click on as many Categories as you would like the product to be listed in, they will highlight in blue.
  5. Click the Save Product button at the bottom.


Batch Inventory Training Video


Bulk Upload Product Images

Steps for Bulk Uploading Product Images

  1. Go to Website > Files > Images, and find the folder you want to upload the images into, then click to highlight it.
  2. Click the blue Upload File button. Make sure your file names are identical to the UPC, Manufacturer ID, or SKU of the products.
  3. You can either drag and drop images into the gray area, or you can click the green Add Files button to add files from your computer. After adding files, you can add more from different locations, up to a total of five hundred.
  4. Once your upload list is complete, click the blue Start Upload button to begin the upload. You'll see progress bars for each file and for the overall upload job. Once it's complete, the upload window will disappear and you'll see your images at the top of the list.
  5. The images with corresponding product ID numbers will be visible if you open the product to edit it, look on the Images tab, in the first (primary) spot.


Catalog Search Training Video


Create a Product Form

The system allows you to create a variety of form fields for a product that will let your customer give you preferences or information about the product. For example, if you sell a bag with embroidered initials, you could create a form to allow the customer to enter the initials they want. You can add single line input, paragraph input, check-box, and drop-list fields to your product, and the system will email you the information entered into the forms.

Here is a short video showing you how you can create product forms in the Product Page 3.0:

Watch on Vimeo


Steps for Creating Product Form Fields

  1. Go to Inventory > Products and search for the product you want, then click on it.
  2. Click the Website Settings tab and look at the Product Form area.
  3. Click on the Input Type drop-list and choose which of the four form types you want.
  4. Enter the Label (title / description for your form) you want for the field, here are some examples:
    • Single Line Input - Initials for monogramming, name / title for engraving, etc.
    • Paragraph Input - Description text for shipping instructions, promotional text, etc.
    • Check Box - Answer yes to a yes/no question if they check the box, e.g. Add me to your mailing list.
    • Dropdown Box - Make a list of options the customer can choose from, e.g. packaging preference: enter Labels for each option, for this example, Recyclable or Standard.
  5. If it is a form field that can be Required, there will be a checkbox to allow you to make it Required or not. The Check Box field type cannot be made Required since that wouldn't offer the customer a choice. 6. At the bottom of the page click Save Product.


Create a Promotional / Store Use Gift Card

Steps for Manually Creating Gift Cards

  1. Go to Inventory > Gift Cards.
  2. Click the + Add New Gift Card button in the upper left.
  3. You can either use the automatically generated Gift Card Code, OR you can scan in a code from a pre-printed card, OR you can manually enter your own code.
  4. It is recommended to enter a unique Title for every Gift Card you create, as an alternative way to look it up.
  5. Enter the Amount.
  6. Click the Add Gift Card button. The Gift Card will be usable in the Point of Sale or through the website shopping cart.
Creating Products: Different Methods

There are several places in the system you can create products. One of the most frequently used is when you click the + Button in the upper left and click Product in the pop-out list.

cp 01.jpg

Another frequently-used area is under Inventory > Products > New Product.

cp 02.jpg

Another area worthy of mention here is the + button in the Register, next to the item search area.

cp 03.jpg

You can also create products from within Work Orders, Purchase Orders & Receiving Orders, and from the Categories page under Products, when viewing a category or subcategory.

Finally, you can create products in bulk with basic data in the Inventory > Bulk area using the Add New Products spreadsheet. For full details, click here: Add Products in Bulk by Spreadsheet


Disassemble Kits

How to Disassemble Kits

If you need the ability to 'disassemble' kits and put the component inventory back into the individual components, you can do that from within the Edit Product page.

Please Note: This tool does NOT reverse inventory adjusted by the Precuts tool, it applies only to kits.

To Disassemble Kits you have already built using the Assemble Kits feature, do the following:

1. Go to Inventory > Products and search for the kit you want to Disassemble.

2. Click on the Kit product title to open its detailed Edit Product view.

3. Click on the Inventory tab on the left.

4. Scroll down to the Current Inventory area and click the Edit button on the right.

dis 02-png

5. Find the inventory line-item with active inventory and click the Disassemble link on the far right.

dis 03

6. In the Disassemble Kit window, select the number of kits you will be disassembling, the Restock Quantity will update to show how much of each component item will be going back into those products.

dis 04

7. Click the Disassemble Kit button to make the inventory changes. The inventory quantity of the Kit itself will be reduced, and each component will be increased according to the numbers you entered.

Find a Gift Card

Steps for Finding Active Gift Cards

  1. Go to Inventory > Gift Cards.
  2. Find your Gift Card in the list of Active Gift Cards.
  3. You can click checkboxes in the upper right to view Inactive cards or Expired cards, if you need.
  4. You can copy and paste Gift Card Codes from the list into the Register to be used as payment, if a customer has misplaced their Gift Card (This is the reason you are encouraged to always enter a unique Gift Card Title when selling or creating Gift Cards).


How do I set shipping rates for individual items?

We do not have a way to set a specific amount to charge for shipping per product, but you can have the product's weight determine how much is charged. Start by looking at your shipping settings. After logging into Rain POS, in the upper right click on the Admin Button with your username and go to Settings > Website Settings > Shipping, and click to Configure your shipping methods. Check the box for the method you want to work with and click to Edit, or if you don't yet have a shipping method, click the green +Add Domestic Shipping Method button to create a new one. After you set the Region, currency, method name, and delivery time, in the 'Based On' area, you will need to select Weight. Each of your products can be set to have whatever weight it might need in order to charge enough shipping to cover the item. If you don't have weight values in place for your products, you will need to enter them, and they go in as decimal values of pounds (or kilograms, if that is the system you use), so an item that weighs 24-ounces will go in as 1.5 in the weight field for the product. Be sure to click Save at the bottom after you're finished adjusting your rates.

How do I set up my products so Members can get special pricing?

If you do wholesale pricing or other special pricing for your Members and you do not yet see a place in your products to add Wholesale Price, please call us at 385-404-6200 and use option 2 for Support and we can activate that for you if you have our Website Plus or greater service package. For more information on how to set up for Wholesale Pricing and membership, please click here: Website Administration - Members.


How to Add or Change Website Images

Images are a crucial part of any website's success, so you need to make sure you are working with them in the best possible ways throughout the site. To start, let's go over some simple rules you'll want to follow.

Article image


Rules for Working with Images

Start Large - As a general rule, you will want images that are large for your website, at least to start. You can always size them down to whatever you need, so starting with a larger image is good, think 800px - 1000px (see size guidelines below).

Use JPEGs, PNGs, or SVGs - Other formats may not work at all (e.g. GIFs). If you are not familiar with PNGs, they are an Adobe image format for the web that allows for image transparency. SVGs are a vector image format (line art instead of pixel art) that scale beautifully larger or smaller as needed. For pixel-based images (JPEGs and PNGs), our system has an auto scaling feature that always rescales the image file for optimal image quality.

Resize with Care - Sizing down is always fine; just realize you will lose detail the smaller the image gets, and that's normal. Never enlarge an image past its starting size, or it will begin to pixelate and look grainy.

Know Your Limits - For web images, the largest you would ever need them to be is about 2,000px wide, so the system may block you from uploading images larger than this. Similarly, you don't what huge image file sizes for web images or it will slow your page load time way down, so the limit on the file size is 4mb. Anything larger will be blocked from upload. If for some reason you need to upload an image that exceeds these limits, click on the Documents folder in the Files area and you can upload files up to 100mb in size. For display on the web page, though, you will want to follow the limits above.

Crop for Best Fit - To maintain an orderly appearance, or to make sure that your images line up nicely, you will want to crop them to exact dimensions. If you're replacing an image, find its original dimensions and crop the new image to fit. In your slideshow, you will want all images to have exactly the same dimensions, whatever you feel looks best.


Add or Change an Image

If you need to add an image into a module to display on one of your pages or if you need to change out an old image for a new one, please follow the steps below:

  1. To add a new image or change one that is already there, first click on the Edit button for the module where you want the image (the Edit button is the small pencil on the far left of the gray Module Toolbar).

    Article image

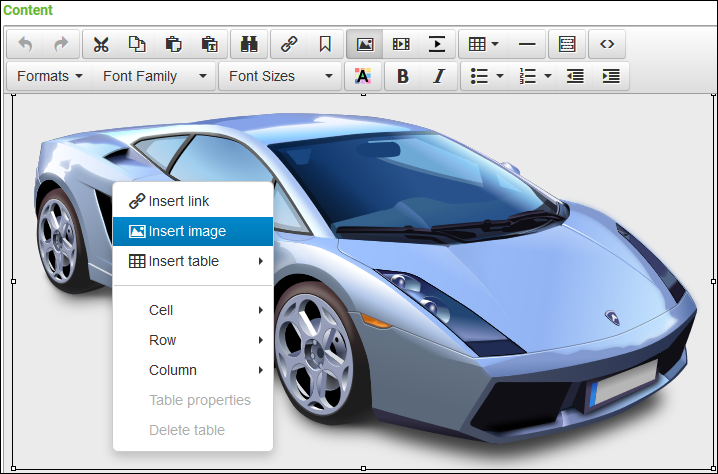
  2. In the content editor, either right-click on an image you want to replace or left-click your mouse where you want the new image to go. If you are changing an existing image, your right-click will pop up a small menu: click on Insert Image to open the Insert / Edit Image window. If you are putting in a new image, either right-click and use the menu or you can click on the Insert/Edit Image button in the controls above the area in which you're working (it looks like a photo of a mountain, look in the top row of buttons below).

    Article image

  3. In the Insert / Edit Image window, if you are changing an image to a new one, you should write down the Width and Height so you can change the new image to the same size. If you are bringing in a new image, you may need to try several sizes, saving the image (see below) to see how it fits.

    Article image

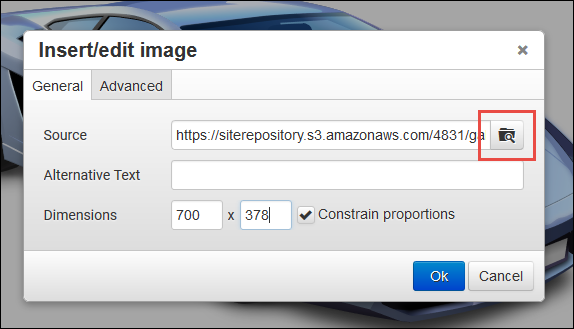
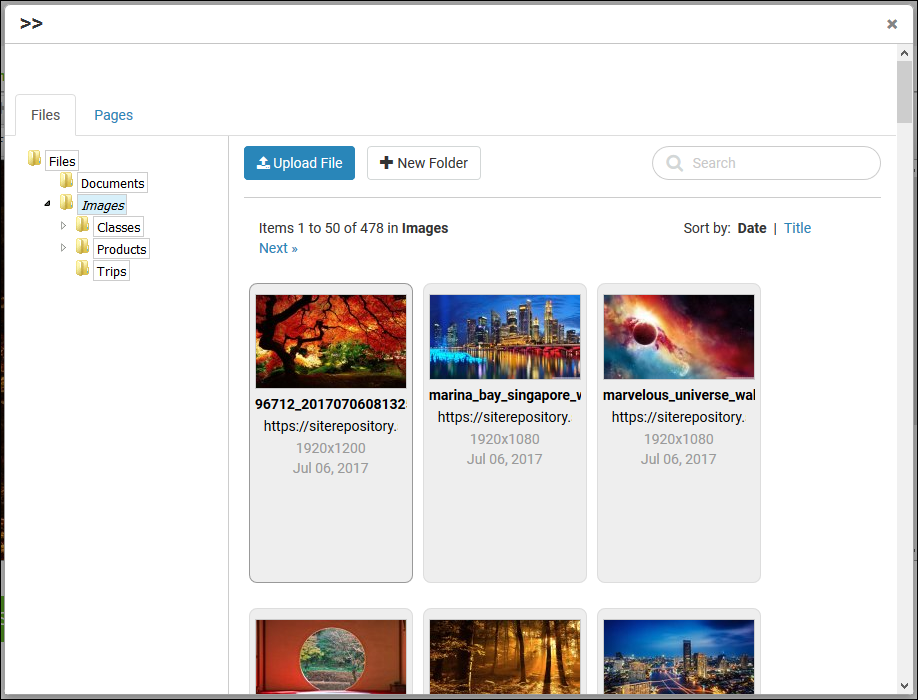
  4. To load the new image, click on the Browse Server button (the button to the right side of the Source field).
  5. You will see the Browse Server window open, with some of your site images visible. If your image is already on the server, click on it. If you are uploading a new one, click on the button for Upload File.

    Article image

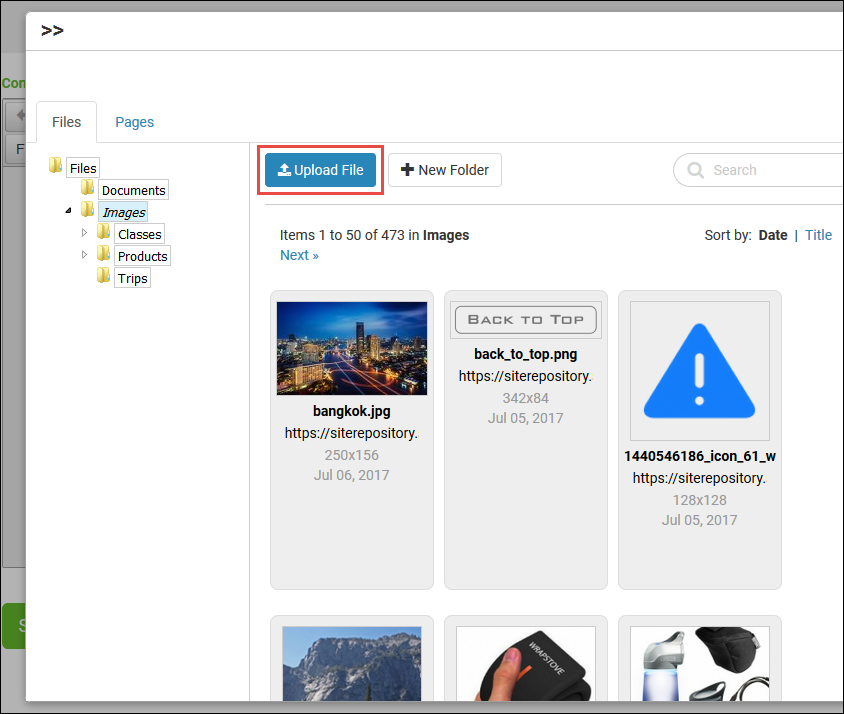
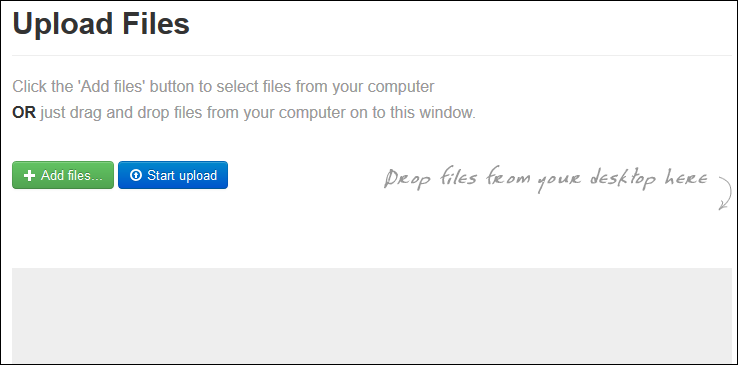
  6. In the Upload File window, click on the Add Files button and browse your computer for the image(s) you want. You can also just drag and drop images into the gray area below the buttons, if you like.

    Article image

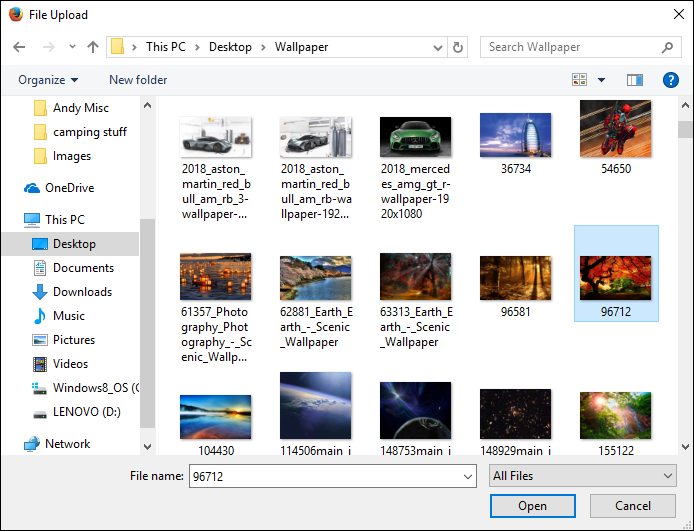
  7. When you find your image(s), if there is only one you need, you can double-click on it (or click on it once and click the Open button at the bottom). If you want to load multiple images, you can click on each separately while holding down Ctrl (Command if you use a Mac) and then click Open. If you are selecting all of the files in a folder, you can do Ctrl + a (Windows) or Command + a (Mac) and then click Open.

    Article image

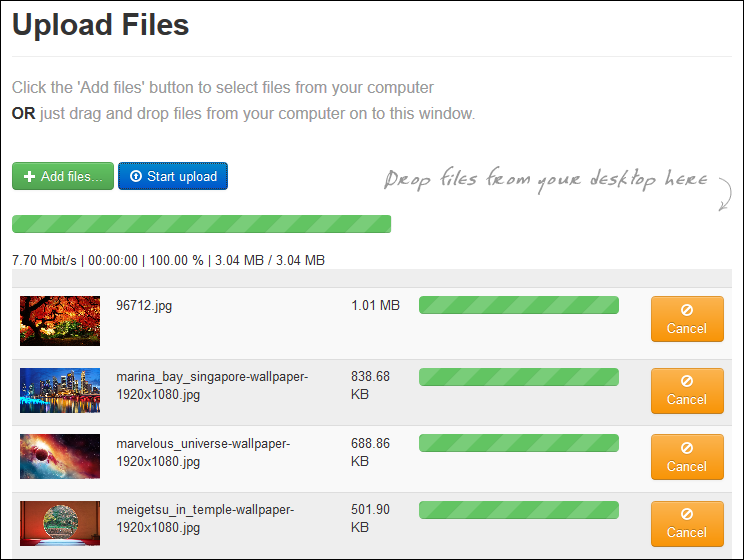
  8. You will see thumbnails of the images you are uploading in the Upload Files window. Click the Start Upload button and the image(s) will upload. When they are finished, the Upload Files window will disappear and you will again be looking at your Browse Server window.

    Article image

  9. You will see the image(s) you just uploaded at the top of the list. Click on the image you want.

    Article image

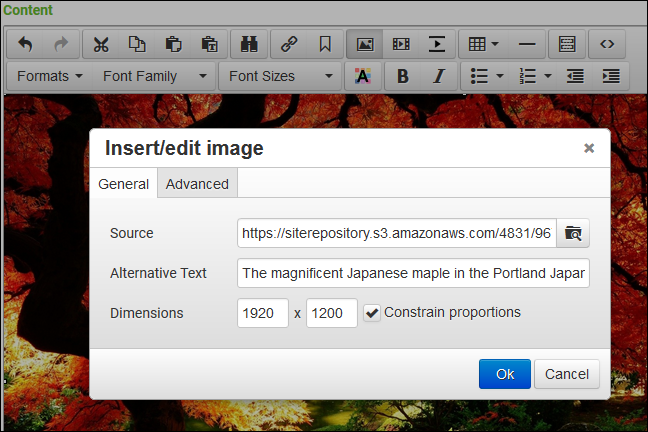
  10. You will see the Width and Height for the image, as well as its URL. You can adjust the Width or Height as desired and click the other dimension and it will adjust to fit. ADD ALTERNATIVE TEXT TO EVERY IMAGE: The Alternative Text area is where you can enter a descriptive phrase or sentence about the image so the search engines will know how to index it for web image searches. Doing this will increase your search relevancy for the whole website, so we strongly encourage you to do this for each image.

    Article image

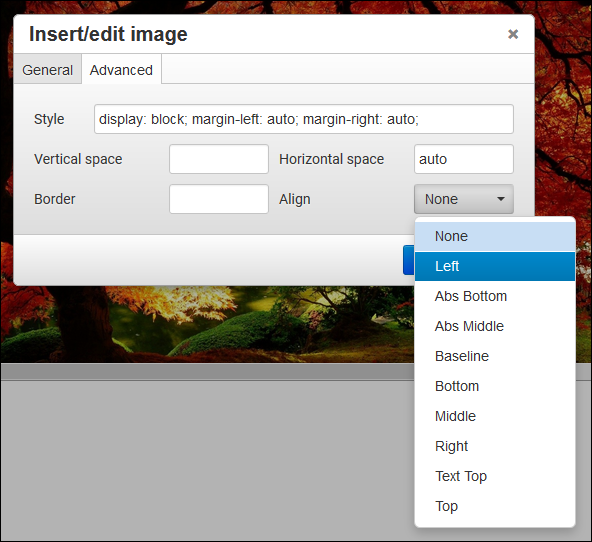
  11. In the Advanced tab, you have other options for formatting your image. You can set Alignment (the way the image lines up to text) and the standoff of how far the image is separated from the text in pixels (using the Horizontal Space and Vertical Space fields, for horizontal and vertical standoff).

    Article image

  12. When you are finished, click OK, and then you can use the resizing 'handles' around the image to adjust further as necessary. When your work is done, remember to click the Save button at the bottom to bring the changes live to the web page.


Guidelines for System Images

In addition to the rules above, you will want to follow these guidelines when working with images in the different areas of the system:

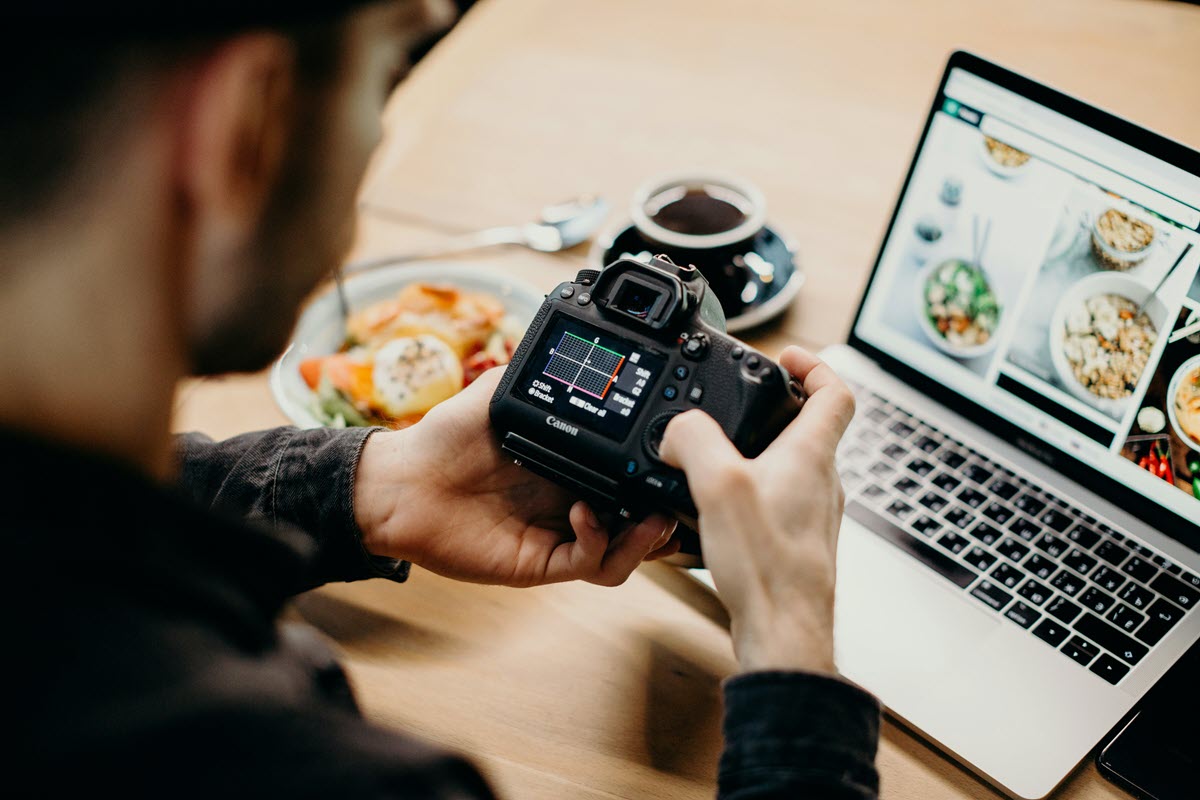
Product Images: You will want these to be large, if you can get them that way. Anywhere from 800px to 1000px is preferred, with a minimum of 500px wide. The system will downsize them as needed wherever they display smaller. Uploading smaller images can work, but it won't represent the product well, and can jeopardize the customer's perception of the product value as well as their online shopping experience. Taking your own photos with a digital camera or smartphone is good if the product manufacturer doesn't have good ones available.

Category Images: Smaller is okay, around 400px is about as large as they will ever be seen.

Class Images: Again, larger is better. If you can follow the same guidelines for product images, that is great. Not as critical as your product images, but still quite important because in many ways, the image you put up for a class will be helping you sell it.

Slideshow: If you are using the Responsive website system (all newer sites do) your slideshow either spans the full width of the browser, or the width of the central content area. We recommend uploading images at 1920px wide for full-width, and 1170 wide for standard width. For the height, the only important consideration is that the images you put in all have the same pixel height.

Free Online Resources: When working with images, especially ones you take with a camera with a high megapixel count (3MP or higher), you often will need to down-size the image to get it to upload in the first place. For many areas of the system, such as your slideshow, you will also need to crop images to specific pixel dimensions. Here are some great free resources to help you with your image work:

Article image

Pixlr.com by Autodesk: This is an online image editing program that is free for you to use, with a paid version that has more robust features. With Pixlr Express you get AI enhanced editing and will easily be able to do simple functions such as resizing, cropping, and even adding text overlays.


Article image

Canva.com is a phenomenal resource and tool set for doing web graphics, promotional images, or any image and text layout work you might have on your list.

WebFX Colorpicker: Need an RGB value or a Hex code for a specific color? This easy to use site will let you get what you need quickly.

IconFinder: Many free icons, buttons, and symbols for whatever you might need for your site.

Pexels.com: Free stock images, all royalty free!

Adobe Color: Need to find matching colors? Or perhaps a palette of compatible colors for use on your site? Adobe has put together an amazing tool you can try for free to help you intuitively find the colors you want.

I don't want to miss any web orders if my products run out of inventory, how can I let orders come through if a product is at zero inventory?

You can set a product to ignore actual inventory levels and sell as if you have unlimited inventory on your website. We strongly recommend doing this only for products you can make yourself or that you can reorder very quickly so that your customers don't have to wait too long for their orders.

Once you are logged into the system, click on Inventory > Products and search for the product you want. Click on its title to open it, then find the Unlimited Web Inventory setting and set it to Yes, then scroll to the bottom of the screen and click Save.

That product will now be available to order online even if you go into negative actual inventory, so you should only do this with products you are sure you can 'turn around' quickly for order fulfillment. If all of your products are safe to set that way, there is an option in your system settings to make new products default to Unlimited Inventory.

On the far right side of the blue bar, click on the Admin Button in the upper right and go to Settings > Website Settings > Products, and about half way down the list of options, you'll see Default Unlimited Web Inventory. Set it to Yes, then scroll to the bottom of the page and click Save. All new products you create will automatically be set to have that 'On' moving forward.

I have a product that needs information from the customer when they order it, how do I get it?

If you wish for your customers to just have a Notes field available on every product where they can enter general notes for you, follow these instructions:

Once you have logged into Rain POS, in the upper right, click on the Admin Button with your username. In the drop-list, go to Settings > Website Settings > Products, you will see a setting for Notes Field a short way down the list. Change the setting to On and then scroll to the bottom of the page and click Save. Each of your products will now have a Notes field with no limit to the amount of text they might want to include for you.

You will receive those notes in the notification email you receive for the order, and they will also be visible when you open the transaction under Orders.

If you wish to create specific types of form fields for a specific product, follow these instructions:

Once you have logged into Rain POS, click Inventory > Products, search for the product you want and click on its Title. On the left, click on the Website Settings Tab, scroll down and you will see Product Form area. You can add a Single Line Input, Paragraph Input, a Check Box for yes or no answers, or a Dropdown Box to let the customer choose one option from a list. Once you've created whatever fields you need, be sure to click Save at the bottom.

On its web page, the product will now display the form fields you created. You will receive the form submissions in the notification email you receive for the order, and they will also be visible when you open the transaction under Orders.


I sell used items and need to list the condition of each item, what is the best way to do that?

We have the ability in the system to enable you to set item conditions for products you sell that have serial numbers as well as for your standard inventory.


Condition Levels for Standard Inventory

To enable this feature, once you are logged into the system click on the Admin Button with your username in the upper right and go to Settings > Website Settings > Products, and you'll see an option for Item Condition about half way down the list. Set it to On, set the Default Condition that new products will start with, and then scroll to the bottom of the page and click Save. Now in each of your products, you will have a drop-list on the product's Details tab below the Price areas where you can set the item's condition. If you make changes to that field, be sure to scroll to the bottom and click to Save the product.


Condition Levels for Serialized Inventory

To enable this feature, once you are logged into the system click on the Admin Button with your username in the upper right and go to Settings > POS Settings > Products, and you'll see an option for Item Condition. Set it to ON, choose the different conditions you wish to use, and then scroll to the bottom of the page and click Save. Now in each of your serialized products, when you click the Change link for the Inventory area on the product's Details tab you will have a drop-list next to each serial number so you can set Condition Levels uniquely for each item.

Similarly, instead of the normal Price fields, you will have a Manage link next to Pricing that will give you a table for different prices for the different Item Conditions, and if you do Rent to Own, you will have a tab for your Rental Pricing by Item Condition level. If you make changes to that field, be sure to scroll to the bottom and click to Save the product.

You can find comprehensive information about how to set up and work with Item Conditions for standard and for serialized inventory by clicking here: Product Condition Levels.


Long Tail Labels: Setting up Zebra GK420t Labels on Chrome using MacOS

Opening CUPS:

To configure the settings for the printer itself, open Chrome and enter the following:

http://localhost:631/printers/

If you get the screen below, you need to enable CUPS for your OS. If not, skip down below to the Localhost Configuration section:

image4.png

To enable CUPS for your computer, first highlight and copy: cupsctl WebInterface=yes

image7.png

Next, click the magnifying glass Search icon in the upper right and enter Terminal, then click to run the application.

image5.png

After Terminal opens, you will see a cursor flashing: paste what you copied and click Return to run the setting.

image10.png

You can close Terminal after it completes the setting. You will now be able to access your printer configuration from the localhost.


Localhost Configuration

You will see a list of all active printers once the localhost opens. Click on the Printer and a page will load showing the printer attributes.

image11.png

Find the drop list pictured below and click on Set Default Options.

image6.png


Under the General tab:

Select Custom Size from the Media Size drop list and enter either 1 x 1 in inches for the 30332 labels, 2.125 x 1.125 in inches for the 30334 labels, 2 x .75 inches for the 30330 labels, 2 x 0.5 in inches for the 1 up labels, or 3.5 x 0.5 in inches for the Rat Tail/Long Tail Labels.

image9.png


Under the Printer Settings tab:

Darkness: 15

Print Rate: 5 in/sec

Label Top: 0

Print Mode: Tear-off

Tear-off Adjust Position: 0

Reprint After Error: Never

image8.png


Creating a Custom Label in the System Dialog Window:

Once CUPS is taken care of, on Rain POS select a label to print. Then in Chrome, click on the More Settings and click on the Print Using System Dialog options.

image12.png

Once in the screen click on the View Details options (If you cannot see more information).

  • Click on Paper Size > Manage Custom Labels
    • Click on the + button (Note: Double click on the work “Untitled” can let you rename the label)
    • Set the paper size to correct size needed (example is Long Tail)
    • Non-Printable Area: User Defined
      • Top: 0
      • Left: 0
      • Bottom: 0
      • Right: 0
    • Once all set click on ok.

image3.png

  • Make sure Orientation set to Portrait
  • Scale is 100%
  • Layout:
    • Reverse Page Orientation is checked
  • Paper Handling:
    • Collate Pages is checked
    • Scale to fit paper size is unchecked
  • Cover Page:
    • None is checked
  • Printer Features:
    • Resolution: 203 dpi
    • Media Tracking: non-continuous (web sensing)
    • Media Type: Printer Default
  • Once all the settings have been set. Click on the drop down for Presets and click on Save Current Settings and Preset. I would recommend naming this after the label size.


Setting Up the Print Preview on Chrome to be the System Dialog Window:


Enable Setting:

Open up the terminal window and enter the following command:

defaults write com.google.Chrome DisablePrintPreview -bool true

(Note: Found this is the best option to print)

image1.png


Disable Setting:

Open up the terminal window and enter the following command:

defaults write com.google.Chrome DisablePrintPreview -bool false

image2.png

If Disabled, To print correctly use the print using System Dialog Option at the bottom of Print Preview.


Configurations for the supported label types:

Configurations for the supported label types:

  • 1 x1 (30332) labels (Chrome Print: Paper Size - 1 x 1.50 (30347) with margins set to minimum and a scale of 93%)
    • Paper Size: 1 in width and 1 in height
    • Margins: all 0
    • Portrait
  • 2.25 x 1.25 (30334) labels (Chrome Print: Paper Size - 2.25 x 1.25 with margins set to default)
    • Paper size: 2.25 in width and 1.25 in height
    • Margins: all 0
    • Portrait
  • 2.25 x 0.75 (30330) labels (Chrome Print: Paper Size - 2.25 x 0.75 with margins set to minimum with a scale of 93%)
    • Paper size: 2.25 in width and 0.83 in height
    • Margin: 0
    • Scale: 95%
    • Landscape
  • Dumbbell 2up Dymo (Jewelry Labels) (Chrome Print: Paper Size - 2 x 0.5 with margins set to default, This may skip labels)
    • Paper size: 2.12 in width and 0.83 in height
    • Margin: all 0
    • Scale: 95%
    • Portrait
  • Dumbbell 1up Dymo (Jewelry Labels)
    • Paper size: 2 in width and 0.5 in height
    • Margin: all 0
    • Portrait
  • Long Tail
    • Paper size: 3.5 in width and 0.5 in height
    • Margin: all 0
    • Portrait
Merge Duplicate Products

You can get to this part of the system by logging into the system and then on the left, click Inventory > Products. You can also merge products in your Purchase Orders, which you create by going to +Create New > New Purchase Order.

products.jpg

You can merge similar or duplicated products in your main Products page as well as in your Purchase Orders. Duplicate products are often the result of accidentally creating a new product in a Purchase Order because you might not have realized it was already saved in your system.

You can merge any two products together with this function, but at present, it does not yet work with product Variants / Options.


Merge Products on the Products Page

From your Products page, you can search for any product that might be duplicated, and on the right, click on the line-item actions button (three vertical dots), and you'll see the option to Merge Products.

merge 01.jpg


Merge Products in a Purchase Order

If you create a new Purchase Order and add items to it, each will have the same line-item action button as in the Products page. For each, if you know there is a duplicate product you need to merge, you can click to Merge Products.

merge 02.jpg


How to Merge Products

To start, after you click the Merge Products button, the Merge Products panel will open, and on the left you'll see the item you selected. You'll also have a Search field on the right where you can search for the duplicate.

Once you have found it, you'll see the items side by side, and you'll need to determine which one has the best primary data to keep. For example, one copy of the product might already be in a Department and in a Category and has Descriptions, and the other one might not. One way that can help to tell them apart is by looking at their creation date and time, as pictured here.

merge 04.jpg

Once you have found the one with the best data, click to Preserve These Values for that item. When you do the merge, the other copy will have its data merged into the primary version, and you will be left with a single product. To complete the merge, click the Merge Products button at the bottom.

merge 05.jpg


Offer Suggested Products


Steps for Adding Suggested Products

  1. Go to Inventory > Products, search for the product you want, then click on it.
  2. Click the Website Settings tab and scroll down to the Suggested Products area near the bottom.
  3. Use the search field to enter a product Title, UPC, SKU, or Manufacturer Number for a product you want to list as a Suggested Product.
  4. In the list that pops up, click on the product you want.
  5. Add as many as you like!
  6. Scroll to the bottom of the screen and click Save Product.
  7. Your Suggested Products will display on the product's web page, below the Description, displaying up to four items per row that link directly to the products you chose.


Product Overview Training Video


Product Pricing & Purchasing Training Video


Products Page Bulk Actions Training Video


Set Products to Display But Not Sell Online

How to Display Products Online Without Allowing Sales


Steps for Setting Products to Display But Not Sell Online

  1. Go to Inventory > Products, search for the product you want, then click on it.
  2. In the Available area of the Product Information tab, make sure the product has Website set with or without Point of Sale so it will be visible online. (You will not see this option if you are not using the Point of Sale part of Rain POS.)
  3. Go to the Website Settings tab on the left.
  4. Find the Show Add to Cart Button toggle and turn it off.
  5. Note that if needed, you also have the option to turn off Show Price on Website, if you have restrictions in that area.
  6. In the Category area, make sure the product is displaying in at least one Category by clicking on the one(s) in which you want to list the product (it will not display on the website otherwise).
  7. Scroll to the bottom of the screen and click Save Product.

Click here to learn how to configure your Product module for displaying products on the website: Product Page 3.0: Part 1 - Overview


Shopify: How to Best Prepare for Integration

Getting set up to be ready for selling on Shopify through Rain POS can be an involved process. Below are some important areas to pay attention to as you get ready.


Seeing Double: Avoid Duplicating Images

When you're adding images to a product, there is a tab for Images that lets you enter as many as you want. Sometimes we see stores use one of those image files on the main Details tab at the bottom of the column of info about the item. This is actually the image area for Variants to use, and it's important to take care here. Entering the same image file in both of those places will send the image twice to Shopify and in some cases it can show up twice. Don't use identical image files in the Images tab AND in the area at the bottom of each variant.

Details and Images.jpg


Brace for Impact: Your Categories Will Be Flattened

In Rain POS you are able to create as many categories and subcategories as you like, and your subcategories can go many levels down, if needed. The integration with Shopify connects your categories to collections in Shopify, and those don't allow for sub-levels. The result will be the flattening of your categories in both systems.

What that means is that you'll have a single list of alphabetized categories, and that can be problematic in some situations:

  • Let's say that under your Gifts category you have a subcategory named Accessories. Under your Men's category, you also have a subcategory named Accessories. After the flattening happens, you'll end up with two categories with identical names and neither of them anywhere near their former 'parent' categories.

Solution: Give your subcategories more specific, unique names. In the examples above, renaming them to Accessory Gifts and Men's Accessories would avoid all confusion after integration.

  • Another issue can arise from top-level categories. These are often empty and are just steps along the path to guide your customers to a bottom-level subcategory that contains the specific items they're wanting to browse. Empty categories won't display in the list of customer-facing collections in Shopify, so upper level categories like this are largely useless in the integration.

Solution: After integrating, in Rain POS go to Website > Categories and work your way down the list, deleting any former top-level categories that have no products in them.

One thing you can do to replace the empty categories would be to use some features in Shopify that will help your customers find your products better: Types and Tags. In Shopify enter the names of former parent categories into your products as Types (for general products) and/or Tags (for specific groupings of product) for better search results in Shopify.


Pick Any Two (As Long As One of Them's a SKU)

In our system there are three primary product identifier codes you can use for your items, UPC, Manufacturer Number, and SKU. This works great internally with our reports and informational tools relating to your products, but there can be a conflict with the Shopify integration.

Shopify allows only two product identifier codes for each item, a SKU and whatever else you prefer (UPC, Manufacturer Number, etc.). In our system if you have all three of our identifiers saved for a product, we can only move two of them over to Shopify. In this scenario, the Manufacturer Number draws the short straw and does not get moved over.

Solution:

  • Before you sync your data, make sure the identifiers you want to move over to Shopify and use there are in your products.
  • Make sure that either UPC or Manufacturer Number is blank in products you will sync before you begin integrating.
  • OR, be willing to not have Manufacturer Numbers in Shopify if you have all three identifiers populated in our system.


Multiple Unwanted Guests

Some stores beginning our Shopify integration have a history of data in Shopify from customers they no longer work with and/or products they no longer carry. If this is your situation we highly recommend cleaning out the old data and deleting anything you wouldn't want in both systems. After the integration, it will be twice as much work to clean them out.


Watch Your Weights

In our system, if you track weight values for your items, you choose either Pounds or Kilograms, and enter those values as decimals. So something that weighs 24 ounces would be entered as a weight of 1.5 (pounds), and something that weighs 1,500 grams would be entered as 1.5 (kg).

Shopify allows you to specify either pounds or ounces, kilograms or grams, and they won't translate if they're entered with either of the smaller measures. For example, in Shopify, if you have a product with a weight value of 8 and it's set to work in ounces, in our system that would show up as 8 pounds. Similarly, an item with a weight value of 250 set to work with grams in Shopify will show up as 250 pounds in our system.

Solution: Adjust the way you list your items in Shopify so they work with pounds or kilograms instead of ounces or grams.


Update Existing Products from the Product Catalog

You can easily update products already saved in the system with new or missing information using the Product Catalog tool. This is especially useful when a product is missing important details such as images or descriptions that can be found in the Product Catalog.

  1. Go to Inventory > Products to search for the item you want to update and click on the product title.
  2. Using the Catalog Search at the top of the Product Information tab, enter the name of the product you are updating or scan in the barcode, and then hit Enter.

  1. From here you can filter the results by the vendor using the Filter button. If what you want isn't in the filters list, you can click to View Catalog Sources to see the full list of vendors.

  1. Hover your mouse over the images to see some of the information for the item and press the Add Item button to update the product.
  2. A window will open giving you the option to update or replace the existing information. Clicking Update will only add information from the catalog for areas that don't already have info saved. For example, if this product already contains an image it would not replace it with the one from the catalog. If you clicked to Replace, the catalog would replace any existing information with the details from the saved catalog listings. This is useful if you want to update a product description with a more detailed or more current one from the catalog.

  1. Once you verify the information has been updated, click the Save Product at the bottom to save your changes. Leaving the page or pressing the Close button will not save the updated information.


Use Separate Website / In-Store Pricing

Set Separate Website and In-Store Pricing


Steps for Setting Different Website / In-Store Pricing

  1. Go to the Admin Button with your username in the upper right and go to Settings > Features > Pricing, as pictured above.
  2. In the area for Website Pricing, toggle the switch to Enabled.
  3. Click Save.
  4. You will now have a Website Price and Website Sale Price field in each of your products, as pictured below.


Website and Advanced Product Setup Training Video


What is the difference between UPC, Manufacturer ID, and SKU?

Simple definitions of these items are below. It is important to understand that not all products will have a UPC or Manufacturer ID. Much of that depends on whether the manufacturer has gone to the effort of creating these.

UPC - The Universal Product Code (UPC) is an assigned number the manufacturer can obtain for a product through a registration process. This code is a completely unique identifier for that product. Many product will not have a UPC due to the amount of effort required. The UPC contains only numbers.

Manufacturer ID - This is typically the identifier assigned to a product by the manufacturer. These codes can contain letters, numbers, and simple punctuation such as hyphens, colons/semicolons. These codes should not contain spaces.

SKU - This is an identifier specifically for your unique use. You can create your own SKU codes according your preference, you can also click in the SKU field to have the system create a unique SKU number for you, as pictured below. These codes can contain letters, numbers, and simple punctuation such as hyphens, colons/semicolons. These codes should not contain spaces.


Why don't my product Short Descriptions show up anywhere in my online store?

The descriptions previously known as Short Descriptions are now called Meta Descriptions. They are not a customer-facing description: they are provided to the search engines and are used as the SEO Description for each product page. They serve  a critical role in getting your products indexed for web searches that will drive customers to your website, so offering solid Meta Descriptions of all of your products is highly recommended.


Will my website orders reduce inventory for my products automatically?

Yes, they absolutely will! Even if you have Unlimited Web Inventory active as an option for your products, the system will still track inventory quantities and reduce the inventory count with each order.


Working With Serialized Products Training Video