Our pros on our Migration team work with spreadsheets all day, and are true wizards at working with data. They wanted to provide a resource for anyone working with bulk data using spreadsheets. The tips below are primarily for Excel, but represent general principles and practices you will want to follow in any spreadsheet program, or even in Google Docs. NOTE: Working with spreadsheets in our system is a highly technical process and is not for everyone! You can edit your product data directly in the Products module, as needed, so the following information is only for those who wish to optionally work with spreadsheets to work with products in bulk.
Scientific Notation
- Excel will always convert large numbers such as your UPCs and SKUs into scientific notation, which will cause a lot of problems if they are uploaded that way. Luckily this is very preventable and quite easy to correct in Excel. When you see that any of your values have been converted into scientific notation, you need to select that entire column (by clicking on the column letter at the top), right click on the selected area, click “Format Cells” and then select “Fraction.” The default choice for that option is just fine, even though that option seems like it makes no sense, it actually works well in preventing the scientific notation alteration.
Clear Formulas by Copying and Pasting as Values
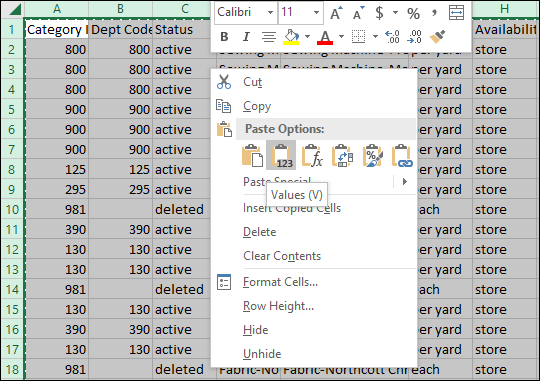
- Copying data and pasting it as values can prevent a lot of issues while working with a bulk spreadsheet. In fact, we recommend you make this your first step when you begin working with a bulk spreadsheet. Doing this is simple. You need to select all your data (press CTRL A), copy it (using CTRL C), right click any selected cell and select “Paste as Values.” The icon representing this is a small clipboard with a blank sheet clipped on it with the numbers 1-3 on the bottom. What this will do is remove any information that is related to Excel formulas, which you do not want when uploading your data.
Preserve Leading 0’s in Product IDs
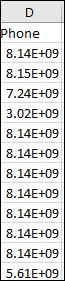
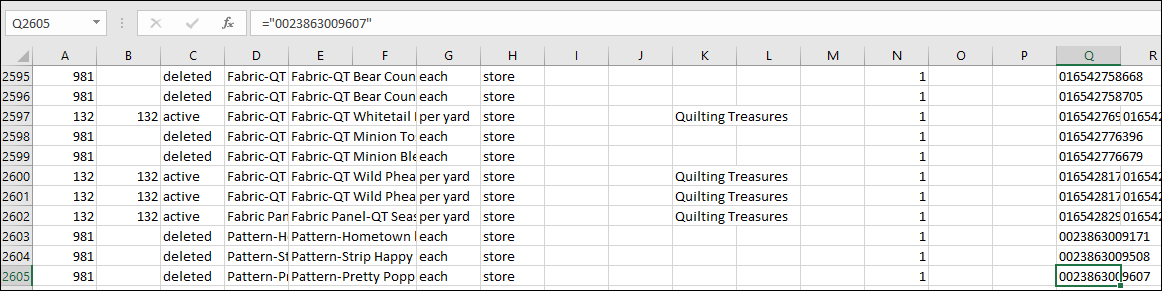
- If you have UPC codes or SKUs which start off with the number 0 you will want to be aware of this issue. In the world of mathematics and numbers, zeroes in front of other numbers, no matter how many, have no meaning and are typically removed by programs like Excel. For example, 0000001 and 1 represent the exact same value. Because of this, Excel will simply convert this number into an easier to view format and remove every leading 0. However, if this value is a UPC or SKU, then we would need to keep these leading 0s for this item to scan properly in our system.
To prevent this from happening, you will first need to re-format the cells as Text. You can do this by highlighting the desired cells or columns, right click in the selected area, click “Format Cells,” click “Text” and then press “OK.” These values will now be treated as text and retain any alpha or numeric character regardless of position.
Custom Sorting
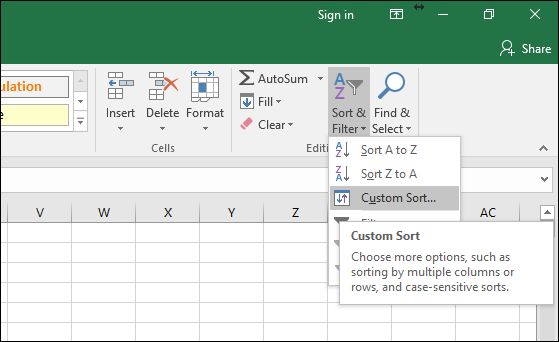
- Sorting your data in Excel can be extremely helpful if done properly, but very damaging to your data if done incorrectly. You essentially have two choices when sorting: either sort all the data together or not. In almost all cases you will want to sort your data together. For example, you have a list of products that are currently listed in alphabetical order by the product title. Perhaps you would like to see which products are oldest based on their creation date. To do this you need to select the entire spreadsheet by clicking on the corner to the left of the letter A of the A column or by pressing CTRL A on your keyboard. With everything selected click on “Sort & Filter” found in the top right corner of Excel and then select “Custom Sort.” Select the column you wish to sort by and then press “OK.” If your data has headers, be sure to check the box “My Data Has Headers” found in the top right corner of that window.
- If you are working with products that have Option Values, you need to be very careful to make sure they stay in their original order. Below is a video of how you can do this, recorded by our director of Migration, Sean Hall.
The VLOOKUP Function
- The VLOOKUP function can be an extremely helpful tool when trying to identify data that matches certain criteria. For example, if you wanted to remove any product in your system that has an inventory count of zero, you would need to use both the Edit Existing Products and Edit Existing Inventory spreadsheets. You would want to sort the inventory spreadsheet by the inventory count and then use a VLOOKUP to mark those products as “deleted” or “deactivated” on the other spreadsheet.
- The following web page provides a very detailed and clear explanation of the VLOOKUP function: http://spreadsheeto.com/vlookup/
- Additionally, you can follow this link for some additional info on this function: https://support.office.com/en-us/article/VLOOKUP-function-0bbc8083-26fe-4963-8ab8-93a18ad188a1
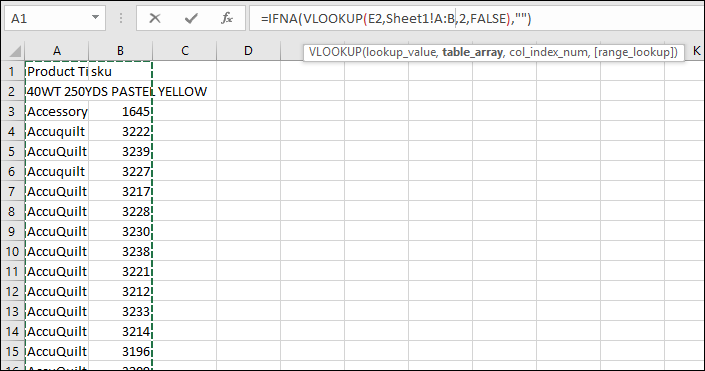
This image above is of the data that we are looking for in a VLookup. If the function finds a match here in column A, we want it to return the value in column B.

The image above is the result of the VLookup function. It found a matching product title listed on sheet1 and returned the associated value.
Don’t Close the Workbook
- Excel does some interesting things when closing and re-opening a workbook, such as converting numerical values into scientific notation. To avoid things like this, you will want to save the document and upload it without closing it until you have successfully uploaded your data or have finished working with the spreadsheet. When using the bulk spreadsheets, it is highly recommended that you do not close and re-open those workbooks until you know you have successfully finished uploading/updating your data.
10,000 Rows or Less
- There is no formal restriction on file size when uploading a bulk spreadsheet. However, we have found that our system begins to struggle fully inputting data if the spreadsheet you are working with has more than 10,000 rows. If you have a sheet that is longer than 10,000 rows, we recommend splitting that spreadsheet into multiple sheets of less than 10,000 rows each.
Data Displaying Incorrectly
- There are some scenarios in which data will display awkwardly in Excel. Two examples are dates and numbers in scientific notation. If you have a date listed in a cell and that cell is not wide enough to display the full text, you will instead see, “########”. This is easily corrected by expanding the width of that column. Scientific notation is easily corrected by converting those cells into numbers.
- The first thing to ask yourself when data is displaying incorrectly in the spreadsheet is, “Is the column wide enough?” and the second thing is, “Are these cells formatted as text or numbers?”
Only Upload Changed Data
- If you are using any of the bulk spreadsheets, it is highly recommended that you only keep the data you are trying to update. Deleting the unnecessary rows will make it easier for our servers to process the upload. Anything you remove from the spreadsheet will not be affected In any way: your updates are only going to be affected by changes you make in the data itself.
Don’t Remove or Add Columns
- Our spreadsheets are formatted in a way that is acceptable by our database. If this format is adjusted by adding or removing columns it will not upload. For example, there is only one address column in the customers bulk spreadsheet. Both the street address and apt/suite number need to be included in this single column. If you add an “address 2” column for this information then the system will not recognize the formatting and will reject the upload.
Uploading Blank Cells
- Our system will essentially ignore blank cells when they are uploaded. A blank space, when uploaded, is the equivalent of not changing that data at all and tells they system, “make no change to this value.”
- Make sure that whatever value you are trying to remove is replaced with an actual character such as a space or a 0. Deleting the contents of a cell will NOT remove it from your system! You must enter something to replace whatever you're removing.

Spreadsheet Type Overview
You can get to this part of the system by going to Products > Bulk. In the Spreadsheet drop list, select the spreadsheet you want and if you like, you can Filter by Department, Category, or Vendor (if you have vendors set up in your system). Click the Download link to download your spreadsheet. When you are done with the changes, you will do exactly the same steps, selecting the same spreadsheet you downloaded in the list, but without setting any filters, then click the Upload link and follow the instructions to upload your spreadsheet.
Here are some good things to know about the current offering of specific spreadsheets you can download and work with in our system:
Add New Products - Any time you want to add products by spreadsheet, download the latest version of this blank spreadsheet to work from! It may change periodically. You do NOT want to work from a previously saved version of this spreadsheet, as uploading the same products more than once with this sheet will duplicate them in the system, so please, always, work from a fresh download.
Edit Existing Products - Use this spreadsheet for working with general product data for products that are already saved in the system. This is the one you will want to use to adjust info about the product's category, title, descriptions, identifier codes (UPC, Manufacturer ID, SKU), status (active, deactivated, or deleted - if you want to delete products with an upload, use that last status, removing the line items doesn't remove a product from our system), and tax code, among other things.
Edit Existing Products, Long - This spreadsheet is only necessary if you need to work with your Long Descriptions. Please note, that the CSV format is plain-text only, so you will want to use that field only for simple block text. You can then go into the product and do any formatting you might need, e.g. bold, italics, bullet points, etc.
Add New Inventory - Use this spreadsheet if you want to add inventory quantities and costs to products you already have saved in the system. It will add a line-item entry to the product's inventory log with the new quantities and costs in place. Please note that only the Add Inventory, Add Cost, Edit Unlimited Inventory (to set it yes or no for unlimited inventory on the website), and the Inventory Note columns can actually be edited. The other fields will NOT update data changes.
Edit Existing Inventory - If you need to change inventory numbers or costs that are already in place for your products, you can use this spreadsheet. Please note that only the Edit Inventory, Edit Cost, and the Inventory Note columns can actually be edited. The other fields will NOT update data changes.
Edit Cost for Inventory with No Cost - This spreadsheet wins the award for Most Convoluted Name. It is also the best way to identify items in your system that have zero cost and add that cost for them. Please note that only the Cost column in this spreadsheet should be edited, the others are just for reference and will NOT update data changes.
Categories - This is a great spreadsheet to download and print out if you'll be doing a lot of work with your Category ID numbers, something you will need access to if you're moving products into different categories and/or adding them to multiple categories. This spreadsheet is purely for reference.
FabShop-Specific Inventory File - If you are a member of the FabShop product listing service, you can download this file to submit to them monthly so they can index your inventory with their directory service.
Product Images - This download gives you a list of all product images (in the Images tab and in the image below the pricing area for the product) along with the image URLs. This spreadsheet is for reference only and is not a way to bulk upload images. To learn how to bulk upload images, click here: Bulk Upload Images.
Google XML Product Feed - If you need to manually update your product listing with Google, you can download this file and submit it for that purpose.
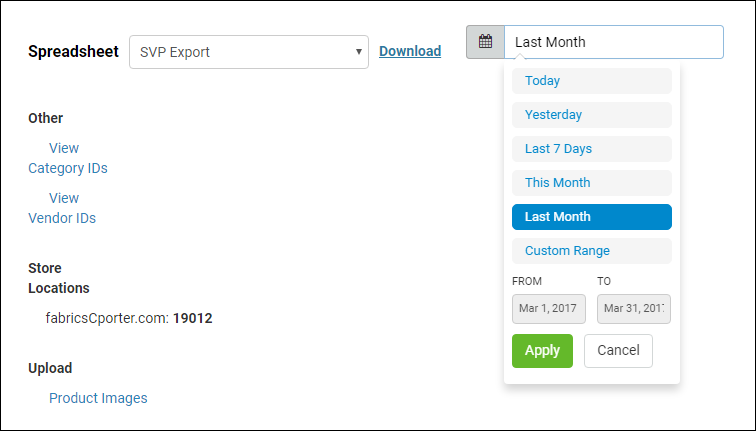
SVP Export - This spreadsheet will contain data specific to Serialized Inventory you have sold and is used for SVP dealers. You can set the time frame you want the data to cover, and it provides useful bulk information about all serialized items sold during the period. If you are not an SVP dealer, this spreadsheet may still have useful information for you for reference on your serialized sales.
 October 01, 2024
Is this page helpful?
×Help us improve our articles