We offer the ability for you to greatly customize labels you print for items in the system. You can get to this part of the system by going to Settings > Printing > Custom Labels. Please note, when you have this feature on, it replaces the previous settings in the POS Settings > General tab in the section for Barcode Labels, so you will no longer see or need that section since the options available to you in this new tool are much more highly customizable.
When you click the Create New button, you can choose the label size you wish to customize:
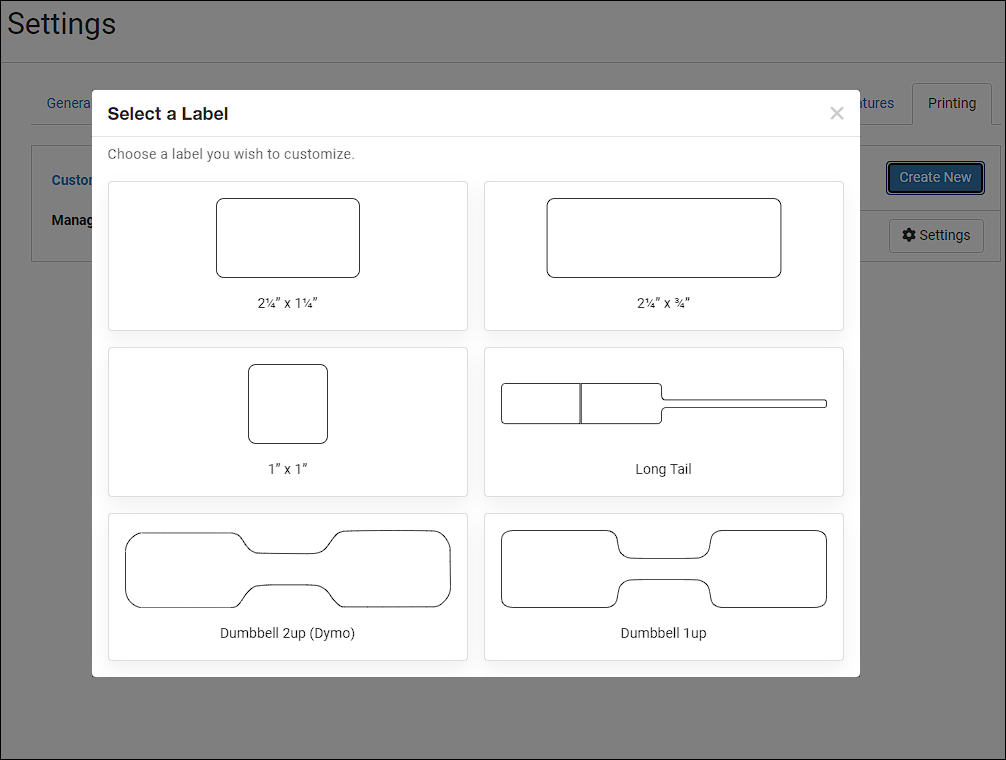
We offer standard label-roll printing sizes of 2.25" x 1.25", 2.25" x .75", 1" x 1", Long Tail, Dumbbell 2-Up (Dymo only), and Dumbbell 1-Up. We hope to add more in the future, but these are the sizes we offer now. When you click on the box to choose the label type, you'll see the following customization window.
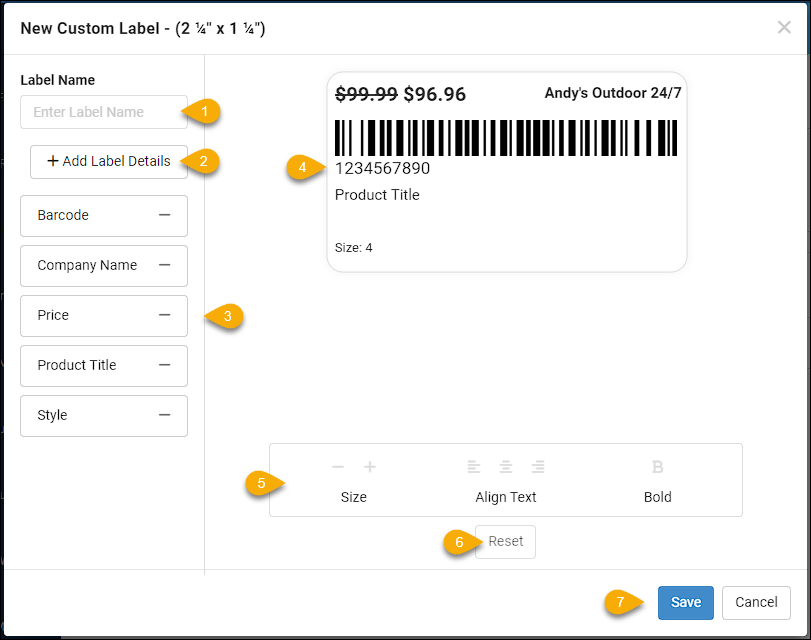
- You will need to add a unique Name for your custom label in order to save it. Labels are shared across locations if you have a multi-location store.
- Click the +Add Label Details button if you want to add more types of data to your custom label, see the image below for the full list of things you can add.
- By default, the Barcode, Company Name, Price, Product Title, and Variant (if any) of the item are in place for your label, with placeholder information displaying in the preview on the right. You can use the Remove buttons ( -) if you don't need an item listed. You can click on any of them to configure how they appear on the label (see the section below about Adjusting and Styling Your Labels for more details).
- The Label Preview will display placeholder information in the size and style each item is configured and will update as you make changes. This area is more than just a preview: you can drag and drop data items around the layout and position them wherever there is available space. You can also click and drag on the border of an element to reduce or increase its available space on the label. See the section below on Adjusting and Styling Your Labels for further details on how this works.
- After you click on one of the data elements in the label, either in the button sidebar or on the preview, the Customization Area will show you options on how you can resize, format, and reposition items. There are videos about each of the major data types you can add in the sections below that show you how to configure each. For example, the section on Data Elements You Can Add to Your Labels starts with Manufacturer ID, UPC, and SKU and shows you how you can work with those codes.
- If you are configuring a data element as described above in #5, if you need to, you can click to Reset it and the configuration will revert to default settings for you.
- When you've made all the adjustments you need for your custom label, you can click the Save button and it will be saved in a list for you. You can reopen saved labels to further configure them if needed. If you don't have any changes that need to be saved, click Cancel to close the window.
Creating and Managing Custom Labels
- You can create as many custom labels as you wish.
- Label names must be unique.
- You can edit and delete existing labels.
- They are shared between locations if you have multiple locations in the system.
Adjusting And Styling Your Labels - The Basics
- You can adjust the font size bigger and smaller.
- You can align the text left, center, and right.
- You can choose to bold the text.
- You can add and remove various data points so only the info you want is included on the label.
- You can click and drag to adjust the max width for your label detail fields to handle the various lengths of data for products such as Product Title.
- We display a warning when your label detail fields overlap and we recommend adjusting them so they don’t overlap before saving (but you can save when they are overlapping). Fields in this state appear in red.
Label Defaults - Learn About the Default Label Details
-
Defaults- When you create a new custom label, we will display default label data and formatting. You can customize whatever you wish, but the video works with the data that is included by default, what it means, and how you can customize it.
-
Price- Select which price you would like to be printed on your labels. By default, the regular Price will display. If you also choose to display a Sale Price and if one is present, it will appear with the regular price crossed out and the Sale Price featured. Also, prices you enter are just for you to test various prices, when you print it will use whatever is actually saved in each product. If you choose to not show decimals, we will round up to the nearest dollar, so if you don’t have a whole dollar amount for your products, we recommend you show decimals.
-
Company Name - this will always be displayed as your company name as it appears on the first panel of the system Settings area and cannot be changed.
-
UPC and Other Identifiers - Choose the priority of which data will display:
- Primary Option (default)
- Secondary Option (if primary is not configured)
- Tertiary Option (if secondary is not configured)
- Internal Product Option ID (if none of the above exist)
Also, for label sizes 1"x1", Dumbbell 1up, Dumbbell 2up (Dymo) and Long Tail, the barcode will actually be an internal number to save space, but it will always be able to pull up the product when scanned. The number below the barcode will always follow the logic you set up for the custom label (so even if the barcode is an internal ID, the value that displays under it will be the UPC, MFR ID, etc.)
- Product Title - You can choose to allow up to 2 rows if you typically have longer product titles, or you can keep it to 1 line if you only need to reserve enough space for 1 line. You can choose to have it print a product’s alt barcode title where available, which is what we recommend. If for whatever reason you want to ignore any alt barcode titles and only print the product title, then uncheck the box
- Variants & Options - You can choose whether or not you want the variant to display. Here’s what’s in the tooltip If you have more than one variation type such as size and color, they will be printed one after another on the same line. For Example: with variations "Size: 4; Color: Gold" or without variants "4; Gold"
Data Elements You Can Add to Your Labels
MFR Number, SKU, and UPC
If you have a barcode in your custom label template, then UPC, SKU, or Manufacturer Number will already be included directly under the barcode. We only recommend adding this data type separately if you are not including a barcode in your custom label template. Otherwise, you may have duplicated content printed.
Serial Number and Condition
- With the. new printing flow, you will be able to select which inventory you want to print so now we can include serial numbers and their conditions on the printed labels.
- The Serial Number field in the editor allows you to try out sample serial number lengths to make sure the area is wide enough to fit all the data.
- The Condition dropdown lists all condition types, so you can test the conditions you use and make sure they fit in the allotted space.
- If you have serialized conditions, the serial number’s condition will be printed. If you don’t have any serialized conditions, it will use the non-serial condition for a product.
Current Date and Date Added
- Both date options allow you to select what type of formatting will be used to display the date.
- Current Date will always be the date when you are printing the label.
- Date Added - you can select which inventory you would like to print for a product, so whatever inventory you select, the date that inventory was added is what will print for this label detail.
Bin Locations and Vendor
- Bin Locations - we decided to only include a very basic example of a 2 level bin location because they are so customizable and can drastically vary between stores. But if Bin Location is added to your custom label, it will print the bin location for that product if there is one. If there is no bin location it will be blank. Note - only bin locations. marked as Public will be displayed on the label.
- Vendor- this will print the primary vendor for the product if there is one. If there is not one it will be blank. You can sample different vendor names to make sure the allotted width is enough.
Item Costs
- Costs can be included on labels, and they will be encoded so it’s not obvious to your customers that it’s a cost.
- You can set up your Encoding Map in the Custom Labels setting page and going to Settings. We will default the encoding map to BLACKHORSE. but it can be changed to whatever you wish.
- The Prefix and Suffix are optional. These will be universal so every single cost that gets printed, even though each product’s cost can be unique, the prefix and suffix will be the same on every label. This helps you make the cost even more encoded because it won’t be a normal length but it’s easy for you and your sales reps to know where the cost actually begins and ends.
- When you configure the Cost field in your custom label, you can test out different cost amounts and see how they will translate onto your label. It will use whatever you’ve configured in the Encoding Map. You can also choose to show decimals or not for this value.
Inventory Type
- Configure what you want to display for specific Inventory Types on the Custom Labels settings page and going to Settings and clicking on Inventory Type. You can make these whatever you want, or you can even choose to leave some blank. A common practice is to leave store inventory blank and only configure special codes to display for Vendor Consignment (Memo) and Consignment inventory.
- When you add inventory type to the custom label, you can switch your view between the different inventory types to see what it will look like when each inventory type is printed. This is just for display purposes, whatever inventory type ends up being your final selection is what will be printed on the label.
General Printing Flow
This video gives an overview of the process of printing a custom label.
Dumbbell Labels (1up and 2up)
These labels have 2 printable areas, the left side and the right side, while the middle is not a printable area. Because of this, dumbbell labels have an extra tool to allow you to select which side a label detail should go on. L represents the left side, and R represents the right side.
 October 01, 2024
Is this page helpful?
×Help us improve our articles