Website

Featured Articles
How to Add Content to Pages Start by logging into the system and clicking on Website > Website Ed
Who Should Use This You should be reading this: If you need to schedule events for your organization
The Classes module is a powerful and flexible way to present your classes or other recurring events
Your Departments, Categories, and Vendors are elements of the system you need to have in place befor
The Content module allows you to compose and create whatever content you like and add it to a page o
You can get to this part of the system by clicking on Orders on the left or just click the Alarm Bel
The Store Locator is a powerful tool to show customers how to find the store locations that sell you
How to Create a Gallery The first part of this process is identifying the page on which you want you
Level Up Your Website Marketing The Rain POS Marketing system empowers your website in four key area
Working With the Forms Module You can get to this part of the system by hovering over Website on the
You can get to this part of the system by hovering over Website on the left and then clicking Naviga
Working with Your Website Pages You can get to this part of the system by hovering over Website on t
The Website Settings Tab: Classes & Calendar You can get to this part of the system by clicking
The system allows you to send a variety of notifications about website orders to your customers, and
You can get to this part of the system by clicking on the Admin Button with your username in the upp
Our latest version of the Shopping Cart comes with it's own configuration tab, and the setup in this
You can get to this part of the system by hovering over Website in the main menu on the left and the
Steps for Adding a Tracking Number to a Web Order Go to Orders in the admin toolbar in the upper lef

All Website Articles

Helpful Blogs

Take a look at some creative ways to level up what you do.
How To Start a Boutique Retail Store: 6-Step Guide

Lorem ipsum dolor sit amet, consectetur adipiscing elit. Ut et massa mi.

image - 2025-04-28T114828.689
How To Start a Boutique Retail Store: 6-Step Guide

Lorem ipsum dolor sit amet, consectetur adipiscing elit. Ut et massa mi.

image - 2025-04-28T114835.188
How To Start a Boutique Retail Store: 6-Step Guide

Lorem ipsum dolor sit amet, consectetur adipiscing elit. Ut et massa mi.

Add Products to Categories

Steps for Adding Products to Categories

  1. Go to Inventory > Products , and find the product you want to work with, then click to open it, or create a new one.
  2. Go to the Website Settings tab on the left.
  3. In the Category area near the top, click the Category Drop-list.
  4. In your list of Categories, click on as many Categories as you would like the product to be listed in, they will highlight in blue.
  5. Click the Save Product button at the bottom.


Bulk Import Calendar Events

You can get to this part of the system by going to Website > Calendar and clicking on the Calendar Category into which you'll be importing.

Steps for Uploading Events in Bulk

  1. Go to Website > Calendar
  2. If you have not created any Calendar Categories, click to create the one to which you want to add your events.
  3. Click on the Category title. If you are working with an existing category, all events previously in the category will be deleted when you bulk upload events.
  4. Click the Upload Events button.
  5. Carefully read the formatting instructions, and create your CSV file following the on-screen instructions. Save it as a CSV.
  6. Click the Browse button and find your CSV file.
  7. Click Upload. Your events will load into the category.


Bulk Upload Product Images

Steps for Bulk Uploading Product Images

  1. Go to Website > Files > Images, and find the folder you want to upload the images into, then click to highlight it.
  2. Click the blue Upload File button. Make sure your file names are identical to the UPC, Manufacturer ID, or SKU of the products.
  3. You can either drag and drop images into the gray area, or you can click the green Add Files button to add files from your computer. After adding files, you can add more from different locations, up to a total of five hundred.
  4. Once your upload list is complete, click the blue Start Upload button to begin the upload. You'll see progress bars for each file and for the overall upload job. Once it's complete, the upload window will disappear and you'll see your images at the top of the list.
  5. The images with corresponding product ID numbers will be visible if you open the product to edit it, look on the Images tab, in the first (primary) spot.


Can I set the font typeface for my Calendar in the Settings somewhere?

Your Calendar module will use the same typeface that is your default for your website headings and body content. If you have questions or want to explore the possibility of making it a different typeface, please call us at 385-404-6200 and use option 2 for Support, and we will be happy to assist you.


Faceted Search

Website Product Faceted Search

This feature is an available Beta Feature. You will be able to opt-in and activate it yourself if you are an Administrator-level User in the system and if you go to your Admin Button with your username in the upper right and you can access Beta Features. If you do not prefer to continue using it after trying it out, you can go back to that area to deactivate it again.

Please Note: We are proud to announce our newest and most powerful product search tool ever! This search will include both Product and Class Categories you use in the system, manufacturers, and product options and styles, as pictured here. You can also search a Price Range from this top level. You can set a Minimum and/or a Maximum Price Range you might be looking for.

fs 01.png

Faceted Search will utilize the different types of product Options you have established in the inventory you carry, for example, you may have set Colors and Sizes for your various products. Those families of Options will be visible in a left-hand column like the one pictured below, and your web shoppers can narrow their searching based on options that they prefer.

fs 02.png

The system will only use Options within the Category being displayed.

One thing to be mindful of: to make the best use of this system, it is advised that you use the same names for option families so the system won't see them as different things. For example, if in one product you called an Option family 'Size' and in another, you called it 'Sizes', those would both show up in the sidebar, even if they are referring to the same sizes.

Please Note: We have improved the way Faceted Search works when being used and viewed on mobile devices.

You can collapse the filters down to a single button and open them again as needed, as pictured below:

faceted mobile.jpg


How can I add a Favicon to my website browser tabs?

This is an administrative setting that we must adjust for you on our end. Please call us at 385-404-6200 and use option 2 for Support for assistance. Your Favicon will need to be a very tiny image, and will display at 16x16 pixels as a .ico image file. One thing you can do to prepare for the call is to do an internet search for an 'ico file converter.' You should get several options that will allow you to upload a square image and then download the converted ICO file(s).

How can I add a Handling Fee to my web orders?

This is an administrative setting that we must adjust for you on our end. Please call us at 385-404-6200 and use option 2 for Support for assistance.

How can I adjust my DNS settings in the system for my domain name?

All Domain Name Server / Domain record changes will need to be done on our end, for almost all of our clients. A very few clients are set up to have their DNS on their own server, but this configuration is NOT recommended, as it creates a single point of failure, meaning if the physical server computer your domain is set up on crashes, your site goes down until the machine is fixed. For over 99% of our clients, we control the DNS so your system resides on four separate servers that have 'load balancing' meaning if one gets busy, another server that is not will be tasked to be active for your domain. Also, if any one of those machines has a physical failure, you are automatically moved to a working one, so your system will have no 'down time.' For any DNS changes you might need, please call us at 385-404-6200 and use option 2 for Support.

How can I adjust the global settings for fonts and/or background colors on my website?

Some areas of your website design must be adjusted from our end. Please call us at 385-404-6200 and use option 2 for Support for assistance.


How do I adjust the colors and font size of my Calendar?

Once you have logged into Rain POS as an Administrator, click the Admin Button with your username in the upper right . In the drop-list, click on Settings > Website Settings. In the first tab that comes up, Calendar & Classes, you will be able to adjust colors in several areas and the font size as well. For more information, click here: Website Settings: Calendar & Classes.

How do I provide terms and conditions for my web transactions and require my customers to agree with them before finalizing the purchase?

You can add custom text for your Terms and Conditions in the website settings. After logging into Rain POS, in the upper right click on the Admin Button with your username and go to Settings > Website Settings > Shopping Cart and in the Checkout Options area, you can set Terms and Conditions to ON, and then click Edit to upload your text. Be sure to click Save at the bottom of the page if you make any changes in this area.


How do I sell free products through my online store?

There is an option in the system settings that will let you sell free products and class registrations through your website shopping cart. After logging into Rain POS, in the upper right click on the Admin Button with your username and go to Settings > Website Settings > Products, you will see a setting for Allow Purchase of Free Products a short way down the list. Change the setting to Yes, then scroll to the bottom of the page and click Save. Any product with the Price field set to 0.00 will be able to be purchased at no cost through your shopping cart.

How do I set in-store pickup and curbside pickup for specific locations of my stores?

After logging into the system, in the upper right click on the Admin Button with your username and go to Settings > Website Settings > Shipping. Near the bottom of the list of options, set Enable In-Store Pickup to ON, if you like, and then click Configure to set the Location(s) at which you want to offer store pickup. For this panel, you do not need to click a Save button. You can similarly set location-specific Curbside Pickup for your web orders.


How do I set my From email address for emails the system sends out?

After logging into the system, in the upper right click on the Admin Button with your username and go to Settings > Website Settings > Website Settings > Email, and you will see a field to enter your From Email Address. Please note the warning on the page about not using an email address provided by one of the big free email providers, such as AOL, Hotmail, Gmail, Yahoo, etc. The reason such email addresses will not work for this system is because that spammers use email addresses like that to send bulk emails out at little risk to themselves. So bulk email provider services have trouble sending messages with From email addresses like that, so in the system, we do not allow them.


How do I set shipping rates for individual items?

We do not have a way to set a specific amount to charge for shipping per product, but you can have the product's weight determine how much is charged. Start by looking at your shipping settings. After logging into Rain POS, in the upper right click on the Admin Button with your username and go to Settings > Website Settings > Shipping, and click to Configure your shipping methods. Check the box for the method you want to work with and click to Edit, or if you don't yet have a shipping method, click the green +Add Domestic Shipping Method button to create a new one. After you set the Region, currency, method name, and delivery time, in the 'Based On' area, you will need to select Weight. Each of your products can be set to have whatever weight it might need in order to charge enough shipping to cover the item. If you don't have weight values in place for your products, you will need to enter them, and they go in as decimal values of pounds (or kilograms, if that is the system you use), so an item that weighs 24-ounces will go in as 1.5 in the weight field for the product. Be sure to click Save at the bottom after you're finished adjusting your rates.

How do I set the email address where I want my website order notifications to go?

After logging into the system, in the upper right click on the Admin Button with your username and go to Settings > Website Settings > Shopping Cart and and enter the email address you want in the Order Notifications Email field, then scroll to the bottom of the page and click Save.


How do I set up which carriers and packaging I will use for my ShipStation integration?

You will configure your Carriers and Packaging options within your ShipStation account first, then you'll select the ones you want to use in your Settings in Rain POS. To configure what you need in Rain POS, after logging into Rain POS, in the upper right click on the Admin Button with your username and go to Settings > Website Settings > Shipping. Near the top of the list of options, click the Configure button for the Enable Shipping Station Integration option and check the boxes for the options you want. Be sure to click Save in the ShipStation panel once you're finished.


How to Add or Change Website Images

Images are a crucial part of any website's success, so you need to make sure you are working with them in the best possible ways throughout the site. To start, let's go over some simple rules you'll want to follow.

Article image


Rules for Working with Images

Start Large - As a general rule, you will want images that are large for your website, at least to start. You can always size them down to whatever you need, so starting with a larger image is good, think 800px - 1000px (see size guidelines below).

Use JPEGs, PNGs, or SVGs - Other formats may not work at all (e.g. GIFs). If you are not familiar with PNGs, they are an Adobe image format for the web that allows for image transparency. SVGs are a vector image format (line art instead of pixel art) that scale beautifully larger or smaller as needed. For pixel-based images (JPEGs and PNGs), our system has an auto scaling feature that always rescales the image file for optimal image quality.

Resize with Care - Sizing down is always fine; just realize you will lose detail the smaller the image gets, and that's normal. Never enlarge an image past its starting size, or it will begin to pixelate and look grainy.

Know Your Limits - For web images, the largest you would ever need them to be is about 2,000px wide, so the system may block you from uploading images larger than this. Similarly, you don't what huge image file sizes for web images or it will slow your page load time way down, so the limit on the file size is 4mb. Anything larger will be blocked from upload. If for some reason you need to upload an image that exceeds these limits, click on the Documents folder in the Files area and you can upload files up to 100mb in size. For display on the web page, though, you will want to follow the limits above.

Crop for Best Fit - To maintain an orderly appearance, or to make sure that your images line up nicely, you will want to crop them to exact dimensions. If you're replacing an image, find its original dimensions and crop the new image to fit. In your slideshow, you will want all images to have exactly the same dimensions, whatever you feel looks best.


Add or Change an Image

If you need to add an image into a module to display on one of your pages or if you need to change out an old image for a new one, please follow the steps below:

  1. To add a new image or change one that is already there, first click on the Edit button for the module where you want the image (the Edit button is the small pencil on the far left of the gray Module Toolbar).

    Article image

  2. In the content editor, either right-click on an image you want to replace or left-click your mouse where you want the new image to go. If you are changing an existing image, your right-click will pop up a small menu: click on Insert Image to open the Insert / Edit Image window. If you are putting in a new image, either right-click and use the menu or you can click on the Insert/Edit Image button in the controls above the area in which you're working (it looks like a photo of a mountain, look in the top row of buttons below).

    Article image

  3. In the Insert / Edit Image window, if you are changing an image to a new one, you should write down the Width and Height so you can change the new image to the same size. If you are bringing in a new image, you may need to try several sizes, saving the image (see below) to see how it fits.

    Article image

  4. To load the new image, click on the Browse Server button (the button to the right side of the Source field).
  5. You will see the Browse Server window open, with some of your site images visible. If your image is already on the server, click on it. If you are uploading a new one, click on the button for Upload File.

    Article image

  6. In the Upload File window, click on the Add Files button and browse your computer for the image(s) you want. You can also just drag and drop images into the gray area below the buttons, if you like.

    Article image

  7. When you find your image(s), if there is only one you need, you can double-click on it (or click on it once and click the Open button at the bottom). If you want to load multiple images, you can click on each separately while holding down Ctrl (Command if you use a Mac) and then click Open. If you are selecting all of the files in a folder, you can do Ctrl + a (Windows) or Command + a (Mac) and then click Open.

    Article image

  8. You will see thumbnails of the images you are uploading in the Upload Files window. Click the Start Upload button and the image(s) will upload. When they are finished, the Upload Files window will disappear and you will again be looking at your Browse Server window.

    Article image

  9. You will see the image(s) you just uploaded at the top of the list. Click on the image you want.

    Article image

  10. You will see the Width and Height for the image, as well as its URL. You can adjust the Width or Height as desired and click the other dimension and it will adjust to fit. ADD ALTERNATIVE TEXT TO EVERY IMAGE: The Alternative Text area is where you can enter a descriptive phrase or sentence about the image so the search engines will know how to index it for web image searches. Doing this will increase your search relevancy for the whole website, so we strongly encourage you to do this for each image.

    Article image

  11. In the Advanced tab, you have other options for formatting your image. You can set Alignment (the way the image lines up to text) and the standoff of how far the image is separated from the text in pixels (using the Horizontal Space and Vertical Space fields, for horizontal and vertical standoff).

    Article image

  12. When you are finished, click OK, and then you can use the resizing 'handles' around the image to adjust further as necessary. When your work is done, remember to click the Save button at the bottom to bring the changes live to the web page.


Guidelines for System Images

In addition to the rules above, you will want to follow these guidelines when working with images in the different areas of the system:

Product Images: You will want these to be large, if you can get them that way. Anywhere from 800px to 1000px is preferred, with a minimum of 500px wide. The system will downsize them as needed wherever they display smaller. Uploading smaller images can work, but it won't represent the product well, and can jeopardize the customer's perception of the product value as well as their online shopping experience. Taking your own photos with a digital camera or smartphone is good if the product manufacturer doesn't have good ones available.

Category Images: Smaller is okay, around 400px is about as large as they will ever be seen.

Class Images: Again, larger is better. If you can follow the same guidelines for product images, that is great. Not as critical as your product images, but still quite important because in many ways, the image you put up for a class will be helping you sell it.

Slideshow: If you are using the Responsive website system (all newer sites do) your slideshow either spans the full width of the browser, or the width of the central content area. We recommend uploading images at 1920px wide for full-width, and 1170 wide for standard width. For the height, the only important consideration is that the images you put in all have the same pixel height.

Free Online Resources: When working with images, especially ones you take with a camera with a high megapixel count (3MP or higher), you often will need to down-size the image to get it to upload in the first place. For many areas of the system, such as your slideshow, you will also need to crop images to specific pixel dimensions. Here are some great free resources to help you with your image work:

Article image

Pixlr.com by Autodesk: This is an online image editing program that is free for you to use, with a paid version that has more robust features. With Pixlr Express you get AI enhanced editing and will easily be able to do simple functions such as resizing, cropping, and even adding text overlays.


Article image

Canva.com is a phenomenal resource and tool set for doing web graphics, promotional images, or any image and text layout work you might have on your list.

WebFX Colorpicker: Need an RGB value or a Hex code for a specific color? This easy to use site will let you get what you need quickly.

IconFinder: Many free icons, buttons, and symbols for whatever you might need for your site.

Pexels.com: Free stock images, all royalty free!

Adobe Color: Need to find matching colors? Or perhaps a palette of compatible colors for use on your site? Adobe has put together an amazing tool you can try for free to help you intuitively find the colors you want.

How to Create a Link to a File

Create a Link to a File

1442439823_open-file.png

These steps will help you create a text or image link to a file hosted on our servers for your site. Our system will allow you to upload the following file types: Documents / Productivity - CSV, DOC, DOCX, PDF, PPT, PPTX, RTF, TXT, XLS, XLSX. Images - BMP, GIF, JPG, PNG. Audio - MP3, WAV. Video - AVI, FLV, MOV, MPG, MP4, QT, SWF, WMV. Compressed Files - ZIP.

  1. After logging into the system, click Website > Website Editor and go to the page where you want to create the link.
  2. Either create a new module for the link (click on the Add Body Content link at the top and click the Add button for the Content module at the top of the list) or click the Edit button (the fat little pencil) in the gray toolbar of an existing module where you want to create the link.
  3. If you are adding a link to an image, click on it to highlight it. If you are making a text link, type out your text and then highlight it with your mouse. (Example: Click here to view our Summer Catalog!)
  4. Click on the Insert/Edit Link button (in the functions above the Content editing box, in the top row of buttons: this button looks like three chain links).
  5. Click on the Browse Server button (the button on the far right of the Source field; it looks like a folder with a magnifying glass).
  6. If you have already uploaded the file, click on the folder it is in and find it in the list (or Search for it in the upper right) and then click on the file. If you have not uploaded the file yet, do the following steps:
    • Click on the blue Upload File button.
    • Click on the green Add Files button and search your computer for the file you want.
    • Either double-click on the file or click on it once and then click the Open button.
    • You will see a small thumbnail image of your file in the Upload Files window. Click on the blue Start Upload button.
    • Depending on the size of the file you are uploading and the speed of your connection, you may see a status bar for the upload. Once the file has finished uploading, the Upload Files window will disappear.
    • You will see your file at the top of the list. Click on it.
  7. You will see the URL for the file inserted into the URL field for the link. Click on the drop-list arrow for Target and then click on New Window (blank). The reason you will want the file to download in a new window is because in many cases a browser will take your visitor away from your site to load the file in the window. By having it load in a new window your visitor can download the file, and when they are done, they can close that window and they will be right back at your site.
  8. Click OK.
  9. Scroll down to the bottom of the screen and click the Save button.
  10. Test your new link to verify that it works correctly.
How to Create a Navigation Link to the Current Calendar

Create a Link to the Current Calendar Month

These steps will help you create a link in your Navigation website menu that will go to whatever the current calendar month is and display the full calendar grid. Please note that you will not need to update the link from month to month; it is fully automated and will take the visitor directly to the calendar grid for whatever month is current. After logging into your system as an administrator, please do the following steps:

  1. Click Website > Navigation.
  2. If your Calendar link will be at the top level, click the blue +New Navigation Item button, OR if your Calendar link will be in a drop list under one of your existing pages, click the small black arrow next to that page's title and in the drop-list area, click the white +New Navigation Item button.  |

nc 1.png

  1. You will choose option 3: Custom URL; click the +Create Navigation Item button in that area.
  2. Copy and paste the following link into the URL field:

/module/events.htm?pageComponentId=1840218&month=current

  1. In the Link Text field, enter the page title the way you want it to appear in your Navigation menu.
  2. DO NOT check the box to Open Link in New Window, you do not need to use this option for on-site links. Click the green Create Navigation Item button.
  3. You will return to the Navigation window, click the laptop icon in the blue Admin Toolbar to go to the website view. Find your new link in the main site navigation menu and click it to test.
How to Create Links to Pages, Files, and Email Addresses

Create a Link to a Page on Your Site

1442429099_page.png

These steps will help you create a text or image link to a page on your site. For these steps, the page must appear in your All Pages list, so this kind of linking will not work if you need to link to one of your products, classes, events, or news items. Please see below for instructions on how to link to dynamic module pages.

  1. Go to Website > Website Editor and go to the page where you want to create the link.
  2. If you are creating a new module for the link: Click Add Body Content and click the Add button for the Content module at the top of the list. If you are adding the link to an existing module: Click the Edit button (the fat little pencil) in the gray toolbar of an existing module where you want to create the link.
  3. If you are adding a link to an imageclick on it to highlight it. If you are making a text linktype out your text and then highlight it with your mouse. (Example: Click here to see our best deals in our Huge Sale!)
  4. Click on the Insert/Edit Link button (in the functions above the Content editing box, in the top row of buttons: this button looks like chain links).
  5. Click on the Browse Server button (the button on the far right of the Source field; it looks like a folder with a magnifying glass).
  6. In the upper left click on Pages and then find the page you are linking to in the list and click on it. Please remember that links to unpublished pages will not work until you publish the page. Also, if you don't find the page in the list, it may have been moved to a sub-folder of pages on the left (you may need to click on the little triangle next to the folder to see the sub-folders). If you cannot find the page in any of the folders, it is most likely a dynamically generated module page (e.g. a product, category, event, news item, etc.). If that is the case, please follow the instructions on Creating a Link to a Dynamic Module Page below.
  7. In the Link Properties window click OK.
  8. Scroll to the bottom of the screen and click the Save button.
  9. Test your new link to verify that it works correctly.


Create a Link to a File

1442439823_open-file.png

These steps will help you create a text or image link to a file hosted on our servers for your site. Our system will allow you to upload the following file types: Documents / Productivity - CSV, DOC, DOCX, PDF, PPT, PPTX, RTF, TXT, XLS, XLSX.  Images - GIF, JPG, PNG, SVG. Audio - MP3, WAV.  Video - AVI, FLV, MOV, MPG, MP4, QT, SWF, WMV.  Compressed Files - ZIP.

  1. Go to Website > Website Editor and go to the page where you want to create the link.

  2. If you are creating a new module for the link: Click Add Body Content and click the Add button for the Content module at the top of the list. If you are adding the link to an existing module: click the Edit button (the fat little pencil) in the gray toolbar of an existing module where you want to create the link.

  3. If you are adding a link to an image: click on it to highlight itIf you are making a text linktype out your text and then highlight it with your mouse. (Example: Click here to view our Summer Catalog!)

  4. Click on the Insert/Edit Link button (in the functions above the Content editing box, in the top row of buttons: this button looks like three chain links).

  5. Click on the Browse Server button (the button on the far right of the Source field; it looks like a folder with a magnifying glass).

  6. If you have already uploaded the file: click on the folder it is in and find it in the list (or Search for it in the upper right) and then click on the file.

    If you have not uploaded the file yet, do the following steps:

    • Click on the blue Upload File button.
    • Click on the green Add Files button and search your computer for the file you want.
    • Either double-click on the file or click on it once and then click the Open button.
    • You will see a small thumbnail image of your file in the Upload Files window. Click on the blue Start Upload button.
    • Depending on the size of the file you are uploading and the speed of your connection, you may see a status bar for the upload. Once the file has finished uploading, the Upload Files window will disappear.
    • You will see your file at the top of the list. Click on the file.
  7. You will see the URL for the file inserted into the URL field for the link. Click on the drop-list arrow for Target and then click on New Window (blank). The reason you will want the file to download in a new window is because in many cases a browser will take your visitor away from your site to load the file in the window. By having it load in a new window your visitor can download the file, and when they are done, they can close that window and they will be right back at your site.

  8. Click OK.

  9. Scroll down to the bottom of the screen and click the Save button.

  10. Test your new link to verify that it works correctly.


Create a Link to an External Page or to a Dynamic Module Page

1442440698_applications-internet.png

These steps will help you create a text or image link to an External Page (a page that is not on your website) or to a Dynamic Module Page (these are pages that are generated by the system: for example, if you look at your Calendar and click on View Entire Calendar, the system takes you to a dynamic page for the current month based on the information you've put into the system). Dynamic Module Pages include Categories and Products in your online store, Categories and Events in your Calendar, Categories and Classes in your Classes module, and individual items in the following modules: FAQ, Job Listings, News, and Newsletter Archive. It is also possible to link to a specific search that you do in your Search module, and those results are also dynamically generated.

  1. Go to Website > Website Editor and go to the page where you want to create the link.

  2. If you are linking to an external web page: open a new tab or window in your browser and go to the page that will be the end destination of the link you are making. Highlight and copy the web page URL.

    If you are linking to a Dynamic Module Page: go to the page that will be the end destination of the link you are making. Highlight and copy the web page URL. IMPORTANT: If your website is not live yet and/or if you are still logging in with the mywebsite.rainadmin.com/admin address, you should copy everything after the .com, so the part of the link you will copy will start with the / after the .com and will look like this: /shop/shoes/nike-streak.htm

  3. After you have copied the URL, go to the page on your site where you want to create the link.

  4. If you are creating a new module for the link: Click Add Body Content and click the Add button for the Content module at the top of the list.

    If you are adding the link to an existing module: Click the Edit button (the fat little pencil) in the gray toolbar of an existing module where you want to create the link.

  5. If you are adding a link to an image: Click on it to highlight it.

    If you are making a text link: Type out your text and then highlight it with your mouse. (Example: Click here to go the Nike website.)

  6. Click on the Insert/Edit Link button (in the functions above the Content editing box, in the top row of buttons: this button looks like three chain links).

  7. Paste the web address you copied into the URL field. NOTE: If you are linking to an External Page, you need to also do the following:

    • Click on the drop-list arrow for Target and then click on New Window (blank). The reason you will want the external page to open in a new window is because the browser will take your visitor away from your site. By having it open in a new window, your visitor can view the page and when they are done, they can close that window and they will be right back at your site.
  8. In the Link Properties window click OK.

  9. Scroll to the bottom of the screen and click the Save button.

  10. Test your new link to verify that it works correctly.


Create a Link to an Email Address

1442445310_email_open.png

These steps will help you create a text or image link to an email address. This kind of link will open your visitor's default email program on their computer. In some cases your visitor might not use such software at all, preferring instead to use browser-based email such as Yahoo Mail or Gmail. If they don't have email software they use, their system will open a default program that may not even be set up for them yet, so it is a good idea to make sure that the link you create to your email address also shows the text of the email address. Please follow the steps and see the example below:

  1. Go to Website > Website Editor and go to the page where you want to create the link.

  2. If you are creating a new module for the link: Click Add Body Content and click the Add button for the Content module at the top of the list.

    If you are using an existing module: Click the Edit button (the fat little pencil) in the gray toolbar of an existing module where you want to create the link.

  3. If you are adding a link to an image: Click on it to highlight it.

    If you are making a text link: Type out your text and then highlight it with your mouse. (Example: Email us at info@outdoor24-7.com!)

  4. Click on the Insert/Edit Link button (in the functions above the Content editing box, in the top row of buttons: this button looks like three chain links).

  5. In the URL field, enter the following: mailto:

  6. Enter the email address the link will be sending to, e.g. mailto: info@outdoor24-7.com (please note there are no spaces in the URL field)

  7. Click the Target drop-list and then click on New Window. You will want this function in case they are using web mail, so it won't take them away from your site; it will open their web mail in a new tab.

  8. Click OK.

  9. Scroll to the bottom of the screen and click the Save button.

  10. Test your new link to verify that it works correctly.


Another type of link is an Anchor link, which will basically jump to a certain part of a page. If you want to learn more about Anchor links, click here: Link to Page Sections with Anchor Links.

How to Move a Content Module from One Page to Another

What can you do if you need to take the content on one page and move it to a different one? Learn how to move the content easily, quickly, and perfectly to where you need it!


Moving Modules

Start by logging into the system and going to Website > Website Editor. Go to the page on your website where your content currently resides.

Many system modules don't need to be moved from one place to another, because the data they display or the function they perform is central to the system and is not stored on the page. For modules like this, all you have to do is place the new copy of the module on the page you want it, and then you can delete the old one. Here is a list of modules that are safe to delete and place a new copy in this way:

  • Calendar
  • Classes
  • Upcoming Classes*
  • Customer Directory
  • Facebook Comments & Like Button‡
  • FAQ
  • Form
  • Gift Card
  • Job Listing
  • News
  • Newsletter Signup Form
  • Newsletter Archive
  • Products
  • New Products*
  • Top Sellers*
  • On Sale*
  • Receive File
  • Search
  • Store Locator

* - Requires the Marketing Package, for more information, click here: The Marketing Package.

‡ - Requires the Plus Service Package. Learn how to set Facebook Features up by clicking here: Facebook Page Setup and Integration.

The modules that you would need to move manually, in the methods described below, require more effort and care in moving, so that you don't lose or disrupt the content. Here is a list of modules that would need to be moved manually:

  • Content
  • Gallery
  • Slideshow

The Gallery and Slideshow modules will have to be recreated on the new page from scratch: You'll need to take note of the images in each and the order in which they're listed, then go to the page where you want the new Gallery or Slideshow, add the module to the page (see below for how to do this) and re-load the images into the new module. In the case of the Gallery, you may want to take note of the Thumbnail Size you are using so the new Gallery will display in the same way as the original. In the case of the Slideshow, you would also need to recreate any Captions and Links you may have had in the original one.


Moving the Content Module

Your Content modules contain all of the custom-created content you've put on your site, such as paragraphs of text, images, even videos and maps. Using the steps below, we can make sure that when you move your module, it will look exactly the same and have all the necessary bits and pieces from the original. Here are the steps:

  1. Click Website > Website Editor.

  2. Go to the page that has the Content module you need to move.

  3. Click the Edit button on the Module Toolbar.

    edit button.png

  4. In the Content Editor, click the Source Code button (just to the left of the Formats button).

    source code button.png

  5. In the Source Code window, click to make sure the cursor is flashing anywhere in the code you see. You do NOT need to adjust or even understand any of what you see. In Windows, hold down your Ctrl key and hit the A to Select All. You will see all of the code in the window highlight, as pictured below. Then hold down Ctrl and hit the C to Copy. If you are working on an Apple computer, use Command-A and Command-C, respectively. You won't see anything happen, but everything selected is now ready and waiting to be pasted onto the new page.

    source code window.png

  6. Click OK at the bottom of the Source Code window to close it, then hit the Back button on your browser to leave the Edit screen. Go to the page on your site where you want to move the module. If you need to create a new page, click here to learn how: Website Pages.

  7. In the upper left of the window, just below the Home icon in the blue Admin Toolbar, move your mouse over the triangle with the + and in the list that drops down, click Add Body Content. If your original module was in the Header or Footer area, choose the appropriate area to place the new one.

    add body content.png

  8. In the list of Modules, click the Add button for the Content module.

  9. Once again, click on the Source Code button to the left of the Formats button.

  10. A blank Source Code window will open, click your mouse anywhere in the blank area so the cursor is flashing. Hold down your Ctrl key and hit V to Paste. If you're on an Apple computer, hold down Command-V. You'll see all the code you copied appear in the window.

  11. Scroll to the bottom of the Source Code window and click OK.

  12. You'll see your content appear in the window. Click Save at the bottom, and it will look exactly as it did on the original page.


How to Put a Video on a Web Page

Adding Video to Your Web Pages

Offering video on your website is a great benefit for your visitors, especially if you have videos of interest or of special use to your target audience. For instructional or promotional videos, you will want to take advantage of the free networking and marketing YouTube will do for you if you upload your video there. If your video is not for the general public, Vimeo is a good option. Both services are free for you.

Click here to learn how to get started with YouTube.

Click here to learn how to get started with Vimeo.

youtube vimeo sm.png


Embed Your Video on a Website Page

Step One: Get the Embed Code

In YouTube:

  1. Go to your video in YouTube and click the Share link below the video.  v 01.png

  2. Click the Embed button that pops up in the Share a Link panel.  

    v 13.png

  3. In the Embed Code, the Width and Height of the player frame is something you can adjust to your preferences.  

    v14.png

    If your video will be the main content of a page and your video is 16:9 ratio (common wide video format), you might want to set it to be a width of 1280 x 720 pixels. If you want it to be medium sized, 480 x 270 pixels wide is a good range. Other common sizes include 853 x 480, 640 x 360, and 560 x 315. When you enter your numbers, make sure they keep the double-quotes, so the code should look like the example above.

  4. Once you have the size you like, click the Copy button in the lower right.


In Vimeo:

  1. Go to your video in Vimeo and click on the Paper-Airplane Icon.  

    v 05.png

  2. Below the Embed Code, click Show More to see your full options. Choose the size of the video you want If your video will be the main content of a page, you might want to set it to be a width of 800 - 1,200 pixels or so. If you want it to be medium sized, 400 - 600 pixels wide is a good range (Vimeo will adjust the height automatically for whatever pixel width you enter).  

    v 06.png

  3. You also have options, such as Autoplay (we strongly recommend you don't use this, unless this video will be on a page where the visitor will expect to see a video playing when they go to the page: most visitors will immediately stop a video or close the page window when unexpected content begins playing and they didn't push play). You can also set the video to loop, so if it is a short promotion or something that you would want to continuously run, this is an option for you.
  4. Once you have your options in place, copy the Embed Code.


Step Two: Embed the Code on Your Page

On your website, follow these steps to get the video onto the page. Do not start these steps until you have copied the embed code from either YouTube or Vimeo, as described above. Please note, for best results in working with our Content Editor, please use Firefox as your browser. Here are the steps:

  1. Go to Website > Website Editor  go to the page where you want to place the video and move your mouse over the triangle in the upper left with the blue Plus. In the menu that pops up, click Add Body Content.

    v 07.png

  2. Find the Content module at the top of the list and click the Add button for it.  

    v 09.png

  3. The Content Editor has a couple of buttons that relate to videos, but those functions do not work properly, so please don't use them. You will want to find the Source Code button (just to the left of Formats; it looks like two arrows pointing away from each other). Find that button and click it

    v 10.png

  4. Paste the embed code you copied immediately below whatever else is in there. Click OK at the bottom of the Source Code window to update the code change.

v 11.png

Please Note: You will see a gray box for the video frame. After you save the module, you will see the actual video frame when you view the web page. You can click on the gray box to highlight it, then go to Formats and click to Center align it, if you like.  

v 12.png

6. Scroll to the bottom of the screen and click the Save button.

Please Note: If your video looks too large or too small at this point, you can use the corner handles to drag the video to the size you want. But for a perfect fit, you could also go back to YouTube or Vimeo where you uploaded the video and adjust the size to get a new Embed Code, then replace the code using the steps above.


How to Set Up a Subscription Payment Button in PayPal

If you need to create a subscription that will charge a card automatically at whatever interval you need (e.g. a monthly subscription), PayPal has an excellent tool for facilitating such payments. Please note that if you are using integrated processing Rain POS Payments you can already use our integrated tool for Subscriptions. Please click here for more information: Product Subscriptions.

Please Note: Creating a payment tool like this will bypass our shopping cart entirely and will exclusively use PayPal to complete the payments. Because of this, if you are using this for a product or a class in the system, you will want to make sure the Add to Cart button is off for the item, as detailed below. The system cannot track inventory for such sales, either, and if you do it for a class, anyone paying this way will NOT go onto the Classes report as a registered attendee. To show the information on the web page, please use the Long Description for the product or class to place your PayPal Subscription button code.

Here are the steps in PayPal to set up your subscription button. Log into your PayPal account and do the following:

  • Log in to PayPal.
  • Go to www.paypal.com/buttons/.
  • Click the Smart Subscribe button.
  • Enter the requested information to tell us about the subscription product you want to offer and click Create Plan.
  • A pop-up window will display with the code to integrate into your website.
  • Click Copy Code and it will automatically be copied to your clipboard.
  • Once copied, your plan will be turned on.

Be careful not to copy anything else until you follow the steps below!

You're done in PayPal after that, next log into your Point of Sale and do the following:

  • Go next to our system, go into Products or Classes and search for the item you want to work with, click on it to open it in Edit view.
  • Make sure the Show Add to Cart Button is set to Off. For a class, this will be a checkbox on the Pricing tab. For a product, this will be a toggle on the Website Settings tab.
  • It is okay to have a Price and even a Sale Price set, if you like, but they will only be there for reference as the transaction will be going straight to PayPal and bypassing our shopping cart. So if you want, you can set Show Price on Website to be Yes.
  • You will enter the code you copied into the following area: For a class, it will be the Long Description on the Details tab. For a product, it will be the Product Description on the Website Settings tab. For both, click at the bottom of whatever text is already there and hit Enter a couple of times to add some space.
  • Find the Source Code button: it is to the left of Formats and looks like this: < >
  • Go to the bottom of the code that's there, click with your mouse to get the cursor blinking at the end of the code and then hit Enter to go to a new line.
  • Paste the code you copied from PayPal (Ctrl V in Windows, Command V on a Mac).
  • Save the product or class, then go to the web page view of the item to make sure your button is showing up correctly.
I bought a new domain name, how can I change the domain name for my website?

Before changing your website over to a completely new domain name, there are some important considerations of which you need to be aware. Changing your domain name will change the website URLs for every page, product, class, and event on your website. This means that the search engines will have to find and index all of your website content from scratch, which means that if you've been live for very long, you are highly likely to experience a big reduction in website traffic. If you still wish to proceed with the domain name change, we will need to change that over for you. We will need your login information for the domain registrar where you bought the new domain name, and you should email that information to support@rainpos.com along with a clear statement that you are aware of the potential consequences and would like us to proceed with changing the domain name over. If you have any questions, please call us at 385-404-6200 and use option 2 for Support.


I don't see the option to add Wait Lists for my Classes, how do I add that?

Once you have logged into the system as an Administrator, in the upper right you'll see the Admin Button with your username. In the drop-list, click on Settings > Website Settings, and in the first tab that comes up (Calendar & Classes), scroll down to the second section and you can check the box for Add to Waitlist in the area for Class settings. Be sure to click Save at the bottom if you made any changes.

Once you have enabled that option, in each class in the Pricing tab you will have the ability to activate a Wait List for the class. Any students that add their names to the Wait List for classes that are fully booked will appear under Reports > Wait Lists.


I don't want products to display on my website if they are out of stock, is there a way to automatically take them down when they reach zero inventory?

You can set your products to 'hide' so they are no longer visible on your website by enabling that option in your system settings. Once you are logged into the system, click on the Admin Button with your username in the upper right and go to Settings > Website Settings > Products and you'll see the option for Display Out-of-Stock Items on Website not far from the bottom of the list. Set it to No, and then scroll to the bottom of the page and click Save.

When a product is at 0 inventory, it will no longer display on the website. Please note that it does not actually go into a Deactivated state, it is simply not going to be visible online at that point. Once a product has inventory again, it will automatically reappear.


I don't want to miss any web orders if my products run out of inventory, how can I let orders come through if a product is at zero inventory?

You can set a product to ignore actual inventory levels and sell as if you have unlimited inventory on your website. We strongly recommend doing this only for products you can make yourself or that you can reorder very quickly so that your customers don't have to wait too long for their orders.

Once you are logged into the system, click on Inventory > Products and search for the product you want. Click on its title to open it, then find the Unlimited Web Inventory setting and set it to Yes, then scroll to the bottom of the screen and click Save.

That product will now be available to order online even if you go into negative actual inventory, so you should only do this with products you are sure you can 'turn around' quickly for order fulfillment. If all of your products are safe to set that way, there is an option in your system settings to make new products default to Unlimited Inventory.

On the far right side of the blue bar, click on the Admin Button in the upper right and go to Settings > Website Settings > Products, and about half way down the list of options, you'll see Default Unlimited Web Inventory. Set it to Yes, then scroll to the bottom of the page and click Save. All new products you create will automatically be set to have that 'On' moving forward.

I have a blank area below my Add to Cart buttons for my products, how do I add content there?

If you wish to add universal content below your Add to Cart buttons that will appear on every product you sell, follow these steps:

Once you have logged into Rain POS, in the upper right click on the Admin Button with your username. In the drop-list, click on Settings > Website Settings > Products, you will see a setting for Product Message Below the Add to Cart Button near the bottom of the list. You can enter whatever content you like in there and it will appear there for each of your products. Be sure to scroll to the bottom of the screen and click Save once you're finished entering your content.

If you wish to add content below the Add to Cart button on a single product, follow these steps:

Go to Inventory > Products and search for the product you want. Click on its Title to open it in the Edit Product view. Click on the Descriptions tab at the top and scroll down until you see Brief Description Below Add to Cart Button. Add your content there. Be sure to scroll to the bottom of the screen and click Save once you're finished entering your content.


I have a product that needs information from the customer when they order it, how do I get it?

If you wish for your customers to just have a Notes field available on every product where they can enter general notes for you, follow these instructions:

Once you have logged into Rain POS, in the upper right, click on the Admin Button with your username. In the drop-list, go to Settings > Website Settings > Products, you will see a setting for Notes Field a short way down the list. Change the setting to On and then scroll to the bottom of the page and click Save. Each of your products will now have a Notes field with no limit to the amount of text they might want to include for you.

You will receive those notes in the notification email you receive for the order, and they will also be visible when you open the transaction under Orders.

If you wish to create specific types of form fields for a specific product, follow these instructions:

Once you have logged into Rain POS, click Inventory > Products, search for the product you want and click on its Title. On the left, click on the Website Settings Tab, scroll down and you will see Product Form area. You can add a Single Line Input, Paragraph Input, a Check Box for yes or no answers, or a Dropdown Box to let the customer choose one option from a list. Once you've created whatever fields you need, be sure to click Save at the bottom.

On its web page, the product will now display the form fields you created. You will receive the form submissions in the notification email you receive for the order, and they will also be visible when you open the transaction under Orders.


I have products I want to show but not sell in my online store, how to I tell customers they need to call?

For products you have created that are set to display on the website (Availability: Both or Website) but that don't have an Add to Cart button, you can enable a special message to instruct people that it is unavailable for sale through the website and display your phone number for more information. You can configure that option in your system settings.

Once you are logged into the system, in the upper right click on the Admin Button with your username and go to Settings > Website Settings > Products and you'll see the option for No Online Purchase Message not far from the bottom of the list. Choose the message you want from the drop-list, and then scroll to the bottom of the page and click Save.


I just want my web orders to go through without having to click a button to collect each one, what do I do?

If you're having to click for each order to Capture Funds, your Checkout Method for the website is set to Authorization. To change that to the straight Sale method, first go to the Admin Button in the upper right and go to Settings > Website Settings > Products. Find the Checkout Method area and change it from Authorization to Sale, then scroll to the bottom of the page and click Save. To complete the configuration, please either call us (at 385-404-6200, option 2) or email us (support@rainpos.com) and let us know you're switching to the Sale method of checkout for your website, and we will configure your processor to work that way.


I keep having to do returns on web orders, what do I do?

The best way to drastically reduce refunds on web orders is to change your Checkout Method from Sale to Authorization. The Authorization method of checking out does not charge the customer's card right away, it just pre-authorizes the funds and sends you the order, giving you a chance to review everything.

In the Orders module, if you open the transaction, you will have the ability to reduce the amount being charged for shipping and adjust quantities of items in the order, if you need. When the order is ready to go, you can click the Update button in the Payment Details area you can click a button to Capture Funds. You cannot set the shipping or quantities to charge a larger amount than was authorized originally on the card.

You can change your Checkout Method by logging into Rain POS as an Administrator. On the far right side of the blue Admin Toolbar, go to Settings > Website Settings > Products and find Checkout Method in the list. Change it to Authorization, then scroll to the bottom of the screen and click Save. Then either call Support (at 385-404-6200, option 2) or email us at support@rainpos.com and let us know you would like to use the Authorization method of checkout for the website, and we will complete your configuration for that on our end in your Processor settings.

I need to add text below the image area to all my products, how do I add a message there?

Once you have logged into the system, in the upper right, click the Admin Button with your username. In the drop-list, click on Settings > Website Settings > Products, you will see a setting for Product Message Below Images near the bottom of the list. You can enter whatever content you like in there and it will appear there for each of your products. Be sure to scroll to the bottom of the screen and click Save once you're finished entering your content.

Pro Tip: This is an excellent place to link to your policies on privacy, international orders, order fulfillment (timeframe, packaging, communication), and shipping.


I read about ShipStation integration in your knowledge base articles, how to I get that activated?

First, you need to set up and activate a ShipStation account, and configure the carriers, shipping methods, and packaging options you wish to offer. Once that is complete, you can integrate the setup in Rain POS.

After logging into Rain POS, in the upper right click on the Admin Button with your username and go to Settings > Website Settings > Shipping.

Near the top of the list of options, set Enable Shipping Station Integration to ON, click Configure to enter your Key and Secret codes from your ShipStation account. Check the boxes for the Carriers, Services, and Packaging you want to use. You are able to set free shipping over a specified amount, you have the option of not requiring weight values for items (if you do this, read the warning carefully, this may invalidate some of your rates), and set how you want your ShipStation rates to appear on the website.

Please note that ShipStation integration requires that most if not all of your products have to have weight values in place, so be sure your products are properly set up before integrating. If you do not see the functionality described here, please call us at 385-404-6200 and use option 2 for Support or email us at support@rainpos.com and we'll be happy to activate it for you.

I set up my shipping, but someone was able to order without a shipping charge, what do I do?

You need to make sure there are no 'gaps' in your shipping rates. To look at your settings, on the far right side of the blue bar click on the gear-shaped button and go to Settings > Website Settings > Shipping, and click to Configure your shipping methods.

Check the box for the method you want to work with and click to Edit. Scroll down until you see the table with your From and To numbers and the Rates. In cases where your shipping method is based on Amount (the total dollar amount of the order), you need to make sure that the first line of your rates starts with 0.01 in the From column, and the From amount in the second row needs to be one penny higher than the To amount in row one. The 'gaps' are when you leave open amounts that do not cover every possible amount in your From and To range.

Here is an example of how to NOT set it up. The 'gaps' occur when you go from whole dollar amounts from one rate line to the next, so in this case, and order amount of $10.01 to $10.99 would not be charged shipping at all, since the first line only goes up to $10.00 even and the next line starts at $11.00.

For a good example of how to do it correctly, please click here and look at the Domestic Shipping section: How to Set Up Shipping Methods.


I want customers to call me if they have questions about my online products, how can I put my phone number on every product?

There is an option in the system settings that will let you add your phone number to each product. Once you have logged into Rain POS as an Administrator click the Admin Button with your username in the upper right. In the drop-list, click on Settings > Website Settings > Products, you will see a setting for Call to Order Display a short way down the list. Change the setting to On, then scroll to the bottom of the page and click Save.


I want my domestic shipping to be free over a certain amount, how do I set that up?

Start by looking at your shipping settings by clicking on the Admin Button with your username in the upper right and go to Settings > Website Settings > Shipping, and click to Configure your shipping methods. Check the box for the method you want to work with and click to Edit. Scroll down until you see the table with your From and To numbers and the Rates. Look at your bottom-most line: the 'To' amount in that line should be .01 less than the target amount over which you want orders to have free shipping. For example, if you want to offer free shipping to all orders $50 or over, your current bottom-most line would need to have 49.99 in the To column. Then you would create another rate line below that and you would have 50.00 in the From column and in the To column, you would have 'and up'. Then in the Rate column you would enter 0.00. Be sure to click Save at the bottom after you're finished adjusting your rates.


I want to brand my shopping cart page, how do I add my look and feel?

You can customize the header of the checkout pages of the shopping cart. After logging into Rain POS click the Admin Button with your username in the upper right and go to Settings > Website Settings > Shopping Cart and near the top you have options for entering just the store name, adding a logo and background color, or doing a full html layout for the header in a Content Editor. Be sure to click Save at the bottom of the page if you make any changes in this area.


I want to put up a message for products in my online store that are in stock, how do I do that?

You can set in-stock products to have a custom In-Stock message on your website by enabling that option in your system settings. Once you are logged into the system as an administrator click the Admin Button with your username in the upper right and go to Settings > Website Settings > Products and you'll see the option for Product In Stock Message not far from the bottom of the list. Set it to On, enter the message you want in the text field, and then scroll to the bottom of the page and click Save. When a product has inventory that message will display. Once the product is out of inventory, the message will no longer appear.


I want to sell wholesale on my website, but my products don't have places for wholesale prices, how do I add that?

If you are eligible to sell wholesale (all clients with the Website Plus or higher service package are eligible) that is something we can activate for you. You will need to contact us so we can activate that for you on our end. Please either call us at 385-404-6200, option 2, or email us at support@rainpos.com and we will be happy to configure that for you.


I'm not getting order notifications for website orders from the system, what do I do?

First, make sure that you have the proper email address in the area of Settings about order notifications. In the upper right, click the Admin Button with your username and go to Settings > Website Settings > Shopping Cart. Verify that the email address listed in the Order Notifications Email is the right one, if not, enter the one(s) you want. You can also get notifications by text message if you like. Once you're done, scroll to the bottom of the page and click Save.

If the address was correct, it may be some other problem so give our Support team a call at 385-404-6200 and use option 2 and we will troubleshoot the issue.


In the shopping cart, can any coupon code from my system be used for web orders?

Coupons you have saved under Marketing > Coupons as well as Reward Coupons will work just fine in the Shopping Cart. Coupons such as the Bounce Back Coupon, Come Back Coupon, and the Birthday Coupon are meant to bring customers back to your physical store (at present), so they will not work in the shopping cart.


Is the website system shopping cart PCI compliant?

The shopping cart is encrypted in the areas where sensitive information is transmitted, and is fully PCI compliant.

Is there a limit to how many products a customer can order from me through the online store?

While there is not technically a limit to what the system can handle, as a practical matter, your browser may experience time-outs if you have more than 100 products loaded into the cart at once.


Is there a way I can get the shopping cart window to be smaller?

At the top right corner of the Shopping Cart window, there is a small arrow pointing up; if you click that, it minimizes the window so it won't get in your way. You can always expand it again if needed.


Local Delivery Option by Zip Code / Postal Code for Online Orders

The system now offers you the option of providing Local Delivery as an alternative to regular shipping or store pickup. Here is a short video of how you can set up this option:


Setting Up Local Delivery

  1. Click on the Admin Button > Settings > Website Settings > Shipping and look at the area for System-Configured Shipping Options.
  2. Click the Configure button for System-Configured Shipping Options.
  3. In the section for Domestic shipping methods, click the green button to Add Domestic Shipping Method.
  4. In the System Shipping Method panel that opens, first set the method name to Local Delivery.

delivery 01.jpg

  1. As soon as you set Local Delivery the window will change to allow you to enter ZIP / Postal codes. So, for example, if there are two zip codes within which you are willing to do deliveries for free, you could set the method up as pictured below, and then you could create another Local Delivery method with ZIP Codes a little farther away for which you would be willing to deliver for a fee. 

local deliver method by zip.png

  1. Be sure to set the Delivery Time to your expected time frame, as pictured above.
  2. If you plan to charge a fee for the delivery, set the rate as pictured above in item number 3 for whatever fee you want to charge. If you plan to offer free Local Delivery, set the Rate to 0.00. You can set up multiple Local Delivery methods if there are ZIP Codes you would deliver to for free, or for a higher fee. All ZIP / Postal Codes listed will use whatever fee you set here, if any.
  3. When you have everything in place, scroll to the bottom of the panel and click Save.

After this is set up, the Local Delivery option will appear with your other shipping methods for online orders that qualify based on the zip codes / postal codes you set, as pictured below.

local delivery in cart.png


Make Phone Number Required for PayPal Orders

paypal-logo.png

Follow these steps to require a customer phone number for web orders that use PayPal as the processor:

  1. Log into your PayPal account.

  2. Click the Gear icon in the upper right.

  1. In the Account menu, click Seller Tools.

  1. In the list of tools, click Website Preferences.

  1. Scroll down to the Contact Telephone Number section and click to select the On (Required Field) option.

Your change is automatically saved and shoppers will be required to enter a phone number when they use PayPal to buy from you online.

Sell a Product for Free

How to 'Sell' Products for Free

Your Rain POS Point of Sale system allows you to offer items for free in Register and in online transactions.


Steps for Selling Free Products in the Point of Sale

  1. Search for your product and add it as a line item to the Register.
  2. In the line item for the product, click the blue pencil.
  3. Enter 100 into the Percentile Discount area, and click Save
  4. Add whatever other items the customer is purchasing and complete checkout in the normal way.


Steps for Selling Free Products Online

  1. Click the Admin Button with your username in the upper right and go to Settings >Website Settings > Products.
  2. Scroll down until you see Allow Purchase of Free Products and set it to Yes.
  3. Scroll to the bottom of the page and click Save. You're all set!


Should I set up my shipping in PayPal or in the system?

We originally patterned our shipping settings off of the way PayPal does theirs, only we added more lines for rates so you would have more depth there. We highly recommend you set up your shipping in Rain POS and make sure you don't have any shipping set up in PayPal, to avoid double-charging your customers. Click here to learn how to set up shipping in the system: How to Set Up Shipping Methods.


Sometimes my inventory is off and when someone orders an item I come up short, how can they tell me their preference for low inventory orders?

There is an option in the system settings that will let your customers specify how they would like you to handle it if you don't have enough inventory for the products they order. Once you have logged into Rain POS as an Administrator (your login link should look like ' yourwebsitename.rainadmin.com/admin';), on the far right side of the blue Admin Toolbar, click the gear-shaped button. In the drop-list, click on Settings > Website Settings > Products, you will see a setting for Send What You Have Option a short way down the list. Change the setting to On, then scroll to the bottom of the page and click Save.

Your online shoppers will have any one of the following options for each product they order (each can be set differently, as needed):

  • Send what you have.
  • Cancel this item.
  • Contact me.


The info on the Advanced tab of my class doesn't show up on the class's web page, how do I get it back?

This information does not display if you are using the 'Version 2 Preview' setting for your Classes. That setting enables the use of the Materials tab of your classes, so at this time, you cannot display both the Materials tab and the Advanced tab information for a class. To enable or disable that setting, once you have logged into Rain POS as an Administrator (your login link should look like ' yourwebsitename.rainadmin.com/admin';), on the far right side of the blue Admin Toolbar, click the gear-shaped button. In the drop-list, click on Settings > Website Settings, and in the first tab that comes up (Calendar & Classes), scroll down to the second section and you can check or un-check the box for Version 2 Preview. If you made any change on the settings page, be sure to scroll to the bottom of the page and click Save.


Use Separate Website / In-Store Pricing

Set Separate Website and In-Store Pricing


Steps for Setting Different Website / In-Store Pricing

  1. Go to the Admin Button with your username in the upper right and go to Settings > Features > Pricing, as pictured above.
  2. In the area for Website Pricing, toggle the switch to Enabled.
  3. Click Save.
  4. You will now have a Website Price and Website Sale Price field in each of your products, as pictured below.


Website Management Best Practices

Here are some key activities you should be doing regularly to make sure your website is in good shape:

  1. Update content often; swap out featured products & categories, slideshow images; update text. You should be doing this weekly on the Home page, and at least monthly wherever else you can.
  2. Look for places to add content that has value, like videos, free stuff, etc.;
  3. Go through your site monthly and check for old content that needs to be updated;
  4. Check your Orders regularly just in case an email notification didn't come through;
  5. Check your online store monthly, make sure all categories have images, and if you use them, descriptions.
  6. Use a free website link checker like this one to make sure you don't have any dead links on your site.
  7. Update social media as often as you reasonably can, link back to your website often.


Website Settings: Products Tab

The Website Settings: Products Tab

You can get to this part of the system by clicking on the Admin button with your username in the upper right and then clicking Settings > Website Settings > Products.
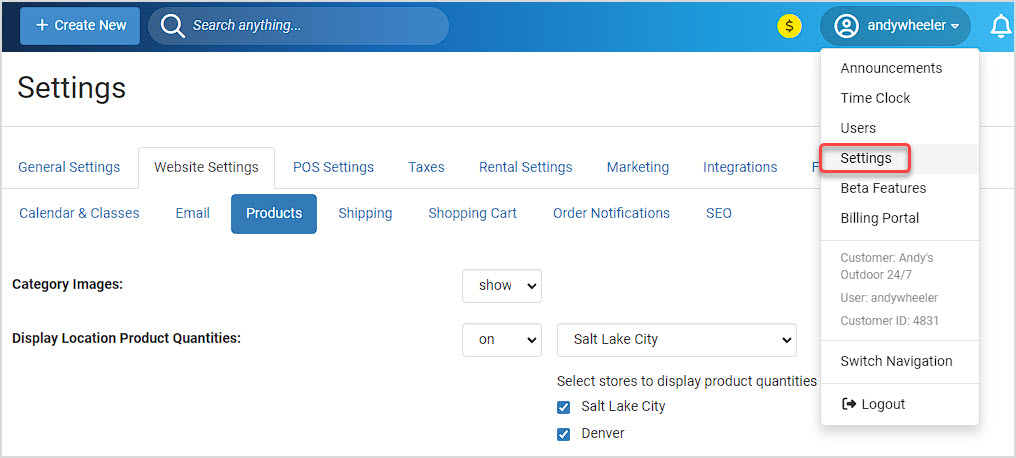
Please Note: As you work on your settings, in each tab, you need to remember to click the Save button at the bottom of the screen before you move on to another tab or screen, or you will lose your work.


Settings for Products

There are a great many configuration options for your eCommerce in the Website Settings > Products tab, ranging from how they display on the site (number of columns for Categories and for Products) to the preferred checkout method in the Shopping Cart and even custom Add to Cart buttons. Details for each setting are below:
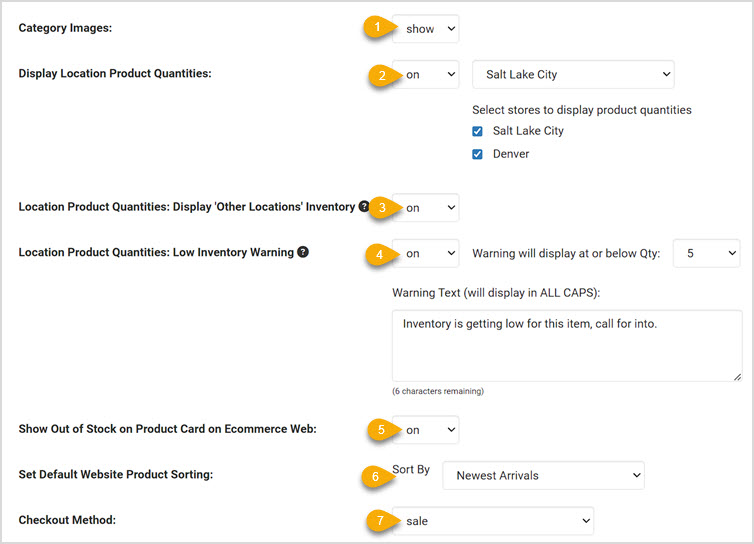
1. Category Images - If you do not want your category images to show, you can toggle this off by changing it from the default value of Show to Hide. We strongly recommend having images for each Category and Subcategory.

2. Display Location Product Quantities - If you have multiple system Locations set up, you can use this setting to let your website shoppers know which local store has what quantity available of the items they view. If you turn it on, in the drop-list you'll need to choose a Default Location the system will use if the customer hasn't set their own. You can also set which of your Locations will display quantities for your products, just check the boxes.

3. Location Product Quantities: Display 'Other Locations' Inventory - Turning this on will display inventory available from all of your non-default store locations in a single pooled total. In the example below, there is only one other location, so its inventory quantity is displayed below the quantity available at the Default Location. Customers can click to See All Locations, and will see inventory for each and can get driving directions, if needed.

4. Location Product Quantities: Low Inventory Warning - This function can give you a way to inform visitors if inventory is getting low at your locations from the setting above. If you turn it on, you're able to set the quantity at which or below the items will display the warning, and you're able to enter your own text for the warning, which will appear in ALL CAPS on the page. Space is limited, so only short messages are allowed.

5. Show Out of Stock on Product Card of eCommerce Web -  If you don't wish for your products to display an Out of Stock message in red when they reach zero inventory, you can turn that off with this setting. By default, that message will display.

6. Set Default Website Product Sorting - From this drop-list, you are able to choose between the various sorting methods whichever one you prefer to be the default for your website visitors. The default is to sort items by the Newest Arrivals, with the newest being at the top of the page.

Please Note: Your customers will be able to set this themselves and their choice will persist on all pages until they change it again, so this setting will only be for what they initially view.

7. Checkout Method - You have two options for the way checkout works for your website transactions:

  1. Sale - This will charge the customer's card at the time of web checkout.
  2. Authorization - This will authorize the funds on the card during checkout, but will not charge the card until you go into the Orders module, open the order, in the Payment Details area click to Update, and click the Capture button. This setting is preferred if you often need to adjust shipping or if you are worried about inventory accuracy.

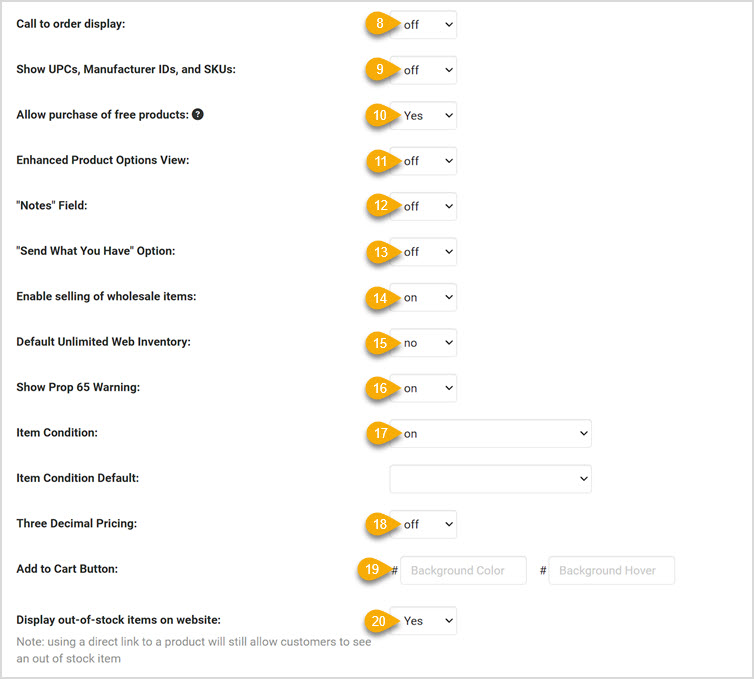
8. Call to Order Display- If this is set to ON, you will see 'or call: (your business phone number)' below the Add to Cart button. Turn it OFF if you do not wish for this to display globally for your products.

9. Show UPCs, Manufacturer IDs, and SKUs - This will display the product identifier numbers, if any, on the product detail page if turned on. If left off, customers can still search by SKU, UPC, and Manufacturer ID if they like, even if it isn't set to display.
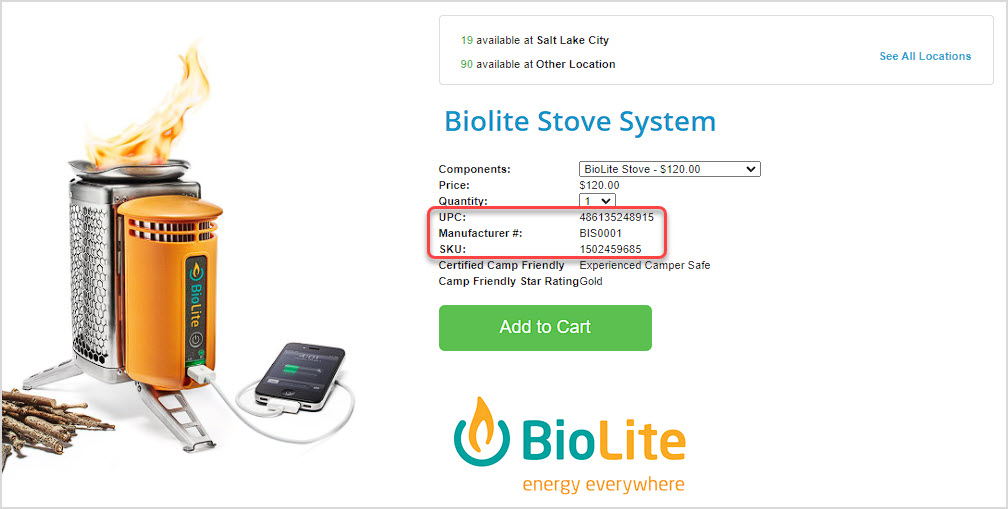
10. Allow Purchase of Free Products- Set this option to Yes if you wish to sell free products. Customers will still have to go through the full shopping cart process, but will only have to add a shipping address. If they have no shipping charges, they will be able to check out for free.

11. Enhanced Product Options View- With this option ON, your products that have options and styles such as size and color are displayed in an attractive and useful style, as pictured above. Please note that this setting works only with the Responsive system, and turning this on will no longer allow your UPCs, Manufacturer IDs, and SKU codes to display (from the setting above). Also, the Notes field and 'Send What You Have' options (see descriptions below) will not display on the page any longer, nor will any product Forms be visible (from the Advanced tab of the product).
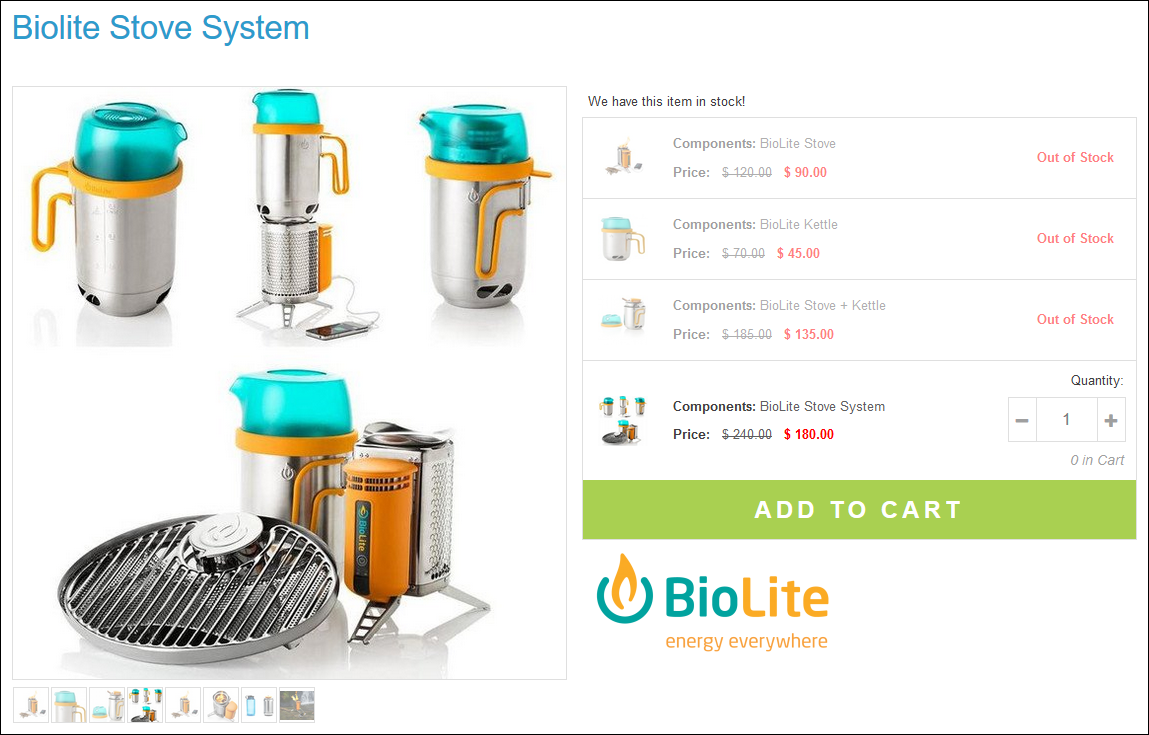
p11.png

12. Notes Field - If you turn this feature ON, customers will see a Notes field on the detail page of the product. This field can be used for them to give you feedback on needs they have for the order, or for the product in particular.

13. 'Send What You Have' Option - This offers a drop-list of options for the customer's preference on what you should do if you don't actually have the quantity they want to order. Options include Send What You Have (default), Cancel This Item, or Contact Me.
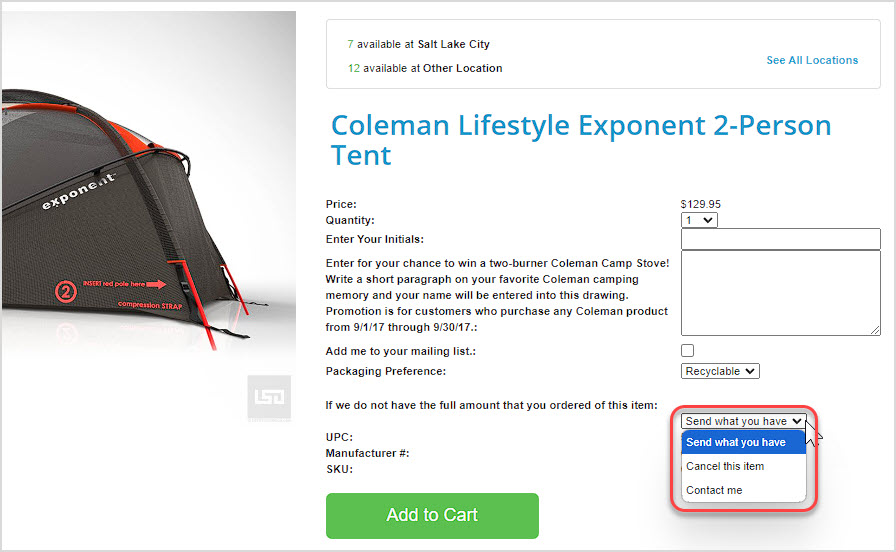
14. Enable Selling of Wholesale Items - If you wish to use the Wholesale functionality in the Products module, you can set this to On. When editing a product, you will see price and description fields for Wholesale in addition to the normal ones. Only Wholesale Members of your site who have logged in will be able to see this information; your regular visitors will only see the standard product info. Click the link to learn more about setting up Wholesale (the link will open in a new browser tab for you): Wholesale Setup: Website Setup for Member Login

15. Default Unlimited Web Inventory - If you set this to Yes, any new products that you create that are set to display and sell on the web will have unlimited inventory, no matter what actual inventory numbers you have in the system for them. This option makes sense if it is a product you make, or if your restock turnaround time is low enough to fit within a reasonable shipping period. It also works well if all of your products are Digital Downloads. Most online retailers set this to No so they are using actual on-hand inventory numbers for the web.
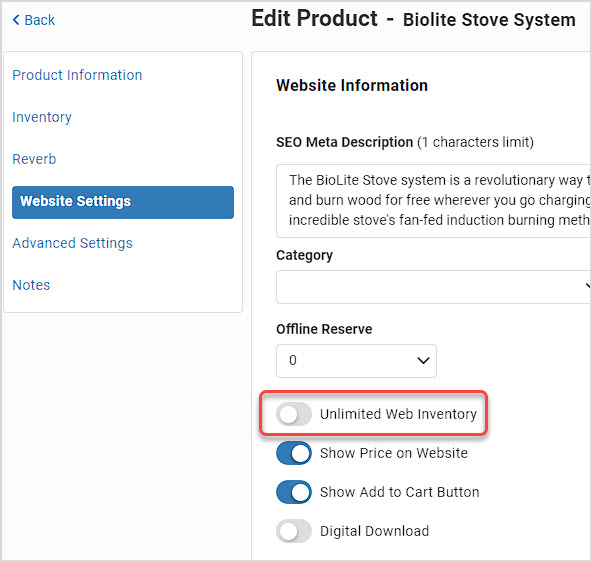
16. Item Condition- If you sell used goods online, this setting will enable an Item Condition field for you. By default, items will be listed as Brand New. Other conditions include Mint, Excellent, Very Good, Good, Fair, Poor, Non-Functioning. If you are unclear how to categorize item conditions, click here for an excellent outline from Ebay on item condition, with recommendation by product type.

17. Item Condition Default- If you sell used goods online, with this setting you can choose the default condition that any new products you create in your system will start with.
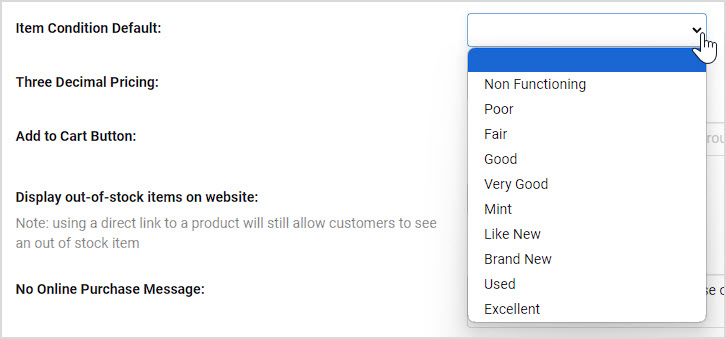
18. Three Decimal Pricing - If you need fractional cents in your prices, you can enable that by turning this setting on and your different Price fields for your products will go to three digits past the decimal point on the right.

19. Add to Cart Button - If you don't want to use the system default colors you see on your website, you can pick a Background Color and a Hover Color for the Add to Cart Button using the same hex-code for your colors. By default, you will have a green button.

20. Display Out of Stock Items on Website - If you don't want your out-of-stock items to display on your website, you can turn this setting off. Please note that anyone with a link to an out-of-stock item's page will still be able to view it even with this setting off.
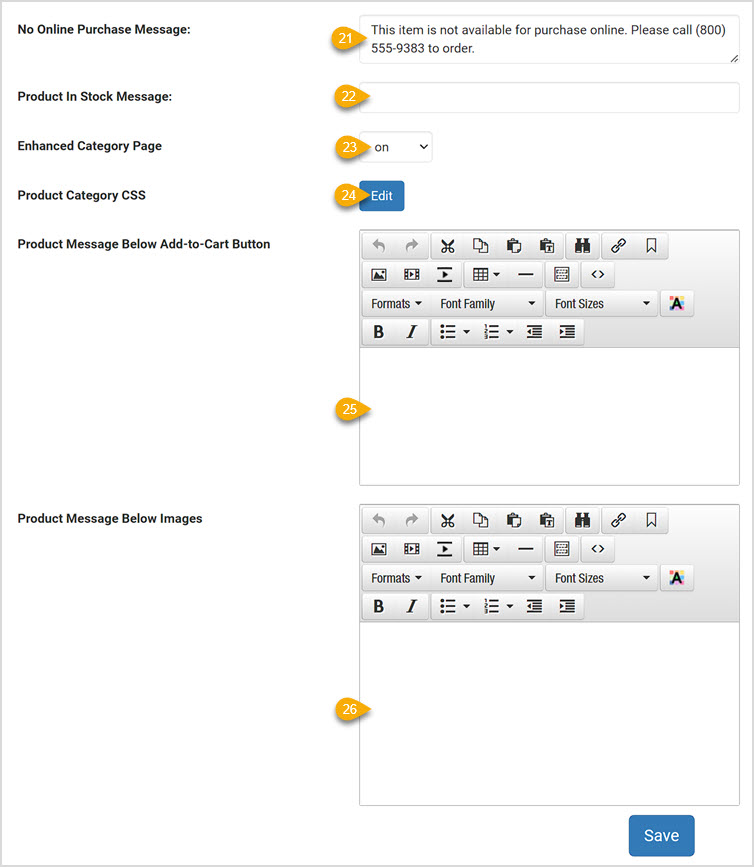
21. No Online Purchase Message - If you have a product set to be visible online but to not display the Add to Cart button, this No Online Purchase Message will display for that product, like the example below.

ps 17.png

22. Product In-Stock Message- You can enter a notice that your items are in stock or whatever text you like that will appear on each product you have in-stock, and you can change this as often as you like. So you can add promotional text, instructions on checkout, or really whatever you like that might apply to your in-stock products.

23. Enhanced Category Page - Please note, this is a non-Responsive website setting only, it will have no effect if your site is Responsive. If you have a non-Responsive website, you can turn this to On if you want your categories to display in the Responsive style. When you mouse-over a category, the image zooms a little and the title highlights in an animated fashion, as with the Shoes category below. Please note that in this view, your Category Short Descriptions will not display. Here is an example:
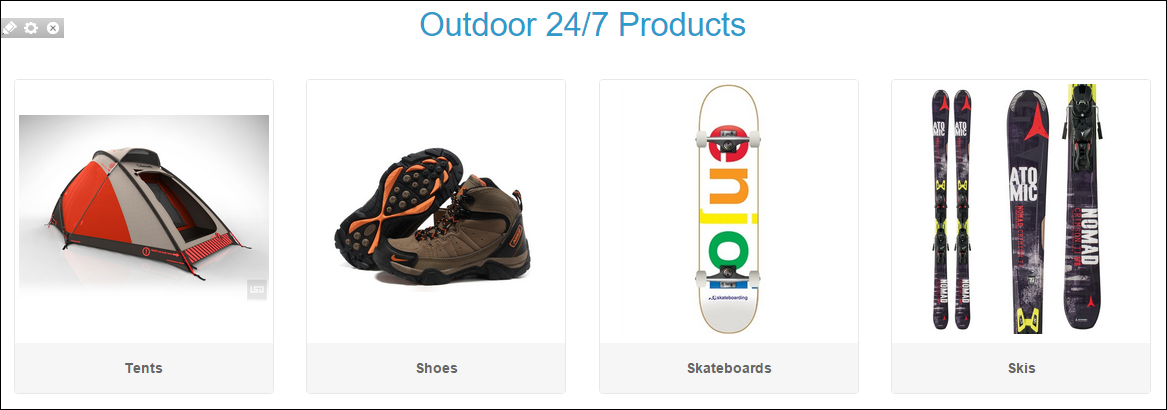
ps 06.png

24. Product Category CSS - If you want to edit the CSS styles that are set for your Products module, you can click the blue Edit button. This is for advanced users with knowledge of CSS and will work only with the Responsive websites.

25 & 26. Product Message Below Add to Cart Button and Product Message Below Images - The two areas described by these functions are often blank space on the page, so it you want to add content to these areas, you can do so using the respective Content Editors provided.

  • Please note that for the first option ( #1 below, the Product Message Below Add to Cart Button, not pictured) you have about 300px of width to work with, so create your content with care. This area is also where you can put product-specific content from the Edit Product > Website Settings > Brief Description Below Add-to-Cart Button, as pictured below with the logo.
  • If the product has multiple images, the micro-thumbnails for them will show up where you see #2 below.
  • The content in the area below the images, #3 below, will be full page width (about 1200 pixels).
  • The Product Description from the Website Settings tab of the product will display in the area indicated by #4 below.

Here is an example of where the content shows up:
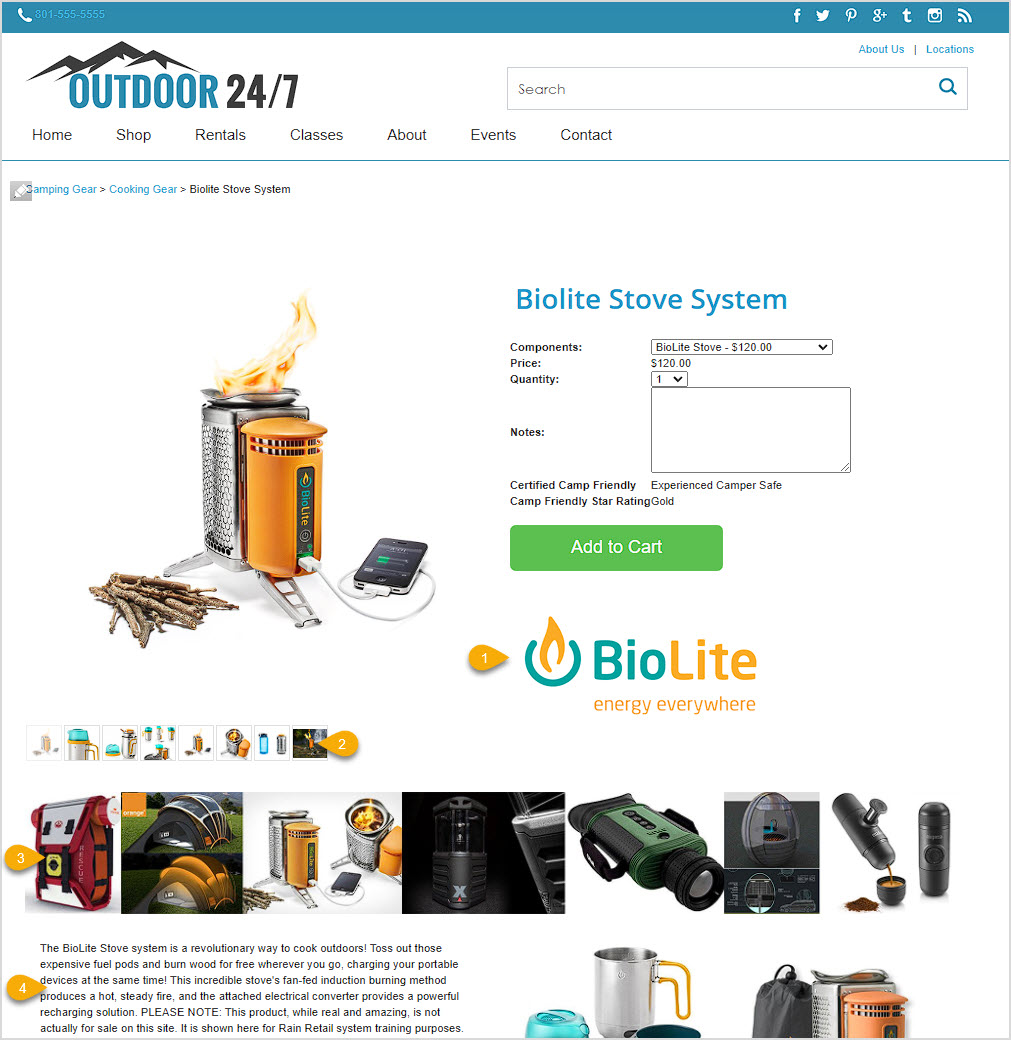
PLEASE REMEMBER that the content for #1 and #3 above will appear for EVERY product listed on your website, so it needs to apply to everything you sell. Links to policies for your online store, shipping rates, promotions you are running, and many other types of content would work well in those areas.


What if I want some of my products to NOT have weights saved in the system for use with my ShipStation integration?

While we strongly recommend having weight values in place for all items using ShipStation shipping, you can set the system to allow items with no weight values in place to ship. Doing this can result in highly inaccurate shipping rates, so please proceed with caution. After logging into Rain POS, on the far right side of the blue bar click on the gear-shaped button and go to Settings > Website Settings > Shipping. Near the top of the list of options, click the Configure button for Enable Shipping Station Integration and scroll down below the methods and packaging. You will see a check box you can click to not require items to have weights in order to work with ShipStation. Check the box, then scroll to the bottom of the panel and click Save.


What is the difference between 'customer' login and 'member' login?

If the Customer Login feature is not yet active for you, you will need to call us at 385-404-6200 and use option 2 for Support so we can activate that for you. That function is for your website customers and is different from the website Member logins, which are intended for use by wholesale customers or club members so they can have password-protected pages and pricing where needed. The Customer Login gives the customer access to their purchase history and to their Rewards. For more information on how to work with user logins, please click here: Set Up User Logins and Groups. And for more on Members, click here: Website Administration - Members

Why don't my product Short Descriptions show up anywhere in my online store?

The descriptions previously known as Short Descriptions are now called Meta Descriptions. They are not a customer-facing description: they are provided to the search engines and are used as the SEO Description for each product page. They serve  a critical role in getting your products indexed for web searches that will drive customers to your website, so offering solid Meta Descriptions of all of your products is highly recommended.


Will my website orders reduce inventory for my products automatically?

Yes, they absolutely will! Even if you have Unlimited Web Inventory active as an option for your products, the system will still track inventory quantities and reduce the inventory count with each order.


You Need a Privacy Statement on Your Website

Have a website? Check.

Doing e-Commerce? Check.

Have a privacy statement prominently posted on your site? No? If not, get one. Now.

Privacy Statement.jpg

California recently passed legislation requiring anyone collecting potentially sensitive information online to have a clear privacy statement posted on the website. They are not the only state doing so, and if you do online sales, it is likely you do business in California and other states that require a posted privacy statement.

In Rain POS, it's super easy to put up your own statement and link to it in prominent places. First, you'll need the text for your statement. The Better Business Bureau offers this free online outline of how to write a good privacy policy statement. If you want some help getting started with content that is specific to your area, Rocket Lawyer offers this great free tool. While you're at it, if you don't have an Online Terms and Conditions statement, here is a free one offered by Rocket Lawyer.


Key Questions About Privacy Policies

Is a privacy policy required by law?

Privacy Policies are Legally Required. Privacy laws around the world dictate that if you collect personal information from your website visitors, then you need to have a Privacy Policy posted to your site. Many third party services used to enhance website performance also require you to have a Privacy Policy. (Source - Thomson Reuters Legal)


Is it illegal to not have a privacy policy?

There is no general federal or state law that requires a company to have a privacy policy in all circumstances. But there are several laws that require one in some circumstances. ... The notice applies to the “nonpublic personal information” the company gathers and discloses about its consumers and customers.” (Source - Snell & Wilmer Law)


Does my state have privacy policy laws protecting me?

There is no single law regulating online privacy. Instead, a patchwork of federal and state laws apply. Some key federal laws affecting online privacy include: The Federal Trade Commission Act (FTC)[1914]– regulates unfair or deceptive commercial practices. (Source - Thomson Reuters Legal)


What do I need to know about California's new data privacy law?

The California Consumer Privacy Act (CCPA), which was signed into law in June 2018 by Governor Jerry Brown, is the first United States law following in the footsteps of GDPR. ... Additionally, the CCPA requires that the California Attorney General publish regulations between Jan. 1, 2020, and July 2, 2020. (Source - Law.com)


Is a privacy policy legally binding?

...you're required to post a legally binding Privacy Policy that informs users of the information you're collecting and that protects their personal data. ...Privacy Policy requirements of third-party services your website/app uses. (Source - FreePrivacyPolicy.com)


Does every website need a privacy policy?

Yes, the vast majority of websites need a Privacy Policy, with a few exceptions. The main exception is that you don't need a Privacy Policy if you are not collecting any personal information from website users. Personal information includes things like name, email address, and phone number. (Source - Quora)


What states have data privacy laws?

At least 31 states have already established laws regulating the secure destruction or disposal of personal information. And at least 12 states: Arkansas, California, Connecticut, Florida, Indiana, Maryland, Massachusetts, Nevada, Oregon, Rhode Island, Texas, and Utah have imposed broader data security requirements.(Source - iApp.org)