Add a Product from the Catalog
The catalog system contains many thousands of products across multiple industries, and while it is n
Enter whatever you're curious about and we'll give you a smart summary of the best answers as well as relevant articles.
 October 01, 2024
You can get to this part of the system by hovering over Inventory on the left and then clicking Bin Locations.
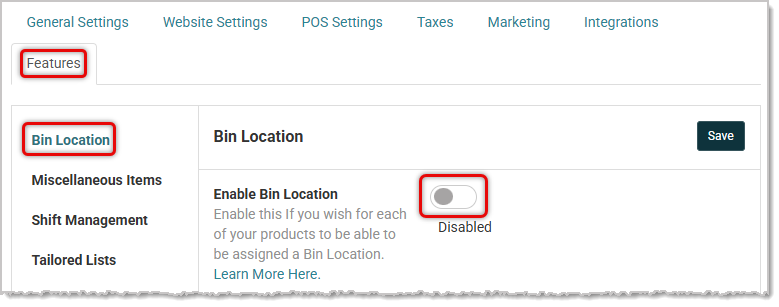
To enable Bin Locations in your system, click on the Admin Button in the upper right and go to Settings > Features > Bin Location, as pictured below. Toggle the setting to Enabled. Be sure to click Save in the upper right once you're finished.
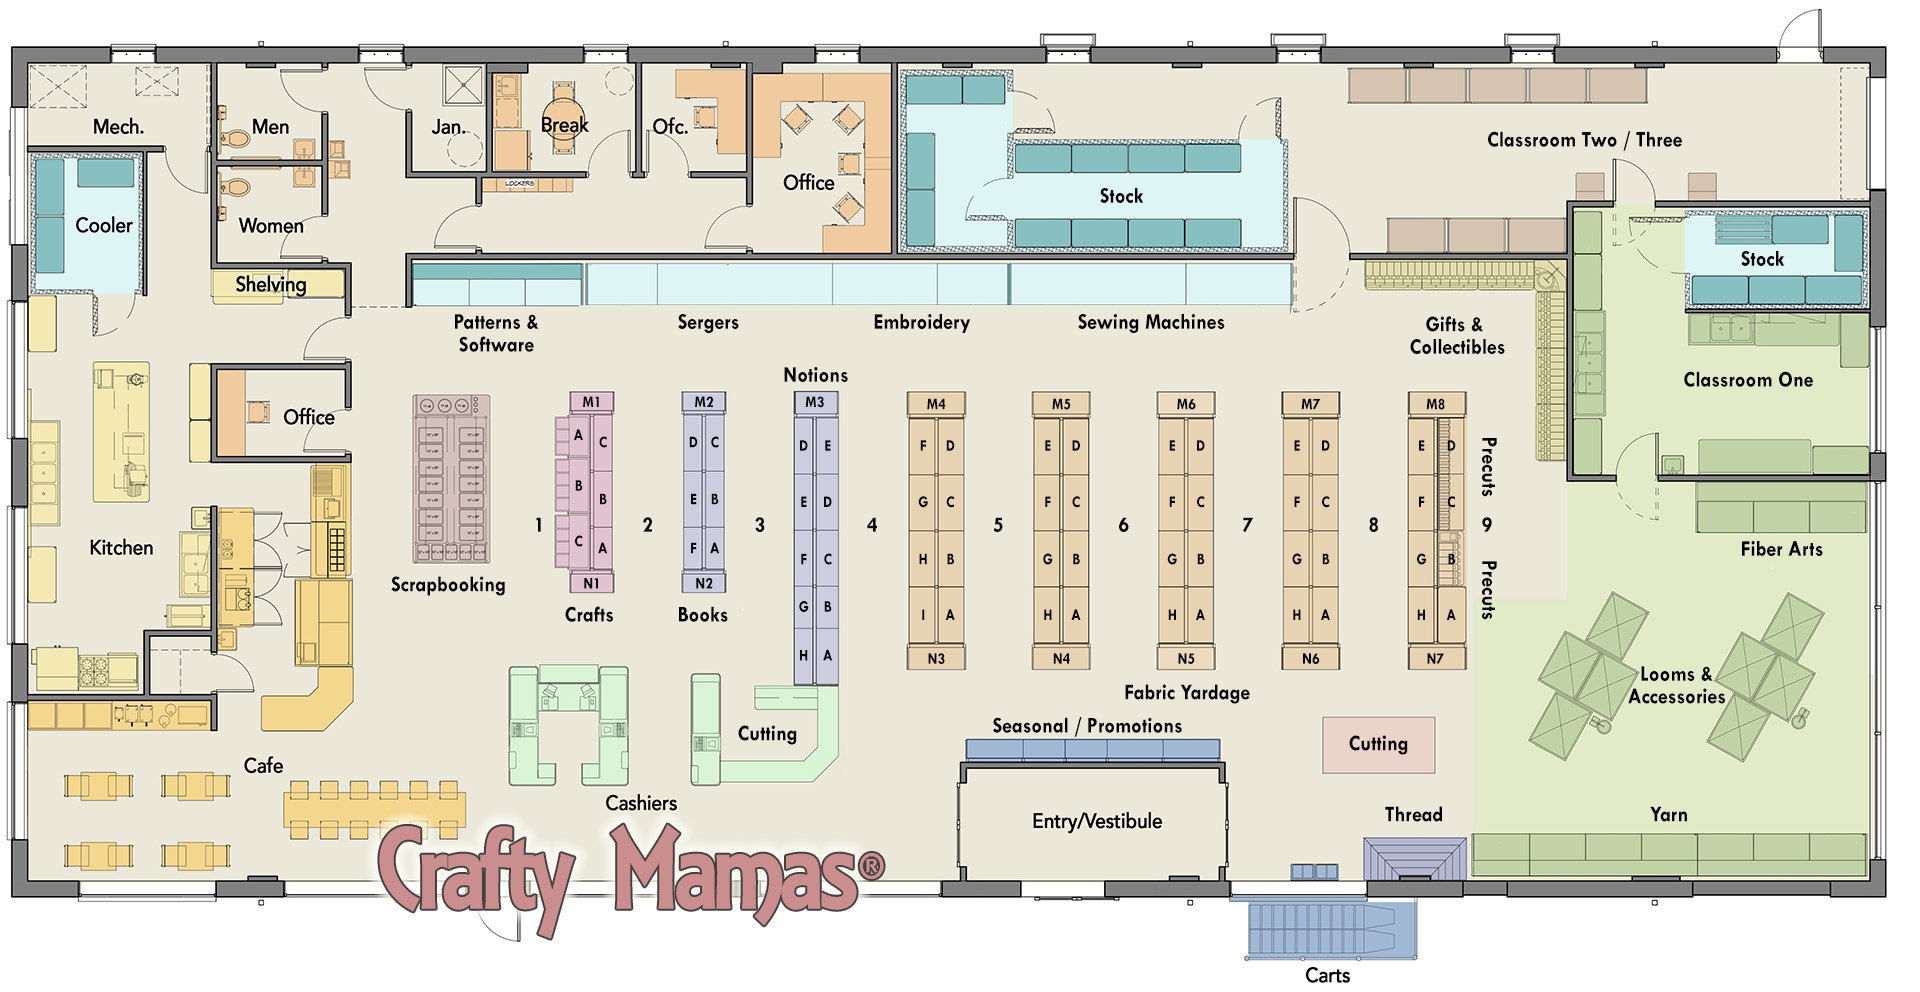
If you don't already have one, you may want a coding structure for your bin locations around your sales floor. For many retailers, these location codes can translate directly into unique SKU numbers. Most code systems center around aisle numbers, and then the shelf sections on the aisle, and then the actual shelf, rack, bin, or whatever the products actually sit on. The warehousing industry has developed this into a science, but for a specialty retailer, you can apply some principles of this kind of coding and use them to save your team dozens of hours of shelf stocking and inventory-taking time.
If you create location-based SKU numbers, you'll want to label your shelves and bins with the appropriate codes. The above example (from clearlyinventory.com) is a good illustration of what will work best in shelf labeling.
Looking at the diagram below, aisle numbers go from left to right across the store, in the normal way. Within each aisle, sections are lettered in a clockwise fashion, starting on the left, going to the end of the left-side shelf, and then over to the right hand shelf and back down and ending again on the right hand side. So if we have a pair of silver-trimmed scissors on Aisle 4, section D, they might hang from a wall rack for that section and use a code like this A4DW, or just 4DW.
So a product on that shelf might use a SKU like 4DW19SC, if it sat on the 19th peg unit on that wall and was a scissors product.
Once you have your coding structure, you can begin setting it up in the Bin Location module of . Just start with the 'first' bin in your coding structure. So in this case, we might start with the Scrapbooking table, which has twenty-four individual bins. We'll start by creating the scrapbooking table, and then we'll create each of the bins for it. Here is how to create your first Bin Location:
Let's continue our example by figuring out the different sections in Aisle one. If you look at the store layout above, Aisle One has a Scrapbooking table on the left and three sections labeled A, B, and C that go down the right side of the aisle for the Crafts section. So let's set up our bin locations for the table, first. We want the next line item under Aisle 1 to be indented as a sub-location, and since this is a top-level item, it will have automatically made one for you. So for our first sub-location item, we will create our table by entering Table into the Type area, and to represent Scrapbooking, we could put that word in the Location field, but we will use an abbreviated code instead in the ID area and enter TS to represent the scrapbooking table.
Next, let's enter all the bins on that table. If you look at the diagram, there are a bunch of them. For this example, let's just enter six. To begin, we need to create a sub-level under our Table line item that is indented so we're going down another level. To do this, we will double-click on the green arrow next to the word Table. Once we do so, we will see a line item under our Table where we can enter the first Bin.
Now we have our first bin for our scrapbooking table. Every time we enter one, a new, blank line item will appear below it for the next one, so we can repeat the steps above until we have all six bins we need. Since these are the actual containers where the products are located, we will enter Labels for them instead of IDs. For this example, they are labeled SB1 - SB6, which represents Scrapbooking Bin 1 through 6.
You may have noticed the icons on the right of each line item. The X will Delete an item. The Duplicate button that looks like two pages will make a copy and will automatically enter the next number in a series, so if you are just numbering the bins, it will always automatically go to the next number for you. For our example, we just entered the codes you see.
Save Your Work
The ? button will show you what your bin location looks like, and now is a good time to look, since we have gotten down to the final level where the products are kept. Here is what our SB6 bin location will look like in the system:
Now we can add that bin location for a product that might be sold from there. To do that, go to Inventory > Products and search for the product you want. Scroll down until you see the product identifier codes (UPC, MFG Number, and SKU), and below you will see Bin Location. Click Edit to begin.
Examples
Here are a couple of examples of small shop configurations for bins. The first example is for a small quilting and fabric shop and goes into detail on things like the front counter area with a snack rack, a knick-knack rack, and a seasonal display rack. You can also see thread racks (A thread for Aurifil and F Thread for Floriani), a pocket wall unit for patterns, Aisle 1 would be Notions, and there would undoubtedly be more aisles of fabric bolts than the one included. Also included are a table for scraps and racks for books and magazines. Please note, all text in green is entered into the Label area, and no ID fields were used in this setup.
The final example is for a ski shop, but the principle used in the setup could apply to the sale of any types of items. Aisle one is skis, several racks, Adult skis on A1 through A4, and Child skis on C1 and C2. Aisle two is snowboards, and Aisle 3 is apparel. Obviously it would need other areas for different things in the store, but this example is included to give you ideas on how you can set up your locations.
Is this page helpful?
×Help us improve our articles