Settings

Featured Articles
You can create your own data fields for your customers by clicking on the Admin button, which is you
The General Settings Tab You can get to this part of the system by clicking on the Admin button with
You can view invoices for each of your customers who has a balance by logging into the system and go
Layaways can be created from the blue Admin Toolbar at the top of the screen in Modules > Layaway
Configuring Your POS Settings In this step you will learn how to adjust the settings for your Point
You can create periodic subscription programs of any length with products you have created already b
You can get to this area if you are already logged in by clicking on the Register Icon on the left s
The POS System Register You can get to this part of the system by clicking on the Register Icon, as
Vendor Consignment Overview Some Rain POS system clients work with Vendors who allow them to sell go
The Website Settings Tab: Classes & Calendar You can get to this part of the system by clicking
The Website Settings Email Tab You can get to this part of the system by clicking on the Admin Butto
The system allows you to send a variety of notifications about website orders to your customers, and
The Rain POS system allows you to integrate special functions for Search Engine Optimization. The fi
You can get to this part of the system by clicking on the Admin Button with your username in the upp
Our latest version of the Shopping Cart comes with it's own configuration tab, and the setup in this
Understanding the Work Order Process You can get to this part of the system by hovering over Modules

All Settings Articles

Helpful Blogs

Take a look at some creative ways to level up what you do.
How To Start a Boutique Retail Store: 6-Step Guide

Lorem ipsum dolor sit amet, consectetur adipiscing elit. Ut et massa mi.

image - 2025-04-28T114828.689
How To Start a Boutique Retail Store: 6-Step Guide

Lorem ipsum dolor sit amet, consectetur adipiscing elit. Ut et massa mi.

image - 2025-04-28T114835.188
How To Start a Boutique Retail Store: 6-Step Guide

Lorem ipsum dolor sit amet, consectetur adipiscing elit. Ut et massa mi.

Buy Now, Pay Later (BNPL) Service Setup

Buy-Now-Pay-Later (BNPL) methods let customers pay in installments over time and has exploded in popularity in recent years. The store is paid immediately, in full, and customers pay nothing or a portion of the total at checkout.

According to recent studies, 56% of consumers have used BNPL services in the past, an increase of nearly 50% in the last year alone. Normally, adoption of these services can be time consuming and expensive to integrate with existing software. With Rain POS Payments, these integrations are easily available to all users with the flip of a switch.

REQUIREMENT: Payment processor must be Rain POS Payments using Stripe for processing (Adyen is not currently supported). Also, for BNPL to be an option at checkout, there must be a minimum $50 value of eligible items in the customer's shopping cart, with none of the restricted items listed below.


Restricted Items

Please note that BNPL services are intended for the purchase of products, so if any of the following items are in a customer's shopping cart, they will not see BNPL as an option for payment:

  • Invoices
  • Subscription Payments / Initial Subscription Signup
  • Short Term Rentals
  • Classes

Now available:

black_logo-transparent_bg.png

Afterpay_Badge_BlackonMint.png

Clearpay_Badge_BlackonMint.png

Klarna marketing badge (pink rgb.svg).png


Enabling Buy-Now-Pay-Later

image (5).png

To turn on one or more of these services, click the Admin button with your username in the upper right and in the menu that drops-down, go to Settings > Integrations > Rain POS. At the bottom of the page, you’ll see a Buy Now Pay Later section. Rates and information for each service is listed on this page. You can enable one or all by pressing the Yes/No button under ‘Enabled’. Once you press the button, Terms and Conditions will appear for you to sign. This must be done before any BNPL service can be enabled.

image (4).png


Receiving Funds

Funds from BNPL transactions will be paid in full with normal Rain POS Payments deposits. For example, if a customer makes a $500 purchase using 4 installments of $125 the store will get paid $500 (minus BNPL fees) on your next Rain POS Payments deposit. See Rain POS Payments: Receiving Payouts or more details on payout information.


Buy Now, Pay Later Service Providers

Affirm

Affirm gives your customers a way to split purchases over a series of payments. Depending on the purchase, they can pay with four interest-free payments (Split Pay) or pay over a longer term (Installments), which may include interest.

Click here Buy Now, Pay Later with Affirm for more details on pricing and information.


Afterpay / Clearpay

Afterpay gives your customers a way to split purchases over four installments. Your customer only pays the first installment at purchase time. Afterpay immediately pays you in full and collects the remaining installments from your customer over time.

Click here Buy Now, Pay Later Service with Afterpay / Clearpay for more details on pricing and information.


Klarna

Klarna gives customers a range of payment options during checkout. Available payment options vary depending on the customer’s billing address and the transaction amount. These payment options make it convenient for customers to purchase items in all price ranges.

Click here Buy Now, Pay Later with Klarna for more details on pricing and information.

Buy Now, Pay Later Service with Afterpay / Clearpay

Afterpay gives your customers in Australia, Canada, the United Kingdom, and the United States a way to split purchases over four installments. Your customer only pays the first installment at purchase time. Afterpay immediately pays you in full and collects the remaining installments from your customer over time.

REQUIREMENTS:

  • Your payment processor must be Rain POS Payments using Stripe for processing (Adyen is not currently supported).
  • Your inventory for items in stock must be accurate: if a customer purchases an out of stock item this way, you will have to void the order and have them remake the order without the item.


Transaction Requirements

For Affirm to display as a checkout option, a customer's shopping cart must have $50 worth of products minimum in the cart with none of the items listed below. Please note that BNPL services are intended for the purchase of products, so if any of the following items are in a customer's shopping cart, they will NOT see BNPL as an option for payment:

  • Invoices
  • Subscription Payments / Initial Subscription Signup
  • Short Term Rentals
  • Classes
  • Gift Cards
  • Digital Downloads


Enabling Afterpay

Please refer to this article Buy Now, Pay Later Service Setup to learn more about turning on/off Afterpay.


Rates & Availability

Please refer to the list below for more information on rates and country availability:

  • Australia: 5.99% + $0.30 AUS
  • Canada: 5.99% + $0.30 CAD
  • United Kingdom: 5.99% + $0.30 GBP
  • United States: 5.99% + $0.30 USD


Restricted Business Types

  • Alcohol
  • Digital Games and Apps
  • Donations
  • Electronics
  • Flash Sales
  • Pre-Orders
  • Travel


Refunds

You can refund Afterpay charges up to 180 days after the original payment.


Disputes and Fraud

Afterpay covers disputes driven by consumer fraud or inability to repay installments.

If a customer claims that you didn’t deliver the relevant goods as expected, Afterpay may send you an email to request additional information. If Afterpay receives a large volume of customer complaints, these disputes may turn into chargebacks, with funds withdrawn from your Stripe account.

Buy Now, Pay Later with Affirm

black_logo-transparent_bg.png

Affirm gives your customers a way to split purchases over a series of payments. Depending on the purchase, they can pay with four interest-free payments (Split Pay) or pay over a longer term (Installments), which may include interest.

REQUIREMENTS:

  • Your payment processor must be Rain POS Payments.
  • Your inventory for items in stock must be accurate: if a customer purchases an out of stock item this way, you will have to void the order and have them remake the order without the item.


Transaction Requirements

For Affirm to display as a checkout option, a customer's shopping cart must have $50 worth of products minimum in the cart with none of the items listed below. Please note that BNPL services are intended for the purchase of products, so if any of the following items are in a customer's shopping cart, they will NOT see BNPL as an option for payment:

  • Invoices
  • Subscription Payments / Initial Subscription Signup
  • Short Term Rentals
  • Classes
  • Gift Cards
  • Digital Downloads


Enabling Affirm

Please refer to this article Buy Now, Pay Later Service Setup to learn more about turning service with Affirm on or off.


Rates & Country Availability

Please refer to the list below for more information on rates and availability:

  • United States: 5.99% + $0.30 USD


Restricted Business Types

  • Boat Dealers
  • Business to Business Services
  • Car Dealerships
  • Contractors, Including Special Trade Contractors
  • Employment Agencies, Including Temporary Help Services
  • Healthcare Services (including, but not limited to, ambulance services, medical, hospitals, dental, nursing homes, laboratories)
  • Higher Education Services
  • Professional Services (including, but not limited to, legal, consulting, accounting)
  • Snowmobile Dealers
  • Stenographic and Secretarial Support Services


Refunds

You can refund Affirm transactions for up to 120 days after the original purchase.


Disputes and Fraud

If your customer initiates a dispute through Affirm and you can’t resolve it, the dispute process works like this:

  • We might email you to request additional information.
  • We work with Affirm on resolving the dispute.

If Affirm receives a large volume of customer disputes, they can turn into chargebacks, with funds withdrawn from your Payments account.

Affirm covers disputes driven by customer fraud or their inability to make payments. In cases of customer fraud, we work with you and Affirm to minimize the loss. Comply promptly with any requests from Rain POS Payments to stop shipment or cancel the transaction.

Buy Now, Pay Later with Klarna

Klarna marketing badge (pink rgb.svg).png

Klarna gives customers a range of payment options during checkout. Available payment options vary depending on the customer’s billing address and the transaction amount. These payment options make it convenient for customers to purchase items in all price ranges.


Klarna Integration Temporarily Down

Our integration with Klarna has not been working properly and we are working with Stripe to get it up and running. If you have enabled Buy-Now, Pay-Later integration with Klarna, once we have it fixed, it will become active and will be a visible option for payment for your customers automatically. If you are interested in integrating with Klarna, that option will be available if you use Rain POS Payments for website payment processing as soon as we have this fixed. Sorry for the inconvenience. Our other integrations with Affirm and Afterpay are both working properly.

REQUIREMENTS:

  • Your payment processor must be Rain POS Payments using Stripe for processing (Adyen is not currently supported).
  • Your inventory for items in stock must be accurate: if a customer purchases an out of stock item this way, you will have to void the order and have them remake the order without the item.


Transaction Requirements

For Klarna to display as a checkout option, a customer's shopping cart must have items ranging from $1 in value up to $2,000 maximum in the cart with none of the items listed below. Please note that BNPL services are intended for the purchase of products, so if any of the following items are in a customer's shopping cart, they will NOT see BNPL as an option for payment:

  • Invoices
  • Subscription Payments / Initial Subscription Signup
  • Short Term Rentals
  • Classes
  • Gift Cards
  • Digital Downloads


Enabling Klarna

Go to the Admin Button with your username in the upper right and click Beta Features. Find BNPL Klarna in the list and toggle it to Yes, then at the bottom click Save. Next, also under your Admin Button, go to Settings > Integrations > Rain POS. In the section near the bottom for Buy Now Pay Later find Klarna and toggle it to Yes. A page will open that will show you the merchant terms for using the Klarna BNPL service, and after you agree, your customers will have that option available at checkout if they're not purchasing any of the restricted items above.


Rates & Availability

Please refer to the list below for more information on rates and country availability:

  • United Kingdom: 5.99% + $0.30 GBP
  • United States: 5.99% + $0.30 USD


Restricted Business Types

  • Charities
  • Political Organizations, Parties, or Initiatives


Refunds

You can refund Klarna charges up to 180 days after the payment completes.


Disputes and Fraud

Klarna covers disputes driven by customer fraud or inability to repay installments provided you follow Klarna’s shipping policy. Merchants aren’t involved in these disputes.

If a customer claims that you didn’t deliver the relevant goods as expected, Klarna may send you an email to request additional information to help resolve the claim. You must submit the requested information within 14 days. If Klarna rules in favor of the customer, they may initiate a dispute, with funds withdrawn from your Rain POS Payments account. Klarna dispute decisions are final—they have no appeal process.

Can I set the font typeface for my Calendar in the Settings somewhere?

Your Calendar module will use the same typeface that is your default for your website headings and body content. If you have questions or want to explore the possibility of making it a different typeface, please call us at 385-404-6200 and use option 2 for Support, and we will be happy to assist you.


Catalog Products with Options from Notions Marketing

If you have Notions Marketing as one of your product Vendors, you can now add products from their catalog along with all options (colors and styles) all at once!

To enable this functionality, at present you will need to click on the Admin Button with your username in the upper right and go to Setting s > Integrations > Vendors and find Notions Marketing. Toggle the integration to Yes and then Save.

You use this anywhere you see the Catalog, so whether you're just creating one product as in the video demo, or whether you're on the main Products page bulk-adding products from the Catalog, as long as you are using Notions Marketing as the vendor, the options will be there for you to add.

Catalog Options.png


How the Process Works

  1. Go to Inventory > New Product.
  2. In the Catalog Search field near the top, enter a keyword for the product family you want to add.
  3. Click on the Filters in the upper right and scroll down to Notions Marketing, check the box.
  4. Find the product you want, the number of Available Styles is noted at the bottom of each listing, and click on the one you wantBe careful to click only once: the system needs time to complete the request, and will need more time for larger numbers of options.
  5. The Add Options panel will open, and you can edit the Title of the style family, also you can make adjustments to any of the option Value names, if you like.
  6. Click to Save, and be sure to save the product as well at the very bottom once you're done adding data.

add options.png


Coupon and Discount Stacking in the Register and Website

Offer your customers the best possible savings with the Coupon & Discount Stacking feature while you maintain control over the way your discounts work! This feature lets you manage how multiple coupons and discounts can be applied when selling face to face in the Register and when selling through your website. Take a look!


Stacking Coupons and Discounts in the Register

To begin configuring how you want your coupons and discounts to work in the Register, click the Admin Button in the upper right that has your username and go to Settings > POS Settings. The General tab will open for you and you can find the Coupons & Discounts section near the bottom.

You have a several options for how multiple discounts and/or coupons can be applied in the Register.

  • The primary setting for Coupon & Discount Stacking will apply by default to individual line-item discounts, transaction-based discounts that cover all eligible items in the transaction, and coupon codes used in the Register that can be applied to individual products or entire departments, or to all items, depending on how the coupon is configured. Here are the options for Stacking:
    • Apply Highest Saving - This setting is the default and will apply only one discount: whichever one offers the greatest discounted amount.
    • Apply All - This will combine all added discounts and coupons and can result in very large (up to 100% off) discounts, depending on how many are added.
  • You can turn off the Line Item Discounts if you don't want to allow specific discounts on individual line items. By default this is on.

  • For the Discount Override for Non-Discountable Items setting, it applies to line-items in the Register. If you check the box for this setting, it will not allow items to be discounted if they are set to not allow discounts in the Product, Service, or Class, or at the Department level. Normally in the Register users can override such settings if needed. If the above setting for Line Item Discounts is disabled, this option is grayed out.

  • If you sell services through your Register, you can choose to Apply Transaction Discounts to Services if you wish for those to be discountable. This applies only to line-item services added manually to the Register.

  • You can Apply Transaction Discounts to Purchased Gift Cards if you wish. Be aware, discounting the original card purchase might be 'double-dipping' by also allowing items purchased with the Gift Card to be discounted as well. Most stores leave this setting off.

  • The Disable Coupons & Discounts for Sale Price Items is a setting for which many of our clients have asked. If you check the box for this setting, items with an active Sale Price will not be discounted, even if they would normally be eligible.

When working with discounts and coupons in the Register, you can see a breakdown of all that have been applied or you can manually adjust discounts by clicking on the Discount link in the register sidebar, as pictured here:


Stacking Coupons on Your Website

For your website, your customers can get discounts via coupons you offer, and there is a settings area that allows you to configure how that works. Click on the Admin Button with your username in the upper left of the system and go to Settings > Website Settings > Shopping Cart. Scroll down the page until you see the section for Coupons like the one pictured below.

You have a couple of options for how multiple coupons can be applied in the website for your customers:

  • The primary setting for Coupon Stacking will apply to all active coupon codes that might be added at checkout by a customer. Here are the options for Stacking:
    • Apply Highest Saving - This setting is the default and will apply only one coupon code discount: whichever one offers the greatest discounted amount.
    • Apply All - This will combine all added coupons and can result in very large (up to 100% off) discounts, depending on how many are added.
  • The Disable Coupons Sale Price Items is a setting for which many of our clients have asked. If you check the box for this setting, items with an active Sale Price will not be discounted, even if they would normally be eligible.


Customizing Work Order Text Messaging

The work order text messaging feature allows users to customize text messages sent to customers regarding their work orders. This includes customizing the default message sent when orders are ready for pickup as well as customizing the signature appended to messages for each store location, if you have multiple stores.


Customize Your Text Signatures

  1. Click the Admin Button with your username in the upper right and go to Settings > POS Settings > Work Orders.

  2. Scroll down to the Signature section.

  3. Click the dropdown and choose Custom Signature.

    • Enter the custom signature you want in the field to the right.
    • Click Save at the bottom.


Ready for Pickup Notification

In the same area of Settings, you can configure the default message content that will be sent whenever a Work Order is ready to be picked up. In the section for Default Message for Notifying Customer, the system default message will be in place. You can edit the content, and if you want, you can add automated merging of the Customer's first name and the Work Order ID, as pictured below. Once you're done configuring the message, click to Save.

Please note, if you have also customized the signatures as described above, the text message notifications will have those custom signatures so the customer will know which location to go to.

In the Work Order, you will see the message when the system prompts you to notify the customer about pickup.

When you change the Status of a Work Order to Ready for Pickup and click to Save the Work Order, a window appears with a text message box and signature.

The Message Content will populate the default message you have saved in the settings, as described above, and will also include your customized signature, as pictured below.


Do's and Don'ts of Quickbooks

QuickBooks Desktop for Windows is the only supported option right now.

We also integrate with Quickbooks Online, but for the QB Desktop integration, we do not integrate with the version for Mac at this time (this is because the Intuit QB Connector app does not support Mac).

How to Set Up Your QuickBooks Connector Step One: Sales Taxes.


We DO Export

- Transaction Data (Sales Receipts, Accounts Receivable, Taxes, Shipping, Gift Cards, etc)

- Cost of Goods Sold (we DO support splitting COGS by departments)

- Income (currently lumped together as a single total)

- Vendor Bills (we only do this for Completed ROs)


We DON'T Export

- Full Inventory Value or Product Inventory Edits

- Customers (no individualized data by customer name, everything is lumped under one customer record)

- Accounts Receivable Edits (we only export when it deals with a transaction, not customer profile edits)


Financial Flow of a Web Order Through the System and into Quickbooks

As transactions come through your website shopping cart and post in your Orders module, the system is working with important data in several areas that will eventually show up in Quickbooks, if you use our integration.

First, the transaction is posted to your Orders module and you are notified that you have unseen orders that need your attention by the warning flag in the upper right of the system:

warning.jpg

You can either click on the Bell icon or go to Orders on the left to view your new orders. Once we find an order to use as an example, it looks like this:

financial flow.jpg

The sales data from this transaction and others like it that happened during the same day are tallied and displayed in Rain POS and show important number such as Taxable Sales, Non-Taxable Sales, Tender Types, Adjusted Inventory, Tax, Shipping, Sales by Department, Cost of Goods Sold, and other key data elements.

reporting.jpg

The following morning, you can batch upload all sales data to your Quickbooks via the integration interface. If you want to map your revenues to different Departments so you can see that breakdown in Quickbooks as well, that is an option, but you will always be able to see Departmental totals in your system reports, so unless your accounting department needs to see it, you don't need to take that step.

export.jpg

Now your data for that day is available in Quickbooks. Here is how it appears. In this first view, you are able to see each transaction for the day as a line item that includes the payment method used and the amount.

customer receipt.png

In your Quickbooks reports you're able to see total amounts for Sales Tax Payable and Merchandise Sales for whatever period you need to view:

transaction breakdown in qb.png

You are also able to view discounted amounts and see how they affect your totals:

day's sales receipts.png


How can I set password-protected pages for my website members?

After logging into the system, you will click on the Admin button with your username in the upper right and go to Users > Restricted Pages. If that feature is not yet active for you, you will need to call us at 385-404-6200 and use option 2 for Support so we can activate that for you. That function will allow for password-protected pages and pricing where needed. For more information on how to work with Member logins, please click here: Website Administration - Members.


How do I adjust the colors and font size of my Calendar?

Once you have logged into Rain POS as an Administrator, click the Admin Button with your username in the upper right . In the drop-list, click on Settings > Website Settings. In the first tab that comes up, Calendar & Classes, you will be able to adjust colors in several areas and the font size as well. For more information, click here: Website Settings: Calendar & Classes.

How do I create new Tills for my Point of Sale Register?

If you have a service package that includes the Point of Sale, you can have up to two Tills set up for your system. These will be set up for you by your Customer Success Manager, and that person can do so at any time for you. If they have not yet set them up for you, reach out through the contact information they provided you during your initial consultation, this will include their direct phone line and email address, and they can set your Tills up for you.

If you are already live and using your Point of Sale system and just need another Till added, there is an additional cost for that for each Till over your initial two, and we can enable that for you if you call our Support team at 385-404-6200.

How do I enable free shipping for my ShipStation integration for orders over a certain amount?

After logging into the system, in the upper right click on the Admin Button with your username and go to Settings > Website Settings > Shipping. Near the top of the list of options, click the Configure button for Enable Shipping Station Integration and scroll down below the methods and packaging. You will see an option to set Free Shipping and you can enter the amount. Orders that are at or over that amount will have free shipping. You can also set which shipping method your free shipping will use. Be sure to click the Save button at the bottom of the panel, and you're all set. If you do not see the functionality described here, please call us at 385-404-6200 and use option 2 for Support or email us at support@rainpos.com and we'll be happy to activate it for you.


How do I get my SKU, UPC, and Manufacturer IDs for my products to display on their web pages?

There is an option in the system settings that will let you display product identifier numbers for each product. Once you have logged into Rain POS, in the upper right, click on the Admin Button with your username. In the drop-list, click on Settings > Website Settings > Products, you will see a setting for Show UPCs, Manufacturer IDs, and SKUs a short way down the list. Change the setting to On, then scroll to the bottom of the page and click Save. Please note that even with this set to Off, all product identifier codes are fully searchable on the website for your visitors and for you on the administrative side.


How do I offer different shipping levels, such as economy, priority, next-day, etc?

After logging into the system, in the upper right click on the Admin Button with your username and go to Settings > Website Settings > Shipping. Click to Configure your shipping methods, and in the panel that comes up, click to +Add Domestic Shipping Method. If you look at the Shipping Method Name, you can make your first rate based on one of the types you see there. Create separate Methods for each of the different types you need. For more information on how to work with that part of the system, click here: How to Set Up Shipping Methods.

How do I print labels for my ShipStation integration from the system?

You will print your shipping labels in Rain POS under the Orders area. Click to open the transaction you want, then click the Update button in the Shipping area. You will see a button to Print Shipping Label for orders in which ShipStation shipping methods were used. For more information on how to set up and work with ShipStation, click here: Configuring Your Shipping Settings

How do I provide terms and conditions for my web transactions and require my customers to agree with them before finalizing the purchase?

You can add custom text for your Terms and Conditions in the website settings. After logging into Rain POS, in the upper right click on the Admin Button with your username and go to Settings > Website Settings > Shopping Cart and in the Checkout Options area, you can set Terms and Conditions to ON, and then click Edit to upload your text. Be sure to click Save at the bottom of the page if you make any changes in this area.


How do I sell free products through my online store?

There is an option in the system settings that will let you sell free products and class registrations through your website shopping cart. After logging into Rain POS, in the upper right click on the Admin Button with your username and go to Settings > Website Settings > Products, you will see a setting for Allow Purchase of Free Products a short way down the list. Change the setting to Yes, then scroll to the bottom of the page and click Save. Any product with the Price field set to 0.00 will be able to be purchased at no cost through your shopping cart.

How do I set in-store pickup and curbside pickup for specific locations of my stores?

After logging into the system, in the upper right click on the Admin Button with your username and go to Settings > Website Settings > Shipping. Near the bottom of the list of options, set Enable In-Store Pickup to ON, if you like, and then click Configure to set the Location(s) at which you want to offer store pickup. For this panel, you do not need to click a Save button. You can similarly set location-specific Curbside Pickup for your web orders.


How do I set my From email address for emails the system sends out?

After logging into the system, in the upper right click on the Admin Button with your username and go to Settings > Website Settings > Website Settings > Email, and you will see a field to enter your From Email Address. Please note the warning on the page about not using an email address provided by one of the big free email providers, such as AOL, Hotmail, Gmail, Yahoo, etc. The reason such email addresses will not work for this system is because that spammers use email addresses like that to send bulk emails out at little risk to themselves. So bulk email provider services have trouble sending messages with From email addresses like that, so in the system, we do not allow them.


How do I set shipping rates for individual items?

We do not have a way to set a specific amount to charge for shipping per product, but you can have the product's weight determine how much is charged. Start by looking at your shipping settings. After logging into Rain POS, in the upper right click on the Admin Button with your username and go to Settings > Website Settings > Shipping, and click to Configure your shipping methods. Check the box for the method you want to work with and click to Edit, or if you don't yet have a shipping method, click the green +Add Domestic Shipping Method button to create a new one. After you set the Region, currency, method name, and delivery time, in the 'Based On' area, you will need to select Weight. Each of your products can be set to have whatever weight it might need in order to charge enough shipping to cover the item. If you don't have weight values in place for your products, you will need to enter them, and they go in as decimal values of pounds (or kilograms, if that is the system you use), so an item that weighs 24-ounces will go in as 1.5 in the weight field for the product. Be sure to click Save at the bottom after you're finished adjusting your rates.

How do I set the email address where I want my website order notifications to go?

After logging into the system, in the upper right click on the Admin Button with your username and go to Settings > Website Settings > Shopping Cart and and enter the email address you want in the Order Notifications Email field, then scroll to the bottom of the page and click Save.


How do I set up my products so Members can get special pricing?

If you do wholesale pricing or other special pricing for your Members and you do not yet see a place in your products to add Wholesale Price, please call us at 385-404-6200 and use option 2 for Support and we can activate that for you if you have our Website Plus or greater service package. For more information on how to set up for Wholesale Pricing and membership, please click here: Website Administration - Members.


How do I set up the place where Members log into the website?

The Member login link can be in your Navigation menu, or just somewhere on your Home page, but it is recommended to make it highly visible. That link will need to go to a password-protected page, and you can set those in the Users area of your settings. After logging into the system, in the upper right click on the Admin Button with your username and go to Users > Restricted Pages. If that feature is not yet active for you, you will need to call us at 385-404-6200 and use option 2 for Support so we can activate that for you. That function will allow for password-protected pages and pricing where needed. After you've set the restricted page(s) you want, you can create the link to the page in the normal way. For more information please click here for how to do Wholesale Setup: Website Setup for Member Login.


How do I set up which carriers and packaging I will use for my ShipStation integration?

You will configure your Carriers and Packaging options within your ShipStation account first, then you'll select the ones you want to use in your Settings in Rain POS. To configure what you need in Rain POS, after logging into Rain POS, in the upper right click on the Admin Button with your username and go to Settings > Website Settings > Shipping. Near the top of the list of options, click the Configure button for the Enable Shipping Station Integration option and check the boxes for the options you want. Be sure to click Save in the ShipStation panel once you're finished.


How does a new website Member get their login info?

You will need to set up a new Member Account in the system for each of your website Members (e.g. wholesale, club, anyone that needs password-protected content and pricing that is not available to the public). After you create their accounts, it's best for you to send them an email with a link to log into the site (just link to a password-protected page) and their login information. We recommend that under the Admin Button with your username Users > Members, you set up each of your Members with a username that is the email address you have for them, and set the password initially to 'changeme'.

You can create a standard email to send to a new member after you have this set up for them, and in the email just tell them to use their email address as their username and that their temporary password is 'changeme', and that they'll be prompted to create their own password. If any of your members forget their password, just reset it to changeme and tell them to log in with that, and once again they'll be prompted to set it to what they want. For more details on this process, click here: Website Administration - Members.


How to Enter Tiered Taxes

Tiered taxes allows you to set up different tax rates based on the total transaction amount. This would be pertinent, for example, if a normal tax rate is 7% but changes to 7.7% once an order is over $3,000.

To begin your tiered tax setup go to the Gear icon in the top right-hand corner and choose the Settings option. From there click on the POS Settings tab and then Taxes.

tt 1.png

This page will display your normal tax rates for both in-store and online sales. To create the tiered tax jurisdiction click on the white ‘Add Jurisdiction’ button. A window will appear on the side allowing you to add a new tax jurisdiction; to make it tiered you simply need to check the ‘Limit price range where tax is applied’ box and you will see two additional text fields appear. Add in the appropriate minimum price & maximum price and the adjusted tax rate that should be applied. For multiple jurisdictions make sure the rates do not overlap and have both a start and end amount ($500.00 - $999.99, $1,000.00 – $2,999.99). It’s vital that you also include the cents so all transactions can be accounted for. For single jurisdictions that extend from a dollar amount onward ($3,000 +) this can be accomplished by setting the minimum price as the amount you want and the maximum price upwards of 1,000,000. Since the system requires an amount to be entered you must enter a specific dollar value.

Please Note: No dollar sign or special characters should be entered in either of the price fields.

tt 2.jpg

After you have all the information entered press ‘Add’ to save it for your settings. You do not need to press Save for it to apply. After these records are entered you will see the new jurisdictions automatically have applied to all available tills (for POS only). If you would like to alter or remove these rates simply edit the appropriate fields and hit ‘Save’.

For more detail on setting up your taxes, including a more in-depth three tier example, click here for the article on setting up taxes and tills: Point of Sale Settings: Taxes.

If you have questions or need help with setup on any part of your Classes, including the tax rate, please give us a call at 385-404-6200.


How to Run a Daily Quickbooks Export

You can get to this part of the system by clicking on the gear-shaped button on the right side of our blue Admin Toolbar, click Settings, then click POS Settings > QB Connect.


Export Daily Data with the QuickBooks Connector

Once you have the connector set up, with Quickbooks itself open and running, go to the Admin button with your username Settings > POS Settings > QB Connect, and click to open the QB Connect Settings. Click on Quickbooks, the first tab that comes up will be the one you need: Export.

2018-10-19_10-43-18.png

Each time you run the Export, you will be exporting a single day's data only. In the Days Back field,  the number you see applies to how many days back from today you want to choose dates from for when you run the Export. For example, the default value of 1 represents 1 day back, so you would be able to export data for yesterday. If you need to run an Export for today, that would be 0. The dates will show up in a drop-list after you click Save to set the range.

Here are some specifics on what the types of data are that can be selected for Export:

1. Export Sales Summaries - Compiles all Cash and Credit transactions into two separate lump totals in Quickbooks. One sales receipt line item for each tender type. Checks and everything else that isn’t Cash or Credit will export to QB as separate line items.

2. Cost of Goods Sold by Department - Advanced functionality that allows the customer to map COGS accounts in QB to Departments and push the COGS to those mapped accounts. Most of our clients to not go to this level of detail because it's not really necessary. Reporting in the system breaks all revenue and asset data down by Department, as needed.

3. Vendor Billing Tracking - Creates bills for vendors within Quickbooks solely based on completed Receiving Orders in the system.

4. Customer Balance Tracking - Our integration with Quickbooks does not currently support the transfer of this data, so there is no reason to export this at this time. We do plan to develop this in the future. Liability totals are exported as part of the sales summaries, so you will have the overall numbers. Enabling this feature will cause errors and other issues to occur with the integration.

5. Class Tracking by Store Location - If you have multiple Locations in our system, and if you've done the setup for location Classes in Quickbooks and the system in the previous steps, check this box so data will export properly for the different Locations. If you have only a single Location in the system, leave this unchecked. If you're not sure if this applies to you or not, go to the gear-shaped button in the upper right and click on Settings. Scroll down through your company information. If there is only one location set in there, you do not have multiple system Locations.

6. Reset Days Transactions - If something changes about a day's data you have already exported (e.g. if you have to do a post-dated transaction, etc.). To update, first you need to clear the data for the day(s) in question, and then you can run the update again and get the full and current data loaded that way. When used this causes all data for the specified day to export to QuickBooks. This can cause duplicate data to exist in QuickBooks if data from that day still exists within QuickBooks.

A Note about Dates - As you begin your Exports, you'll notice that you're building a list of dates that have been updated. Some of these dates may display an asterisk, and that means that the data was successfully sent over to Quickbooks. If you see a day with an asterisk that needs to be sent to QuickBooks again, you can use the Reset Days Transactions checkbox to send the data over again.

To run the update, make sure the Days Back has a large enough number to go back to the date you want to Export. After you have set the data checkboxes for the options you want, click the Save button. You'll be taken back to the starting screen for this part of the settings, so click on Quickbooks again, and you'll be back to the Export tab.

Click the Export Transactions button, and the export will run. It is recommended to run the Export each day for the previous day's data.

You can Export as many days as you need to, you just have to do one at a time in this way. The Connector will update all such Exports you send it when you run the Update Selected.

You're all set!


QuickBooksConnect2017-Brand_Phase-FULL_white-1.png


I changed some settings for my classes / calendar but they didn't go in, what am I missing?

After you have made changes to most all of the Settings pages in the system, be sure to scroll to the bottom of the page and click the Save button, or those changes will not go into effect.


I don't see the option to add Wait Lists for my Classes, how do I add that?

Once you have logged into the system as an Administrator, in the upper right you'll see the Admin Button with your username. In the drop-list, click on Settings > Website Settings, and in the first tab that comes up (Calendar & Classes), scroll down to the second section and you can check the box for Add to Waitlist in the area for Class settings. Be sure to click Save at the bottom if you made any changes.

Once you have enabled that option, in each class in the Pricing tab you will have the ability to activate a Wait List for the class. Any students that add their names to the Wait List for classes that are fully booked will appear under Reports > Wait Lists.


I don't want products to display on my website if they are out of stock, is there a way to automatically take them down when they reach zero inventory?

You can set your products to 'hide' so they are no longer visible on your website by enabling that option in your system settings. Once you are logged into the system, click on the Admin Button with your username in the upper right and go to Settings > Website Settings > Products and you'll see the option for Display Out-of-Stock Items on Website not far from the bottom of the list. Set it to No, and then scroll to the bottom of the page and click Save.

When a product is at 0 inventory, it will no longer display on the website. Please note that it does not actually go into a Deactivated state, it is simply not going to be visible online at that point. Once a product has inventory again, it will automatically reappear.


I have a blank area below my Add to Cart buttons for my products, how do I add content there?

If you wish to add universal content below your Add to Cart buttons that will appear on every product you sell, follow these steps:

Once you have logged into Rain POS, in the upper right click on the Admin Button with your username. In the drop-list, click on Settings > Website Settings > Products, you will see a setting for Product Message Below the Add to Cart Button near the bottom of the list. You can enter whatever content you like in there and it will appear there for each of your products. Be sure to scroll to the bottom of the screen and click Save once you're finished entering your content.

If you wish to add content below the Add to Cart button on a single product, follow these steps:

Go to Inventory > Products and search for the product you want. Click on its Title to open it in the Edit Product view. Click on the Descriptions tab at the top and scroll down until you see Brief Description Below Add to Cart Button. Add your content there. Be sure to scroll to the bottom of the screen and click Save once you're finished entering your content.


I have products I want to show but not sell in my online store, how to I tell customers they need to call?

For products you have created that are set to display on the website (Availability: Both or Website) but that don't have an Add to Cart button, you can enable a special message to instruct people that it is unavailable for sale through the website and display your phone number for more information. You can configure that option in your system settings.

Once you are logged into the system, in the upper right click on the Admin Button with your username and go to Settings > Website Settings > Products and you'll see the option for No Online Purchase Message not far from the bottom of the list. Choose the message you want from the drop-list, and then scroll to the bottom of the page and click Save.


I just want my web orders to go through without having to click a button to collect each one, what do I do?

If you're having to click for each order to Capture Funds, your Checkout Method for the website is set to Authorization. To change that to the straight Sale method, first go to the Admin Button in the upper right and go to Settings > Website Settings > Products. Find the Checkout Method area and change it from Authorization to Sale, then scroll to the bottom of the page and click Save. To complete the configuration, please either call us (at 385-404-6200, option 2) or email us (support@rainpos.com) and let us know you're switching to the Sale method of checkout for your website, and we will configure your processor to work that way.


I keep having to do returns on web orders, what do I do?

The best way to drastically reduce refunds on web orders is to change your Checkout Method from Sale to Authorization. The Authorization method of checking out does not charge the customer's card right away, it just pre-authorizes the funds and sends you the order, giving you a chance to review everything.

In the Orders module, if you open the transaction, you will have the ability to reduce the amount being charged for shipping and adjust quantities of items in the order, if you need. When the order is ready to go, you can click the Update button in the Payment Details area you can click a button to Capture Funds. You cannot set the shipping or quantities to charge a larger amount than was authorized originally on the card.

You can change your Checkout Method by logging into Rain POS as an Administrator. On the far right side of the blue Admin Toolbar, go to Settings > Website Settings > Products and find Checkout Method in the list. Change it to Authorization, then scroll to the bottom of the screen and click Save. Then either call Support (at 385-404-6200, option 2) or email us at support@rainpos.com and let us know you would like to use the Authorization method of checkout for the website, and we will complete your configuration for that on our end in your Processor settings.

I need to add text below the image area to all my products, how do I add a message there?

Once you have logged into the system, in the upper right, click the Admin Button with your username. In the drop-list, click on Settings > Website Settings > Products, you will see a setting for Product Message Below Images near the bottom of the list. You can enter whatever content you like in there and it will appear there for each of your products. Be sure to scroll to the bottom of the screen and click Save once you're finished entering your content.

Pro Tip: This is an excellent place to link to your policies on privacy, international orders, order fulfillment (timeframe, packaging, communication), and shipping.


I read about ShipStation integration in your knowledge base articles, how to I get that activated?

First, you need to set up and activate a ShipStation account, and configure the carriers, shipping methods, and packaging options you wish to offer. Once that is complete, you can integrate the setup in Rain POS.

After logging into Rain POS, in the upper right click on the Admin Button with your username and go to Settings > Website Settings > Shipping.

Near the top of the list of options, set Enable Shipping Station Integration to ON, click Configure to enter your Key and Secret codes from your ShipStation account. Check the boxes for the Carriers, Services, and Packaging you want to use. You are able to set free shipping over a specified amount, you have the option of not requiring weight values for items (if you do this, read the warning carefully, this may invalidate some of your rates), and set how you want your ShipStation rates to appear on the website.

Please note that ShipStation integration requires that most if not all of your products have to have weight values in place, so be sure your products are properly set up before integrating. If you do not see the functionality described here, please call us at 385-404-6200 and use option 2 for Support or email us at support@rainpos.com and we'll be happy to activate it for you.

I sell used items and need to list the condition of each item, what is the best way to do that?

We have the ability in the system to enable you to set item conditions for products you sell that have serial numbers as well as for your standard inventory.


Condition Levels for Standard Inventory

To enable this feature, once you are logged into the system click on the Admin Button with your username in the upper right and go to Settings > Website Settings > Products, and you'll see an option for Item Condition about half way down the list. Set it to On, set the Default Condition that new products will start with, and then scroll to the bottom of the page and click Save. Now in each of your products, you will have a drop-list on the product's Details tab below the Price areas where you can set the item's condition. If you make changes to that field, be sure to scroll to the bottom and click to Save the product.


Condition Levels for Serialized Inventory

To enable this feature, once you are logged into the system click on the Admin Button with your username in the upper right and go to Settings > POS Settings > Products, and you'll see an option for Item Condition. Set it to ON, choose the different conditions you wish to use, and then scroll to the bottom of the page and click Save. Now in each of your serialized products, when you click the Change link for the Inventory area on the product's Details tab you will have a drop-list next to each serial number so you can set Condition Levels uniquely for each item.

Similarly, instead of the normal Price fields, you will have a Manage link next to Pricing that will give you a table for different prices for the different Item Conditions, and if you do Rent to Own, you will have a tab for your Rental Pricing by Item Condition level. If you make changes to that field, be sure to scroll to the bottom and click to Save the product.

You can find comprehensive information about how to set up and work with Item Conditions for standard and for serialized inventory by clicking here: Product Condition Levels.


I set up my shipping, but someone was able to order without a shipping charge, what do I do?

You need to make sure there are no 'gaps' in your shipping rates. To look at your settings, on the far right side of the blue bar click on the gear-shaped button and go to Settings > Website Settings > Shipping, and click to Configure your shipping methods.

Check the box for the method you want to work with and click to Edit. Scroll down until you see the table with your From and To numbers and the Rates. In cases where your shipping method is based on Amount (the total dollar amount of the order), you need to make sure that the first line of your rates starts with 0.01 in the From column, and the From amount in the second row needs to be one penny higher than the To amount in row one. The 'gaps' are when you leave open amounts that do not cover every possible amount in your From and To range.

Here is an example of how to NOT set it up. The 'gaps' occur when you go from whole dollar amounts from one rate line to the next, so in this case, and order amount of $10.01 to $10.99 would not be charged shipping at all, since the first line only goes up to $10.00 even and the next line starts at $11.00.

For a good example of how to do it correctly, please click here and look at the Domestic Shipping section: How to Set Up Shipping Methods.


I understand the Marketing Email area needs my street address to send out bulk emails, but what do I do if I only have a PO box?

The anti-spam laws have few ways to help legitimate bulk emailers verify that they are actually legitimate, and one of the primary ways is to provide a unique physical street address that can be directly associated with the organization. If you currently use a PO Box, as many web-only businesses do, one option is to use a 'mailbox store' that provides postal boxes for a monthly fee. That would allow you a street address with a unique 'suite number' that would work just fine for the anti-spam laws.


I want customers to call me if they have questions about my online products, how can I put my phone number on every product?

There is an option in the system settings that will let you add your phone number to each product. Once you have logged into Rain POS as an Administrator click the Admin Button with your username in the upper right. In the drop-list, click on Settings > Website Settings > Products, you will see a setting for Call to Order Display a short way down the list. Change the setting to On, then scroll to the bottom of the page and click Save.


I want my domestic shipping to be free over a certain amount, how do I set that up?

Start by looking at your shipping settings by clicking on the Admin Button with your username in the upper right and go to Settings > Website Settings > Shipping, and click to Configure your shipping methods. Check the box for the method you want to work with and click to Edit. Scroll down until you see the table with your From and To numbers and the Rates. Look at your bottom-most line: the 'To' amount in that line should be .01 less than the target amount over which you want orders to have free shipping. For example, if you want to offer free shipping to all orders $50 or over, your current bottom-most line would need to have 49.99 in the To column. Then you would create another rate line below that and you would have 50.00 in the From column and in the To column, you would have 'and up'. Then in the Rate column you would enter 0.00. Be sure to click Save at the bottom after you're finished adjusting your rates.


I want to brand my shopping cart page, how do I add my look and feel?

You can customize the header of the checkout pages of the shopping cart. After logging into Rain POS click the Admin Button with your username in the upper right and go to Settings > Website Settings > Shopping Cart and near the top you have options for entering just the store name, adding a logo and background color, or doing a full html layout for the header in a Content Editor. Be sure to click Save at the bottom of the page if you make any changes in this area.


I want to put up a message for products in my online store that are in stock, how do I do that?

You can set in-stock products to have a custom In-Stock message on your website by enabling that option in your system settings. Once you are logged into the system as an administrator click the Admin Button with your username in the upper right and go to Settings > Website Settings > Products and you'll see the option for Product In Stock Message not far from the bottom of the list. Set it to On, enter the message you want in the text field, and then scroll to the bottom of the page and click Save. When a product has inventory that message will display. Once the product is out of inventory, the message will no longer appear.


I want to sell wholesale on my website, but my products don't have places for wholesale prices, how do I add that?

If you are eligible to sell wholesale (all clients with the Website Plus or higher service package are eligible) that is something we can activate for you. You will need to contact us so we can activate that for you on our end. Please either call us at 385-404-6200, option 2, or email us at support@rainpos.com and we will be happy to configure that for you.


I'm not getting order notifications for website orders from the system, what do I do?

First, make sure that you have the proper email address in the area of Settings about order notifications. In the upper right, click the Admin Button with your username and go to Settings > Website Settings > Shopping Cart. Verify that the email address listed in the Order Notifications Email is the right one, if not, enter the one(s) you want. You can also get notifications by text message if you like. Once you're done, scroll to the bottom of the page and click Save.

If the address was correct, it may be some other problem so give our Support team a call at 385-404-6200 and use option 2 and we will troubleshoot the issue.


If I have multiple locations set up in the system with inventory tracking for each, where can I set up the addresses for each location?

Once you have logged into the system as an Administrator click the Admin Button with your username in the upper right. In the drop-list, click on Settings. In the first tab that comes up, you will find information sections for each of the Locations that have been set up in your system. If you have multiple locations listed on your website that you don't see here, you'll need to give us a call if you want them to be set up for individual inventory tracking in the system. For any changes you make on that Settings page, be sure to scroll to the bottom of the page and click Save.


Is the website system shopping cart PCI compliant?

The shopping cart is encrypted in the areas where sensitive information is transmitted, and is fully PCI compliant.

Local Delivery Option by Zip Code / Postal Code for Online Orders

The system now offers you the option of providing Local Delivery as an alternative to regular shipping or store pickup. Here is a short video of how you can set up this option:


Setting Up Local Delivery

  1. Click on the Admin Button > Settings > Website Settings > Shipping and look at the area for System-Configured Shipping Options.
  2. Click the Configure button for System-Configured Shipping Options.
  3. In the section for Domestic shipping methods, click the green button to Add Domestic Shipping Method.
  4. In the System Shipping Method panel that opens, first set the method name to Local Delivery.

delivery 01.jpg

  1. As soon as you set Local Delivery the window will change to allow you to enter ZIP / Postal codes. So, for example, if there are two zip codes within which you are willing to do deliveries for free, you could set the method up as pictured below, and then you could create another Local Delivery method with ZIP Codes a little farther away for which you would be willing to deliver for a fee. 

local deliver method by zip.png

  1. Be sure to set the Delivery Time to your expected time frame, as pictured above.
  2. If you plan to charge a fee for the delivery, set the rate as pictured above in item number 3 for whatever fee you want to charge. If you plan to offer free Local Delivery, set the Rate to 0.00. You can set up multiple Local Delivery methods if there are ZIP Codes you would deliver to for free, or for a higher fee. All ZIP / Postal Codes listed will use whatever fee you set here, if any.
  3. When you have everything in place, scroll to the bottom of the panel and click Save.

After this is set up, the Local Delivery option will appear with your other shipping methods for online orders that qualify based on the zip codes / postal codes you set, as pictured below.

local delivery in cart.png


Long Tail Labels: Setting up Zebra GK420t Labels on Chrome using MacOS

Opening CUPS:

To configure the settings for the printer itself, open Chrome and enter the following:

http://localhost:631/printers/

If you get the screen below, you need to enable CUPS for your OS. If not, skip down below to the Localhost Configuration section:

image4.png

To enable CUPS for your computer, first highlight and copy: cupsctl WebInterface=yes

image7.png

Next, click the magnifying glass Search icon in the upper right and enter Terminal, then click to run the application.

image5.png

After Terminal opens, you will see a cursor flashing: paste what you copied and click Return to run the setting.

image10.png

You can close Terminal after it completes the setting. You will now be able to access your printer configuration from the localhost.


Localhost Configuration

You will see a list of all active printers once the localhost opens. Click on the Printer and a page will load showing the printer attributes.

image11.png

Find the drop list pictured below and click on Set Default Options.

image6.png


Under the General tab:

Select Custom Size from the Media Size drop list and enter either 1 x 1 in inches for the 30332 labels, 2.125 x 1.125 in inches for the 30334 labels, 2 x .75 inches for the 30330 labels, 2 x 0.5 in inches for the 1 up labels, or 3.5 x 0.5 in inches for the Rat Tail/Long Tail Labels.

image9.png


Under the Printer Settings tab:

Darkness: 15

Print Rate: 5 in/sec

Label Top: 0

Print Mode: Tear-off

Tear-off Adjust Position: 0

Reprint After Error: Never

image8.png


Creating a Custom Label in the System Dialog Window:

Once CUPS is taken care of, on Rain POS select a label to print. Then in Chrome, click on the More Settings and click on the Print Using System Dialog options.

image12.png

Once in the screen click on the View Details options (If you cannot see more information).

  • Click on Paper Size > Manage Custom Labels
    • Click on the + button (Note: Double click on the work “Untitled” can let you rename the label)
    • Set the paper size to correct size needed (example is Long Tail)
    • Non-Printable Area: User Defined
      • Top: 0
      • Left: 0
      • Bottom: 0
      • Right: 0
    • Once all set click on ok.

image3.png

  • Make sure Orientation set to Portrait
  • Scale is 100%
  • Layout:
    • Reverse Page Orientation is checked
  • Paper Handling:
    • Collate Pages is checked
    • Scale to fit paper size is unchecked
  • Cover Page:
    • None is checked
  • Printer Features:
    • Resolution: 203 dpi
    • Media Tracking: non-continuous (web sensing)
    • Media Type: Printer Default
  • Once all the settings have been set. Click on the drop down for Presets and click on Save Current Settings and Preset. I would recommend naming this after the label size.


Setting Up the Print Preview on Chrome to be the System Dialog Window:


Enable Setting:

Open up the terminal window and enter the following command:

defaults write com.google.Chrome DisablePrintPreview -bool true

(Note: Found this is the best option to print)

image1.png


Disable Setting:

Open up the terminal window and enter the following command:

defaults write com.google.Chrome DisablePrintPreview -bool false

image2.png

If Disabled, To print correctly use the print using System Dialog Option at the bottom of Print Preview.


Configurations for the supported label types:

Configurations for the supported label types:

  • 1 x1 (30332) labels (Chrome Print: Paper Size - 1 x 1.50 (30347) with margins set to minimum and a scale of 93%)
    • Paper Size: 1 in width and 1 in height
    • Margins: all 0
    • Portrait
  • 2.25 x 1.25 (30334) labels (Chrome Print: Paper Size - 2.25 x 1.25 with margins set to default)
    • Paper size: 2.25 in width and 1.25 in height
    • Margins: all 0
    • Portrait
  • 2.25 x 0.75 (30330) labels (Chrome Print: Paper Size - 2.25 x 0.75 with margins set to minimum with a scale of 93%)
    • Paper size: 2.25 in width and 0.83 in height
    • Margin: 0
    • Scale: 95%
    • Landscape
  • Dumbbell 2up Dymo (Jewelry Labels) (Chrome Print: Paper Size - 2 x 0.5 with margins set to default, This may skip labels)
    • Paper size: 2.12 in width and 0.83 in height
    • Margin: all 0
    • Scale: 95%
    • Portrait
  • Dumbbell 1up Dymo (Jewelry Labels)
    • Paper size: 2 in width and 0.5 in height
    • Margin: all 0
    • Portrait
  • Long Tail
    • Paper size: 3.5 in width and 0.5 in height
    • Margin: all 0
    • Portrait
My shipping rates aren't coming up correctly in the website shopping cart, what do I do?

You need to make sure there are no 'gaps' in your shipping rates. To look at your settings, on the far right side of the blue bar click on the gear-shaped button and go to Settings > Website Settings > Shipping, and click to Configure your shipping methods. Check the box for the method you want to work with and click to Edit. Scroll down until you see the table with your From and To numbers and the Rates. In cases where your shipping method is based on Amount (the total dollar amount of the order), you need to make sure that the first line of your rates starts with 0.01 in the From column, and the From amount in the second row needs to be one penny higher than the To amount in row one. The 'gaps' are when you leave open amounts that do not cover every possible amount in your From and To range.

Here is an example of how to NOT set it up. The 'gaps' occur when you go from whole dollar amounts from one rate line to the next, so in this case, and order amount of $10.01 to $10.99 would not be charged shipping at all, since the first line only goes up to $10.00 even and the next line starts at $11.00.

For a good example of how to do it correctly, please click here and look at the Domestic Shipping section: How to Set Up Shipping Methods.


Point of Sale Best Practices

Here are some great things to do to improve your use of the Point of Sale system:

  • Utilize User PIN Codes - While it may be a slight annoyance to have to enter your PIN code for each new transaction, the benefits far outweigh the inconvenience. With this feature on, clerk names are logged on all transactions, and that puts accountability in place for you. Train your team to practice security: if you step away, click the Clerk name locking the screen. If you use this feature, make sure to create good PIN codes: nobody, including you or your managers, should use codes such as 0000 or 1234, or similar, intuitive numbers. Make codes for your employees, and make them random. To activate this feature, go to Settings > POS Settings, and in the left column, you will see where you can activate User PINs. Save at the bottom when done.
  • Use Rewards - Are you using the Rewards program? If so, do you feel like you're getting the most out of it? All by itself, the Rewards program is pretty good, but if you put effort into it and train your team to do so as well, you can start building serious loyalty. Train your clerks to talk about it, have them focus on customer experience and always be asking themselves, "If I was shopping here, what would make my experience better?" You can also offer bonus rewards as a marketing strategy, for example, if you have some items you need to sell, offer double reward points, and manually give customers extra rewards after purchasing. You can activate and configure your Rewards by going to Settings > POS Settings > Customer. After you're finished with the settings, scroll to the bottom and click Save.
  • Use Customer Notes / Transaction Notes - Are you noting everything properly? Sometimes taking a few seconds to note something can save hours of frustration later if you forget the details. Train your team to note everything: Use Customer notes to details special situations or circumstances, family members, etc. Use Transaction notes to record circumstances your accountant will need to understand at the end of the month. Adopting this as your regular process will help with special situations so everyone will know what is needed. Customer notes can be added by clicking to view the customer details and scrolling down to the Other section and entering notes in the Till Alert area. You can add notes to a transaction by clicking the Notes link to the right of the main item search field.
  • Make the Best Use of Coupons- If you are not already using coupons for promotions, you should take advantage. They are flexible and can add tremendous value to sale events you run. For more information on how to set up your Coupons, click here: Coupons. Maximize the effectiveness of your coupons by sending out email blasts with the coupon code, feature the code in Facebook and other social media posts, and instruct your team to offer the code to everyone so they won't miss out! To create a Coupon, go to Products > Coupons and once you're finished, click Save at the bottom.
  • Work in Multiple Browser Tabs - Ever feel like you're having to do way too many clicks just to get information when you're in the middle of something? You should be working in multiple browser tabs! It's much easier to click an open tab that's already got your Customers or your Products or whatever it is you find yourself looking up throughout your day. Keep several tabs open at once; one for your Register, and others for the parts of the system you need most, and that way you don't have to leave your transaction and possibly have to recreate it after you look up that critical piece of information. To open a system link in at new tab, hold down Ctrl and click on the link, or right-click and choose Open in New Tab from the popup menu.


Purchase Orders

You can start a new Purchase Order from anywhere in the system by clicking the +Create New button in the upper left and then clicking Purchase Order.

po 01.jpg


Setting Up Your Purchase Order

First you will need to choose the Vendor you are ordering from. A Purchase Order always goes to a single Vendor only: it is not possible to order from two Vendors at once on a single order. If the Vendor you need is not yet in your list, you can click the + button to create a new one.

po 02.jpg

If you have multiple Locations, the default Location will be selected in that drop-list. You can choose which of your Locations you will want the order to be shipped to. It isn't possible to have an order be delivered to multiple locations, but it IS possible to include inventory for more than one of your Locations on the order. If you do so, you can use the Transfers tool under the Inventory menu to move inventory from the Ship To Location to the end-destination Location after you have received it. You can use the Notes area in the upper left for any details you need to remember about the order.

po 09.jpg

In the upper right of the PO, you can enter the following items:

  • Purchase Order Number - If you have a specific PO number that needs to go on this order, you can enter it here.
  • Ship Date / Don't Ship After Date - If you know the date the order should ship, you can enter that here, and if you have a cutoff date after-which you would no longer want the order, you can also enter that.
  • Discount - If you qualify for a Discount on everything in the order, you can enter a percentage off the total amount here. You can see the pre-discount total in the Subtotal area just above. Please note, if you are getting a discount only on one or more items, you can enter Discount dollar-amounts for any line-item that qualifies.
  • Freight - If you know the Freight amount you will be paying, you can enter that here.
  • Total - As you add items and discounts to the order, the Total will display the final total amount you anticipate you will be charged for this order.


Adding Items to Your Order With the Purchase Queue

po 03.jpg

Once you have chosen your Vendor, the Purchase Queue will show you how many Low Inventory and Special Order items are waiting to potentially be added to the order. Please Note: the items that are Low Inventory are those you have set with Reorder Point and Desired Stock Level values. Such products appear on your Low Inventory report. Items that are not set with those two values will not appear in the Low Inventory report and will not be offered to be automatically added to a Purchase Order even if they are low in inventory. For more information on this functionality, click here (this link will open in a new tab for you): Setting Up Products for Inventory Management. Click the Purchase Queue button to add items that are low in inventory. You will also see any Special Order items waiting to be added to a PO for the vendor.

If you don't wish to see items that are on Backorder in other inventory orders, you can turn that toggle off in the Special Orders section.


Other Methods of Adding Items

You have several ways to add items to your PO in addition to any automatically added up to this point. You can click the Existing Vendor Products button (#4 above) to see the first hundred items in the system currently that are associated with the Vendor for the order. You can click to Load More at the bottom of the list, if needed. You can search by keyword for other products carried by that Vendor. To add items, check the box for the item and set the quantity you will need. Once you have everything selected you will need, click the Add button in the lower right.

po 10.jpg

Pertinent information about the products is included, including how many are currently on hand. If you check the box for a product on the left, you will see an Add button at the bottom. Click that button and you will see the item added to your order.

If you missed any low inventory items from the Vendor in the order, you can add those items by clicking on the Purchase Queue button (you will only see this if you didn't add all of the low inventory items for the vendor).

po 13.jpg

You can also add items associated with any vendor using the Product Search field on the left; a useful feature if the has not yet had a vendor assigned.

And finally, you have the ability to create new products entirely by clicking the + button next to the search. You have full access to any products in the Catalog for your industry when you create new products this way. Be sure to leave the Inventory and Cost area untouched, since the Receiving Order will add that information for you when you receive the shipment.


Working With Your Order Items

Once you have added items through the Purchase Queue, if you don't want to order an item that appeared this way, you can click the X button on the far right of the line item to Delete it from the order.

po 05.jpg

Purchase Order Item Functions:

  1. All-Item Search - You can search by keyword for any item saved in your system as a product, which is useful if you have items that have not yet been assigned a Vendor.

  2. Create New Product - You can create a new product by clicking the + button. You will have access to the system Catalog if the item is searchable there.

  3. Purchase Queue - At any time, you can click the Purchase Queue button and add items that are low in inventory for this vendor either as a Primary Vendor or a Secondary Vendor, as well as Special Order items.

  4. Existing Vendor Products - This will open a panel that will allow you to add products you have associated with this vendor either as the Primary Vendor or as a Secondary Vendor. See the section below on Adding Items for more detail.

  5. Item Quantity - You can manually adjust the Quantity field, if needed.

  6. Sortable Column Headers - The column headers that are blue you can click on to sort all of the items by that column. Clicking again will reverse the sort.

  7. Retail Price - You can click on this amount if you need to change the regular Price for an item. Changes you make here will automatically save to the product listing as you make them (you don't need to click a Save button).

  8. Product ID Codes - For convenience, the system will show you UPC (editable), Manufacturer ID (editable), and SKU. While you cannot edit your SKU codes from the Purchase Order, you can edit them from the Low Inventory report, if needed. Just as with the Retail Price, any changes you make will be saved to the product as you make them.

  9. Vendor Part ID - If you have set up Vendor Packaging in a product and if the vendor has a Part ID that is unique for purchase orders for the vendor, that ID will display here. You can set Vendor Part ID codes by opening a product and going down to the Styles and Pricing area and clicking the Manage link next to Purchasing. Please note, you will not see any content in the panel that opens in this area if you have not set a Vendor yet for the product.

    po 05-1.jpg

  10. Quantity on Hand - This column will show the quantity of each item that you have in stock at present.

  11. Quantity On Order - If you already have an item on a different PO, you will be able to see by hovering your mouse over a number in this column. A window will pop up and you are able to click on PO numbers to view full details about orders in question, as pictured here:

    po 06.jpg

  12. Back Ordered - If you have started receiving inventory on this PO, any inventory you haven't already received will display a number in blue in this column, indicating that it is in a Back Ordered state.

    po 06-1.jpg

  13. Sales Summary - You can view your sales over time for an item by hovering over a number in this column. You will see total sales for the item for recent months as pictured below.

    po 07.jpg

  14. Unit Cost - If the system knows what your Cost for each item would be, that will display here. You can adjust that number if you know what your per-unit cost will be or if you want to estimate what it will be.

  15. Unit Discount - Please note that if you are getting a Discount on the total for the PO, there is an area to enter that as a percentage off the total amount in the upper right of the PO. If you have a discount on an item in the order, you can use the Discount column to enter the dollar amount off the Unit Cost you are getting.

  16. Line Item Total - The system will do the math and show you the estimated Total for each line item, and above you will see the Total for the whole PO.

  17. Remove Item - You can click the X button for any line item to remove it from the PO. The X at the top with the other column headers will allow you to Remove All items from the order, and will pop up a confirmation to make sure you really mean to do that.

  18. Merge Product - If you have somehow created duplicate items in the system that are showing in the PO, you can click the Ellipsis button (the three-dot stack) and you can Merge the products into one.

    po 08.jpg


Purchase Order Functions

At any point along the way you can click the Draft button to save the order and come back to it any time by going to Purchasing > Purchase Orders. In the window that comes up, you will see all POs that are saved as Drafts. You are also able to update orders you've already sent, and if you do so, you can Save the updated purchase order.

1298569367_Thumb-pdf.png

You can also Print your Purchase Order either to a hard-copy printer, or from your browser you can print to a PDF file. If you want to work ahead and Print Barcodes for your items, clicking that button will bring up a window that will allow you to use the full functionality of our barcode printing module. The Email button will open a panel like the one below and will reference your Vendor for a contact email address. You can compose whatever message you like and the system will automatically attach the order to the email as a PDF file. You can also Export the order as a .CSV spreadsheet file viewable in any spreadsheet program, if needed. If you find you don't need the order and it has already been saved, you can Delete it on the right. You'll be asked to confirm you really want to delete it. Be aware, we have no way of restoring Purchase Orders you delete in this way.

po 14.jpg

Once you have completed assembling your PO and printed it to be sent, click the Mark as Sent button to finish the PO. If you hear back from the Vendor about substitute items or altered quantities, you can always go back into the order and add or adjust whatever is needed. Just remember to Save once you've finished your changes.


QuickBooks Connector Overview

Quickbooks_intuit_logo.png


What the Web Connector Can Do

The Web Connector is a utility created by Intuit for QuickBooks that pushes over information from our POS to QuickBooks. Here are some key details:

  • The Connector is a program you download and install onto the computer where you have your QuickBooks program. It is completely free to download. Most likely, it is already installed on your computer along with QuickBooks itself, since it is bundled with that program.
  • You run the Connector daily in the morning, updating your information for the previous day (it only takes about two minutes to run).
  • It pushes over transactions including On Account, Gift Cards, Layaways, Outside Financing, Cost of Goods Sold, Assets, and of course regular transactions.
  • Payment type is broken out for all revenues, and credit/debit card company is also specified in the exported data.
  • We can also show you how to set up CoGS and Assets by department if you wish.
  • We handle returns and we can either push all the sales into undeposited funds or into a bank account that you have created in your system.
  • We also push over completed Receiving Orders from our POS and create a bill as well as update your Asset account.
  • We can handle multi-store.


What the Web Connector Can't Do

Here are a few things we can’t do yet:

  • The Connector does not push over individual customers or products.
  • When we create bills, we push over the date the Receiving Order was created and we use the assigned invoice number, not the date the invoice was created from the vendor, nor the invoice number you might have. We hope to have these updated in the near future.
  • We don’t organize income by departments.
  • Currently all transactions can either come over as individual line items, or in a combined  summary.
  • We can't push info over to QuickBooks on the Cloud.
  • We can’t upload the web connector to a Mac because it’s an .exe file.


Setting Up Your Web Connector

We like to set up the web connector after you’ve been using the system for at least two days so we have transactions to push over and use for testing. It usually takes about an hour and a half to do this.

We can set it up at any point and we go back into your history years if necessary to update information.

Please email support@rainpos.com and in the Subject line, enter QB Setup Request, your company name, and your Customer ID. You can find your Customer ID under the gear-shaped button on the far right of our blue Admin Toolbar.

Or if you would like to set the integration up yourself, click here for a full walk-through: QuickBooks Connector Setup Step 1: Sales Taxes.


QuickBooks Connector Setup Step 1: Sales Taxes

Quickbooks_intuit_logo.png


Please Note: You need to be using the Windows Desktop version of Quickbooks for the Intuit Quickbooks Connector to be able to work. For more information, click here: QuickBooks Connector Overview.


Step One: Setting Sales Taxes

First, we will set up your installed Windows version of QuickBooks to work with the Connector and our Point of Sale. Start by opening QuickBooks.

1-0 tax-preferences initial.png

  1. In the top menu, click Edit, and at the bottom of the drop-list, click Preferences.

1-1 tax item setup fixed.png

  1. In the column of options on the left, click Sales Tax and then click the tab for Company Preferences.

  2. Make sure that Do you charge sales tax? is marked as Yes. NOTE: If you don't actually charge sales tax in your area, you still need to do this. You can choose to turn it off later, after you have finished this initial setup.

  1. Click the Add Sales Tax Item button and create the first of two new taxes:


Type: Sales Tax Item

Name: Sales Tax

Tax Rate: Leave Blank (this will be calculated in our Point of Sale)

Tax Agency: Either choose an existing tax agency (e.g. Utah State Tax Commission) in your system or add one by clicking Add New.

Click OK.

Repeat the process but this time name the sales tax Sales Tax POS:

Click the Add Sales Tax Item button and create the following new tax:


Type: Sales Tax Item

Name: Sales Tax POS

Tax Agency: Use the same one as you did with the first Sales Tax.

After creating a new tax, an Updating Sales Tax popup will appear. Click OK in the Preferences window. The system will reset and close the window.

NOTE: Why do you need these two tax rates? The short answer is, in QB you can't have the same tax within a sales receipt and ON the sales receipt, or it won't do the taxes properly. So you set up these two, and your taxes will come through properly from Rain POS.


Sales Tax Follow Up

Last, we have to make sure that QB is using the appropriate new tax rates in the right areas.

Go back to Edit, and choose Preferences(see first screen image, above).

Choose Sales Tax and the tab Company Preferences.

Make sure that that the new Sales Tax POS is NOT showing in the 'Your Most Common Sales Tax Item' drop-list. Any other sales tax is fine.

1-2 tax item turn off & verify.png

You can now mark Do you charge sales tax? to No (if that is appropriate for your area; if you DO charge sales tax, leave it as Yes) and click OK to save the changes. Sales tax will actually be charged in the POS, so you do not need it on here in QuickBooks.

Coming Up Next: Set up your Default Customer settings for your Receipts.


Go to the next step:

Quickbooks Connector Setup Step 2: Setting Up the Default Customer / Receipts

Quickbooks Connector Setup Step 2: Setting Up the Default Customer / Receipts

Step Two: Setting Up the Default Customer / Receipts

You should have already completed Step One: Sales Taxes before starting this one. If it is not already open, launch your Windows version of QuickBooks. In this step, we will be further configuring your desktop Quickbooks to work with the Rain POS Point of Sale.

  1. On the top gray menu bar, click on Customers and choose Customer Center from the drop-list menu.

2-0 customer-cust center-new cust.png

  1. In the Customer Center, click the New Customer & Job button and click on New Customer from the drop-list menu.

2-1 create receipt customer.png

  1. In the Customer Name field, enter ' A Sales Receipt,' then click the blue OK button. You do not need any other information in that window.

Why is it named 'A Sales Receipt'?
The 'customer' in this setup will actually be sales receipts coming over from the system, so we have standardized the Default Customer name to make it easier to support you and our other clients using this system, if questions come up in this area.


Coming Up Next: Set up your various Accounts for the system.


Go to the next step:

Quickbooks Connector Setup Step 3: Setting Up Your Accounts


Quickbooks Connector Setup Step 3: Setting Up Your Accounts

The integration between your Point of Sale and QuickBooks will need several Accounts that may not exist within your Quickbooks. In this step we will be creating and setting up all of the Accounts you will need. Start by opening your desktop Windows version of Quickbooks.


Checking Chart of Accounts

The following account types must be available to map to. If they are not, you’ll need to create them. You can check the list below in your Quickbooks by clicking on Lists > Chart of Accounts. Click here to download a printable checklist if you want a hard copy to work from.

     
Account Type Account Name Purpose
Accounts Receivable Accounts Receivable Used for On-Account purchases
Other Current Asset Inventory Assets For Inventory Assets
Other Current Asset Undeposited Funds Account for undeposited funds such as Checks, Cash, Paypal and Credit
Other Current Liability Gift Cards Balance for Gift Cards bought and used
Other Current Liability Layaway Balance of Layaways
Income Merchandise Sales Record of sales
Income Shipping Record of customer payments for Shipping
Cost of Goods Sold Cost of Goods Sold For Cost of Goods Sold


Why should I name these accounts this way?
The Rain POS system refers to certain elements in specific ways, a good example is Gift Cards. Throughout the system, they are referred to as Gift Cards, even if you actually sell Gift Certificates instead.


How to Create and Set Up Accounts

One important question you need to answer for your Accounts setup is 'Where will funds land in QuickBooks?' The answer will either be Direct Deposit to a bank or other account, or it will be to Undeposited Funds, which is a holding account. The most common setup is to have funds go to Undeposited Funds, so we will start with that example. Here is a sample list of Accounts in the Chart of Accounts:

3-0 lists-Chart of Accounts.png

In our example, let's say that one of the Accounts you need to add is Undeposited Funds. To create that Account, look at the bottom of the Chart of Accounts window and click on Account and in the drop-list, click New.

3-1 account-new.png

When creating your Account you will first choose the Type, and for Undeposited Funds you will click Other Account Types and in the drop-list, click Other Current Asset.

3-2 new account type.png

In the Other Current Asset window, enter the Account Name for Undeposited Funds and then save the entry.

Please Note: There is a 30-character limit to account names you enter.

3-3 other current asset-undeposited funds.png

If you do Layaways, you will also want those funds and amounts properly accounted for, so you will set an account for Layaways up as an Other Current Liability with the Account Name of Layaway.

3-4 other current liability-layaway.png


COGS/Assets by Department

If you would like to have your COGS/Assets organized by product departments, you must create COGS and Asset accounts depending on how you want your COGS to be split. For example:

Clothing COGS - Clothing Asset

Book COGS – Book Asset

Gift COGS – Gift Asset

Please Note: Most of our clients do not go to this level of detail, and prefer to track individual Department asset values in the Rain POS Point of Sale system reports.


Payment Separated into Bank Accounts (OPTIONAL)

The default and recommended setup sends all income into Undeposited Funds. This allows the store owner to balance totals before depositing them into the Business Bank Account. Some customers alternatively prefer to have all cash go straight to a bank account designated for that purpose, checks to another account and credit cards to a third.

To have funds deposited in this way, you must create both the Holding Account and the Bank accounts in your chart of accounts. You must either send all invoices to undeposited funds or else to the holding account/bank accounts.


Create Shipping and Sales Items

Go to Lists at the top of the screen, and from the drop-down choose Item List.

Your sales tax will already be listed. You will need to add the following items:

Shipping – Type: Non-Inventory Part – Account: Choose the Shipping Income Account created above.

Merchandise Sales – Type: Non-Inventory Part – Account: Choose the Sales Income Account created above.


Add Payment Methods

Many of these payment methods may already be listed in QB. You only need to add those that are not in the list, or edit existing payment methods so that they match what is listed below.

Go to Lists, and choose Customer and Vendor Profile List from the drop down.

From that drop-down menu choose Payment Method list.

The following payment methods need to be listed, EXACTLY as you see them:

   
Method Type
Cash Cash
Check Check
American Express American Express
Discover Discover
MasterCard MasterCard
Visa Visa
Debit Debit Card
Paypal Other
Gift Card Gift Card
Account Other
Outside Financing Other
o.f. Other
Credit Card Other Credit Card


Please make sure that the payment types in the Method column are spelled exactly the way they show above, including periods spaces and capitalization. The naming of these accounts has to be perfect, without any letters misplaced, in order to properly sync with Rain POS.

You have now configured Quickbooks to work with the Point of Sale system!


Coming Up Next: Install and configure the QB Connector Application.


Go to the next step:

Quickbooks Connector Setup Step 4: Installing the Application


Quickbooks Connector Setup Step 4: Installing the Application

You can get to this part of the system by clicking on the gear-shaped button on the right side of our blue Admin Toolbar, click Settings, then click POS Settings > QB Connect.


Please Note: It is likely that you already have the Connector installed on your computer (by default it installs with Quickbooks itself). You can check by going to the Search near your Windows button and searching for Quickbooks Connector. If it is already installed, you can skip #1 below and start with step #2.


Set Up Your QuickBooks Connector

There are several things we need to take care of before you will be ready to start synchronizing your daily sales and inventory with your Quickbooks. Start by following the instructions above to get to the QB Connect Settings area.

4-01.png

When you first look at this area, you'll see a notice warning you to save any other settings you might have changed, since the link for the QB setup will take you to a different part of the system. To get into the setup area, click the link that says Click here to go to the QB Connect Settings.

Initially, you will see some tools the Migration team uses (we strongly recommend not trying to use any of the tools yourself). In the gray bar near the top, click Quickbooks to proceed.

4-02.png

Under the Quickbooks menu, on the far right click on Web Connector. There are three steps to setting up your QB Web Connector utility. This is a separate program created by Intuit to facilitate data updates to the Desktop Windows version of QB from point of sale systems like Rain POS. So our first step is to get that downloaded and installed to your computer.

1. Download and Install QB Web Connector v. 2.1

Click the link to download version 2.1. Version 1.5 is for VERY old versions of QB only, so if your version is older than ten years, that may need to be considered, but most likely you will want the newest version.

Follow the on-screen instructions to install the program.

2. Setup User

Your QB integration can be associated with only one user in Rain POS. That user login will tie in with your QB Connector. Enter the password for that user has in place for their Rain POS account (you must be currently logged into Rain POS with that user account). Confirm the password by entering it again in the second field.

Click the Create User button, and if the password was correct, you'll see 'Current User Exists' in green text, and you'll have a Reset User button. If, in the future, you need to change the User that's associated with the QB Web Connector, you can click that button to reset the User login.

NOTE: M3rchant was a former name for our company. We did business as M3rchant for about one year, and that was around the time we created our Quickbooks integration. The reference to M3rchant will be removed when we do the next user-interface for QB Connector.

3. Create and Run Your QWC File

In order to connect with Rain POS, the QB Web Connector program needs a QWC file configured by our system

To create your QWC file, first click the radio-button for Live (since you will be using the system for live data updates to QB from the Rain POS). Then click the Create QWC File button. You will want to save the file to your computer. The file will have your Customer ID at the front, followed by -qbwc.qwc (see example below). You can find your Customer ID under the gear-shaped button on the far right side of our blue bar.

4-03.png

If you download the file from Firefox, you can find the file using your Downloads button in the upper right of Firefox. The QWC file will be at the top of the list.

4-04.png

If you download the file from Chrome, you can find it at the bottom of your Chrome window in your Downloads bar. It will be the file furthest to the left, as pictured below.

4-05.png

Before you proceed, make sure you have the main Quickbooks program up and running. Every time you run an update through the Connector, you will need Quickbooks itself running as well.


Move the QWC File to your Desktop

You will want to move the QWC file to your Desktop, so you can easily run it when needed. In Firefox, in the Downloads drop-list, click the small folder icon on the right for the QWC file and it will open the folder, and you can move the file from there to your Desktop.

In Chrome, click the small Up arrow

Click the file in either location to run it. The QB Web Connector will launch.

The following warning screen will pop up and requires your authorization for the Connector to gain access to your Quickbooks data before proceeding:

4-06.png

Click OK to proceed. Another, similar authorization window will also pop up in Quickbooks, and it's important how you resolve it, here is what it looks like:

4-07.png

For the question "Do you want to allow this application to read and modify this company file?", choose the option Yes, whenever the Quickbooks company file is open. Our system requires your QB to be open with the proper company file loaded in order to run the connector.

Do not check the box at the bottom that says Allow this application... Your company information will not require sensitive personal information that this would allow.

Click Continue, you'll be prompted to confirm your choices, if they look right, click Done to complete the authorization.


The Quickbooks Connector, Initial Launch

The QB Web Connector will open as soon as you've authorized permissions as noted above. You'll see the QWC file you created as a line-item in the Connector window, as pictured below. You may have other QWC files you already work with. To run your update, check the box on the left to select your QWC file, and make sure that you enter your Rain POS system user password on the right.

4-08.png

You will want Autorun set to Off (it won't work with our system, as updates have to be run manually). Up above, click the Update Selected button. You'll see the progress bars for Application Progress and Total Progress work their way up to 100%, and at that point, the update will be complete. Future updates you run, after you have completed the final setup steps, will populate data for you into Quickbooks.

Coming Up Next: Configure your QB Connector Settings in Rain POS.


Go to the next step:

Quickbooks Connector Setup Step 5: Configuring QB Accounts in Rain POS

Quickbooks Connector Setup Step 5: Configuring QB Accounts in Rain POS

You can get to this part of the system by clicking on the gear-shaped button on the right side of our blue Admin Toolbar, click Settings, then click POS Settings > QB Connect.


Importing Accounts for QuickBooks Connector

The next thing you need to do is get to where you can Import your QB Accounts. Now that you have the connector set up, with Quickbooks itself open and running, go to Settings > POS Settings > QB Connect, and click to open the QB Connect Settings. Click on Quickbooks, then in the tabs below that, click Import.

5-1.png

This step will import your account information from QB to the Accounts tab in our system settings, so you won't have to manually enter each, and to ensure they are spelled exactly the same.

You will want to check all boxes except Class List, just as pictured above. You don't need that one, unless you have multiple store Locations set up in our system (that can manage inventory separately). If you have multiple Locations in Rain POS, check the box. Click the Set to Import Lists button. Click Save to ready our system to do the import.

Open and navigate to the Quickbooks Web Connector program and click the Update Selected button.

This is a step you only need to do once, and will save you time in configuring your Accounts.


Please Note: The Class List setting does not refer to classes that you teach. Class List refers to the ability to associate transactions to a class list grouping within QuickBooks.


Multi-Location Class List Setup (Optional)

Please skip this section if you only have a single Location in the system.

How do I know how many Locations I have? If you are unsure of your Location setup, you can verify your settings by clicking on the gear-shaped button on the far right of our blue Admin Toolbar, then click on Settings. Your list of Locations is under your Company Name. If you have more than one, you need to follow the instructions in this section; if not, skip down to the section titled Configure Your Accounts.


1. Make sure QB is ready for multi-location by configuring Classes.

If you have two separate physical stores (or more) that have separate product databases and Location IDs in Rain POS, you'll need to make sure your Quickbooks has the Classes set up before you Import your Accounts.

5-3.png

In Quickbooks, go to Edit > Preferences, then in the column on the left, click on Accounting and in the window that pops up, click on the Company Preferences tab. The Class settings are below Accounts. Make sure the box to Use Class Tracking for Transactions is checked. Click OK.

5-2.png

Next, we need to make sure you have a Class set in Quickbooks that will coincide with transactions for each of your Locations. Click on Lists in the menu at the top, and then go to Class List. If you already have your Classes set up, you'll see a line-item for each (#1 below).

5-4.png

If you need to create Classes for additional Locations, go to the bottom of the screen and click the Class button (#2 above) and click New in the pop-up list. In the next step, you will set up these Classes along with your other Accounts from QB in the Rain POS settings. Then, when you run your daily updates, each transaction will list the proper Class in that column, as pictured below.

5-5.png


Map Your QB Accounts Into Rain POS

In Rain POS, go to the Account Mapping tab (Settings > POS Settings > QB Connect > QB Connect Settings > Quickbooks > Account Mapping).

Each of the drop-lists for the Accounts field will have populated with the corresponding Accounts from your QB from what you did previously in the Import tab. For each area, your drop-list should have an item like the ones shown below (according to the setup instructions in Step Three of this setup series). Click here if you need to reference your original setup of those accounts.

5-7.png

For Bank Deposit Accounts, you don't need to put anything in there if in the Accounts section above, you use Undeposited Funds for all your Sales Receipts (revenues) as a holding account. That is the most simple way to set up and utilize this integration, but if you want different payment types to automatically be mapped over to specific bank accounts you've set up in QB, Sales Receipts in the section above will need to be mapped to a different Holding Account. If they all go to the same place, there is no need to specify bank accounts, just leave your Sales Receipts mapping as Undeposited Funds.

You have the ability to specify different bank accounts you deposit to for different payment types. Use the account names that coincide with what you set up in your Quickbooks. You can have each set to a different account, or any number of them set to the same accounts, you just need at least one or more set to a different account. Here is an example:

5-9.png

For QB Classes, as noted above, you only need this if you have multiple Locations (with separate product databases) set up in our system. Again, these are not about classes you teach, but they are Classes in QB that you set up to tie to transactions from a specific Location. Set each one appropriately, if needed.

5-91.png

Once you're finished, click Save at the bottom to finalize your Account Mapping settings.


Coming Up Next: Configure your QB Connector Settings in Rain POS.


Go to the next step:

Point of Sale Settings: Quickbooks

QuickBooks Integration: Essential QuickBooks Tax Setup

Getting Error 3140 from QuickBooks? Or Perhaps QuickBooks Is Charging Extra Tax? Here's How to Fix It

These issues are due to an update our developers made in order for transactions to be classified as Taxed within QuickBooks. This overview will show you how to adjust your settings to stop either of these issues.

qb logo.png


QuickBooks Error 3140

For the error 3140, this is most likely due to taxes not being set up within your QuickBooks. To complete that setup, follow these directions:

  1. Open QuickBooks and click Edit in the upper left.
  2. Go to Preferences.
  3. In the left-hand list select Sales Tax, then along the top click Company Preferences. (see image below)

company preferences.png

4. At the top, you will see a setting for " Do you charge sales tax?" Click Yes (even if you don't, you will have to select this in order for the Integration to work properly, because you charge a sales tax of $0).

5. Next, you need to add some sales tax items to QB. Find: Add Sales Tax Item, name: Sales Tax POS with Tax Rate of 0%. Also Select a Vendor for Tax Agency (even if you don't have one, something must be selected here for the integration to work) click OK once you're finished. You will enter 0% for this universally in QB because Rain POS will provide the actual percentages and amounts for tax.

6. For the final Add Sales Tax Item, name: QB Company Tax with Tax Rate 0%. Also Select a Vendor here and click OK. Make this item your most Common Sales Tax Item. Click OK.

You're all set!


QuickBooks Adding Extra Tax

If you are having issues with extra tax being added to transactions once in QuickBooks, then fixing it will be a similar process to steps above.

  1. In QuickBooks, click Edit in the upper left.
  2. Go to Preferences.
  3. In the left-hand list select Sales Tax, then along the top click Company Preferences.
  4. Next, you need to add a sales tax item to QB. Find: Add Sales Tax Item, name: QB Company Tax with Tax Rate of 0%. Select the Vendor for your Tax Agency, Click OK. Make this your Most Common Sales Tax Item, click OK.
  5. Click Customers at the top, then click Customer Center. Double-click on the customer A Sales Receipt (this is the default customer name we set up for our clients, see the image below).

Customer Tax Settings.png

6. Click the tab Sales Tax Settings. Set the Tax Code to " Tax", and the Tax Item to " QB Company Tax". Click OK below.

You're all set!

If you need additional help, feel free to call into our Support line at (385) 404-6200, and use option 2. We have made our agents are aware of these procedures so they can assist you with this issue. That will be the quickest method of fixing these issues if you do need assistance with implementing these changes.

Reader Diagnostics Tool for Payments

This tool should be the first step in troubleshooting any Rain POS Payments card readers. It gives you helpful information like the device type, date it was added, the IP Address of the device, and more. On a high level, if all the items in the Diagnostics section (see below) are green then they should be able to process successfully. If some of the items are red then you’ll need to troubleshoot.

Please Note: The 2nd and 4th items in the Diagnostics section will only work if the tool is run on the same network as the card reader (meaning those two icons won’t work from your machine). Best case is to run the tool from the customer’s machine either guiding them through it or doing a screenshare.

rd 01.jpg


Running the Tool:

  1. Click your username in the upper right. 
  2. Go to Settings > Integrations > Rain POS Payments.
  3. On the right side of the Reader line item in your Hardware list, click the Heart Icon.

A window will pop up displaying three sections: Terminal Details, Diagnostics, and Help.


Terminal Details

This section lists out the hardware details. This can be helpful for identifying the IP Address of the device or knowing the device with which you’re working. It will also tell you if it’s online or offline (connected to the internet or not).

rd 02.jpg


Diagnostics

There are four items in this section. Each of these will have either:

check.png A green check mark to indicate it is working as expected

remove.png Or a red ‘-‘ icon to indicate its failure. Use the following guide to walk you through the troubleshooting steps for each of these items.

rd 03.jpg

  1. The Reader is successfully paired with the System
  2. If this is green it means the device was successfully paired with the system.
  3. If this is red is means the device was somehow unpaired from their account. All you need to do is go through the pairing process again by clicking here: Payments - Setting Up the Verifone P400
  4. Could not communicate with the Reader
  5. If this is green then we can successfully talk to the card reader.
  6. If this is red then the computer and the card reader are not on the same network. To correct it, use this Rain POS Payments - Setting Up the Verifone P400 article to connect the card reader to the correct network. If you’re unsure if it’s on the same network, use the top debug sequence in this article, Rain POS Payments: Troubleshooting Your Verifone P400, to check the network name and IP address. If you’ve verified they are on the same network, the fastest fix is usually this Payments - How to Set Up Cloudflare DNS on Windows, Mac, Android, and iOS article.
  7. DNS hostname is valid
  8. If this is green then their network DNS is allowing us to send information to and from the card reader.
  9. If this is red then their network is blocking our ability to send information to and from the card reader. If that doesn’t work, then the Payments - How to Propagate the Device DNS Record article should resolve it.
  10. IP Address reachable
  11.  If this is green then we can successfully ping the IP Address listed in the Terminal Details section.
  12.  If this is red then it’s likely it’s the same issue as #2, above. Follow the same steps. The only difference here is that we just try to ping the IP, not the full API.


Help

This section will have general information the customer can use to troubleshoot the problem themselves.

rd 04.jpg


See Previous Transaction Details

Show Previous Transaction Details in Your Register

Sometimes things move quickly as you're wrapping up a transaction and you might lose track of important details, like the exact amount of change you need to give the customer. Turning on this feature will show you those details so you won't have to scramble for them, and also allows you to reprint the receipt if needed.


Steps for Setting Your Register to Show Previous Transaction Details

  1. Click the Admin Button with your username in the upper right and go to Settings > POS Settings.
  2. In the General settings area, scroll down until you see Show the previous transaction in the till and check the box for that setting.
  3. Scroll to the bottom of the screen and click Save.
  4. After you have completed a transaction, and before you start a new one, you will see the Customer, Transaction ID, Total, and Change Due from the previous transaction, and you will be able to click the Receipt button to reprint the receipt, if needed.


Sell a Product for Free

How to 'Sell' Products for Free

Your Rain POS Point of Sale system allows you to offer items for free in Register and in online transactions.


Steps for Selling Free Products in the Point of Sale

  1. Search for your product and add it as a line item to the Register.
  2. In the line item for the product, click the blue pencil.
  3. Enter 100 into the Percentile Discount area, and click Save
  4. Add whatever other items the customer is purchasing and complete checkout in the normal way.


Steps for Selling Free Products Online

  1. Click the Admin Button with your username in the upper right and go to Settings >Website Settings > Products.
  2. Scroll down until you see Allow Purchase of Free Products and set it to Yes.
  3. Scroll to the bottom of the page and click Save. You're all set!


Shopify Integration Comprehensive Data Sync Technical Details

Comprehensive List of Data Syncing Between Rain POS and Shopify


Rain POS Features and How They Work With Shopify

  1. Products - Product creation and edits work only from Rain POS to Shopify after the initial sync. In the initial sync, existing products in Shopify will be created in Rain POS if they are active.

  2. Customers - Manual customer creation and edits work only from Rain POS to Shopify after the initial sync. In the initial sync, existing customers in Shopify will be created in Rain POS if they are active, but not vice versa. New customers in web orders from Shopify will create the new customer listings in Rain POS.

  3. Categories - Rain POS categories are created in Shopify as Collections, but Shopify collections are not brought into Rain POS. Updates and edits to Rain POS Categories will push to Shopify, but changes in Shopify Collections will not come back to Rain POS.

  4. Vendors - Vendor data for products will sync both ways for integrated products in the initial sync, but after, only changes from Rain POS will push to Shopify for vendors.

  5. Reports - All reports should work with web orders received from Shopify, and respect inventory adjustments made by Shopify web orders.

  6. Bulk Editing - All changes to supported product and customer fields should sync with Shopify automatically, if they meet the sync criteria.

  7. Spreadsheet Updates - All changes to supported product and customer fields should sync with Shopify automatically, if they meet the sync criteria.

  8. Spreadsheet Creation - All changes to supported product and customer fields should sync with Shopify automatically, if they meet the sync criteria.

  9. Website Pricing Setting - With this enabled, the Rain POS integration with Shopify will use the Web Price and Web Sale price when available, and fall back to the regular Price and Sale Price when the web fields aren’t in use. Turning this feature on/off may require a manual resync, so we recommend having it set the way you want before integrating.

  10. Scheduled Sales - Full support for prices updated by scheduled sales is part of the integration from Rain POS to Shopify, also respects the Website Pricing setting.

  11. Catalog Integrations - Products can be created in Rain POS from any catalog, and the corresponding product will be created in Shopify, assuming it meets the sync criteria.

  12. Website Orders - Web Orders sync from Shopify to Rain POS, but not from Rain POS to Shopify. New customers, product inventory adjustments, shipping charges, and tax fees also sync with Shopify web orders into Rain POS. Products in Shopify that are not integrated with Rain POS that are in Shopify web orders will display in the Orders module, but will not track inventory in Rain POS nor will product-level detail appear in Rain POS sales reports, such as Transaction Details or Sales Details.

  13. Receiving Orders - Like most inventory updates, any inventory changes made in Rain POS through this feature will update the Shopify product as well. No RO information (such as vendor, RO number, etc.) is sent to Shopify. Only product inventory updates done in the PO/RO will push to Shopify. Does not work with Shopify’s Purchase Order feature.

  14. Inventory Transfers - Just like Receiving and other forms of inventory quantity changes, transfers should work to move inventory between locations, and the inventory availability in the Shopify-synced location, if it was part of the Transfer, would increase or decrease accordingly. Does not work with the Shopify Transfers feature.

  15. Vendor Integrations - Vendor integrations that save product data to Rain POS should then push those updates to Shopify, however it is completely untested at this time.

  16. Local Inventory with Google - Untested at this time, but it is expected any product changes saved by the integration in Rain POS should post to Local Inventory with Google.

  17. QuickBooks Online - All POS aspects should still work, but it is not currently known how the QBO integration will handle events created by Shopify.

  18. Quickbooks Desktop - This feature is untested, but Shopify has its own integration with Quickbooks Desktop.

  19. Shipping Rates - Shipping rates are configured in Shopify for orders placed on the Shopify site. However, it is a VERY GOOD IDEA to set up accurate shipping rates in Rain POS as well, in case you ever decide to configure the Rain POS website.

  20. Tax Rates - Tax rates in Rain POS will only apply to the POS. The Shopify integration will use Shopify's system to determine and charge taxes and the amount charged will come over to Rain POS in the order and will appear properly in the sales and tax reports in Rain POS. Rain POS does not adjust tax for Shopify orders in any way. All taxes for website sales made in Shopify are configured in Shopify.

  21. Avalara Integration - Its only application in the POS is when applying Shipping at the Register. Rain POS does not adjust tax for Shopify orders in any way, and this includes through our Avalara Integration. However, shipping in Shopify should be calculated with the same accuracy as Avalara.

    https://help.shopify.com/en/manual/taxes/tax-services

  22. Online Canada Tax - Shopify has their own process for this which is not covered through our integration and is handled entirely on Shopify's side:

    https://help.shopify.com/en/manual/taxes/location

  23. Australia GST - Shopify has their own process for this which is not covered through our integration and is handled entirely on Shopify's side:

    https://help.shopify.com/en/manual/taxes/location

  24. Google Analytics - Shopify has their own process for this which is not covered through our integration.

  25. SEO Page Titles & Descriptions / Metatags - Shopify has their own process for this which is not covered through our integration and is handled entirely on Shopify's side.

  26. 301 Page Redirects - Shopify has their own process for this which is not covered through our integration and is handled entirely on Shopify's side.

  27. Marketing Package - Much of the Rain POS Marketing Package does not require a live website. Features such as Text Message Marketing and others that are purely internal to Rain POS do not integrate with Shopify. Marketing tools in Shopify should function as intended, and resulting sales and updates to inventory quantities will still sync to Rain POS.

  28. Authorization and Sale Checkout Methods - Shopify has their own process for this which is not covered through our integration but will function as expected within the Shopify website.

  29. Facebook Pixel Tracking - Shopify has their own process for this which is not covered through our integration but will function as expected within the Shopify website.

  30. Live Selling - CommentSold® has their own integration with Shopify. Using this integration concurrently with the Rain POS integration is unsupported and untested but should function as expected within the Shopify website.

  31. Tailored Lists - Store management only from the Rain POS side, does not push to Shopify.

  32. Online School Rentals - Does not work with Shopify.

  33. Online Rental Contracts - Does not work with Shopify.

  34. Rental Contracts - Only Rain POS POS aspects will work, does not integrate with Shopify.

  35. Classes - Only Rain POS POS aspects will work, does not integrate with Shopify.

  36. Coupons - Only Rain POS POS aspects will work, does not integrate with Shopify.

  37. Reverb Integration - Our Reverb integration could work, since it adjusts the inventory directly in Rain POS. However, it has not had any testing and is not yet officially supported. Since both Shopify and Reverb have an open API, there are 3rd party services that offer a connection, but implementing these services with the Rain POS/Shopify integration is untested, unsupported and not recommended.

  38. JM® Integration - Only Rain POS POS aspects will work. We are not aware of any integrations that Shopify and JM® might have, but if one does exist, its use with the Rain POS integration is untested, unsupported, and not recommended. The purchase of JM® Care Plans cannot work through the Shopify integration.

  39. Rain POS Payments Integration - Only POS aspects will work, Rain POS Payments will not integrate with Shopify.

  40. Clientbook Integration - Only Rain POS POS aspects will work, does not integrate with Shopify.

  41. Consignment - Only Rain POS POS aspects will work. Consignment items can sync to Shopify but will NOT register with the Consignment contract in Rain POS if they are sold through Shopify, so it is recommended to not list such items in Shopify.

  42. Inventory Purchase & Receiving Orders - Only Receiving Order updates to product data in Rain POS will push to Shopify. Price updates made in PO/RO to integrated products should also push to Shopify.

  43. Invoicing - Nothing syncs to Shopify from Invoices except inventory adjustments saved to the products.

  44. My Music Staff Integration - The MMS integration should not be affected by the Shopify Integration, and nothing specific to MMS will push to Shopify customers.

  45. Short Term Rentals - Nothing about Short Term Rentals syncs to Shopify.

  46. Restricted Items - The setting should not affect the Shopify integration. Even in Rain POS it is a POS-only setting.

  47. Special Orders - Only Rain POS POS aspects will work (most of the feature is POS-only), nothing syncs to Shopify until inventory is adjusted when the Special Order is picked up.

  48. Subscriptions - Subscriptions require SSL and a Rain POS website and cannot work through Shopify. Individual products listed in a Subscription can be sold independently in Shopify. Any Shopify functions for Subscriptions or third-party plugins relating to this functionality have not been tested with the integration.

  49. Services - Rain POS POS only, nothing about Services syncs with Shopify.

  50. Gift Registry - Rain POS POS only, does not sync with Shopify.

  51. Departments - Rain POS POS only, does not sync with Shopify.

  52. Wholesale Selling - The integration with Shopify cannot sell wholesale items at wholesale prices with wholesale descriptions listed in Rain POS.

  53. Multi-Location - Only one physical location can be synced to Shopify at a time, but that location can be changed at any time.

  54. Serial Numbers - Serialized inventory is sellable through the integration, but it goes over as pooled inventory, meaning just as a quantity of the product without specific serial number data. When a sale comes through, the system will assign the first available serial number of the product.
Should I set up my shipping in PayPal or in the system?

We originally patterned our shipping settings off of the way PayPal does theirs, only we added more lines for rates so you would have more depth there. We highly recommend you set up your shipping in Rain POS and make sure you don't have any shipping set up in PayPal, to avoid double-charging your customers. Click here to learn how to set up shipping in the system: How to Set Up Shipping Methods.


Sometimes my inventory is off and when someone orders an item I come up short, how can they tell me their preference for low inventory orders?

There is an option in the system settings that will let your customers specify how they would like you to handle it if you don't have enough inventory for the products they order. Once you have logged into Rain POS as an Administrator (your login link should look like ' yourwebsitename.rainadmin.com/admin';), on the far right side of the blue Admin Toolbar, click the gear-shaped button. In the drop-list, click on Settings > Website Settings > Products, you will see a setting for Send What You Have Option a short way down the list. Change the setting to On, then scroll to the bottom of the page and click Save.

Your online shoppers will have any one of the following options for each product they order (each can be set differently, as needed):

  • Send what you have.
  • Cancel this item.
  • Contact me.


Use Separate Website / In-Store Pricing

Set Separate Website and In-Store Pricing


Steps for Setting Different Website / In-Store Pricing

  1. Go to the Admin Button with your username in the upper right and go to Settings > Features > Pricing, as pictured above.
  2. In the area for Website Pricing, toggle the switch to Enabled.
  3. Click Save.
  4. You will now have a Website Price and Website Sale Price field in each of your products, as pictured below.


Website Settings: Products Tab

The Website Settings: Products Tab

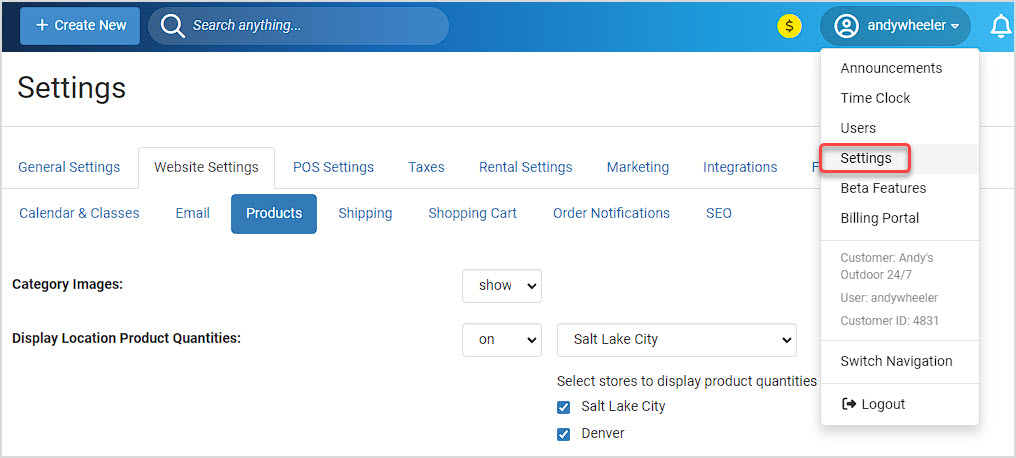
You can get to this part of the system by clicking on the Admin button with your username in the upper right and then clicking Settings > Website Settings > Products.

Please Note: As you work on your settings, in each tab, you need to remember to click the Save button at the bottom of the screen before you move on to another tab or screen, or you will lose your work.


Settings for Products

There are a great many configuration options for your eCommerce in the Website Settings > Products tab, ranging from how they display on the site (number of columns for Categories and for Products) to the preferred checkout method in the Shopping Cart and even custom Add to Cart buttons. Details for each setting are below:

1. Category Images - If you do not want your category images to show, you can toggle this off by changing it from the default value of Show to Hide. We strongly recommend having images for each Category and Subcategory.

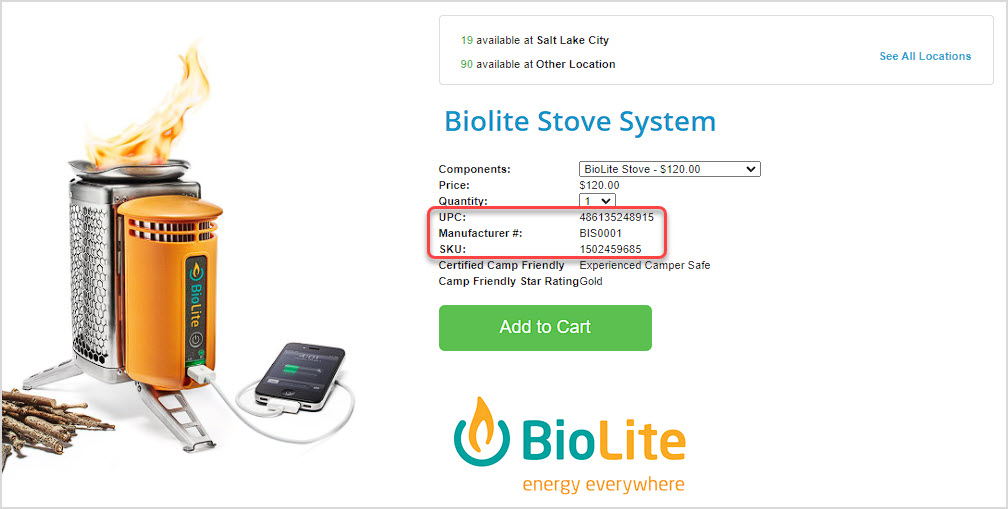
2. Display Location Product Quantities - If you have multiple system Locations set up, you can use this setting to let your website shoppers know which local store has what quantity available of the items they view. If you turn it on, in the drop-list you'll need to choose a Default Location the system will use if the customer hasn't set their own. You can also set which of your Locations will display quantities for your products, just check the boxes.

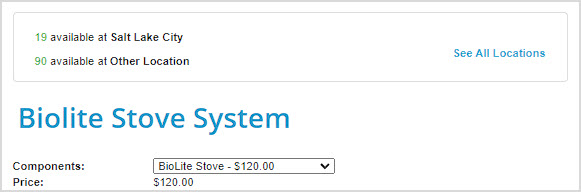
3. Location Product Quantities: Display 'Other Locations' Inventory - Turning this on will display inventory available from all of your non-default store locations in a single pooled total. In the example below, there is only one other location, so its inventory quantity is displayed below the quantity available at the Default Location. Customers can click to See All Locations, and will see inventory for each and can get driving directions, if needed.

4. Location Product Quantities: Low Inventory Warning - This function can give you a way to inform visitors if inventory is getting low at your locations from the setting above. If you turn it on, you're able to set the quantity at which or below the items will display the warning, and you're able to enter your own text for the warning, which will appear in ALL CAPS on the page. Space is limited, so only short messages are allowed.

5. Show Out of Stock on Product Card of eCommerce Web -  If you don't wish for your products to display an Out of Stock message in red when they reach zero inventory, you can turn that off with this setting. By default, that message will display.

6. Set Default Website Product Sorting - From this drop-list, you are able to choose between the various sorting methods whichever one you prefer to be the default for your website visitors. The default is to sort items by the Newest Arrivals, with the newest being at the top of the page.

Please Note: Your customers will be able to set this themselves and their choice will persist on all pages until they change it again, so this setting will only be for what they initially view.

7. Checkout Method - You have two options for the way checkout works for your website transactions:

  1. Sale - This will charge the customer's card at the time of web checkout.
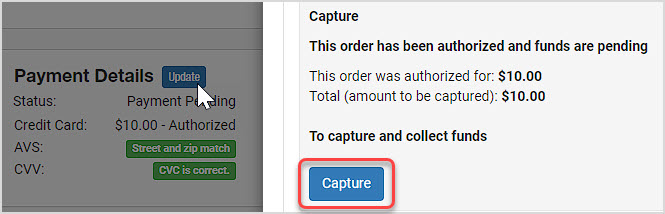
  2. Authorization - This will authorize the funds on the card during checkout, but will not charge the card until you go into the Orders module, open the order, in the Payment Details area click to Update, and click the Capture button. This setting is preferred if you often need to adjust shipping or if you are worried about inventory accuracy.

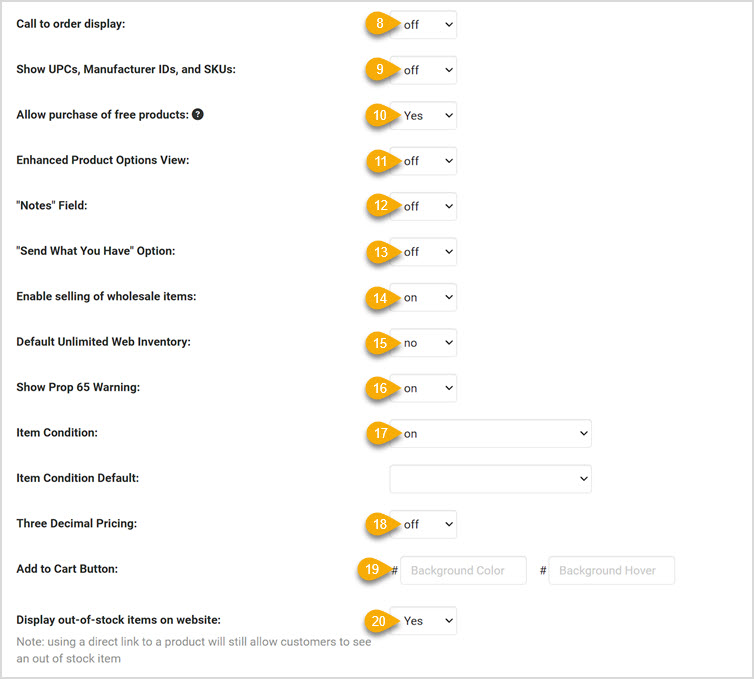
8. Call to Order Display- If this is set to ON, you will see 'or call: (your business phone number)' below the Add to Cart button. Turn it OFF if you do not wish for this to display globally for your products.

9. Show UPCs, Manufacturer IDs, and SKUs - This will display the product identifier numbers, if any, on the product detail page if turned on. If left off, customers can still search by SKU, UPC, and Manufacturer ID if they like, even if it isn't set to display.

10. Allow Purchase of Free Products- Set this option to Yes if you wish to sell free products. Customers will still have to go through the full shopping cart process, but will only have to add a shipping address. If they have no shipping charges, they will be able to check out for free.

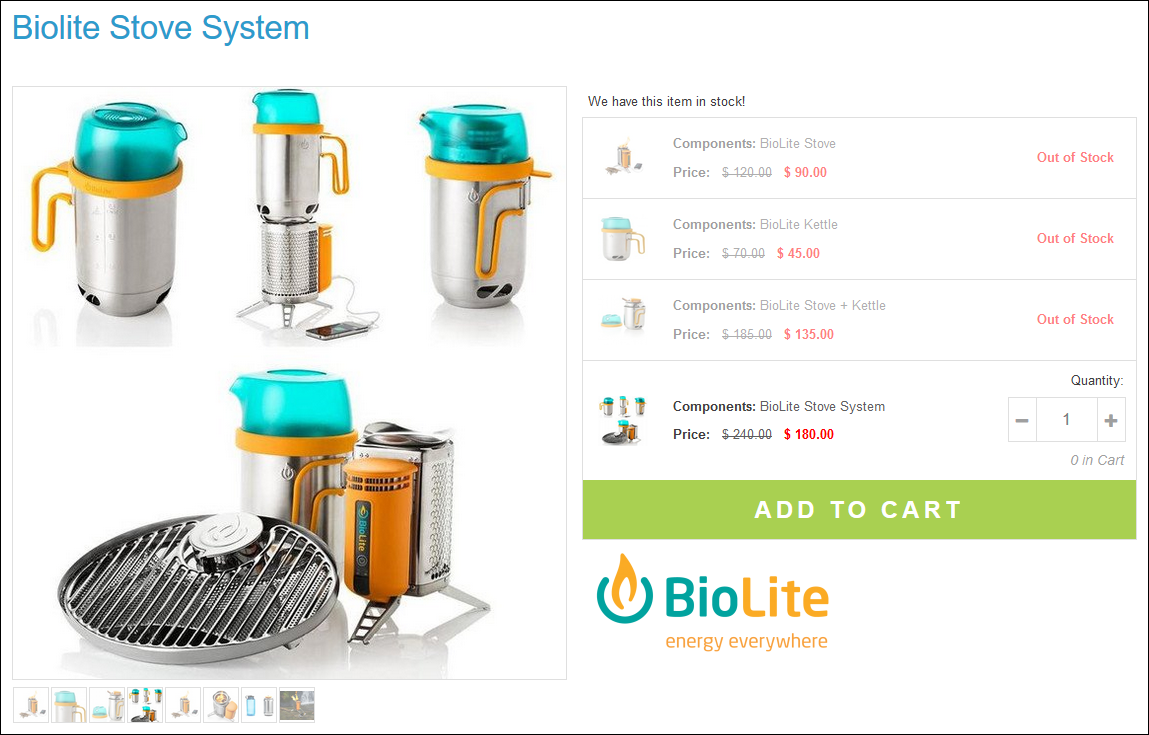
11. Enhanced Product Options View- With this option ON, your products that have options and styles such as size and color are displayed in an attractive and useful style, as pictured above. Please note that this setting works only with the Responsive system, and turning this on will no longer allow your UPCs, Manufacturer IDs, and SKU codes to display (from the setting above). Also, the Notes field and 'Send What You Have' options (see descriptions below) will not display on the page any longer, nor will any product Forms be visible (from the Advanced tab of the product).

p11.png

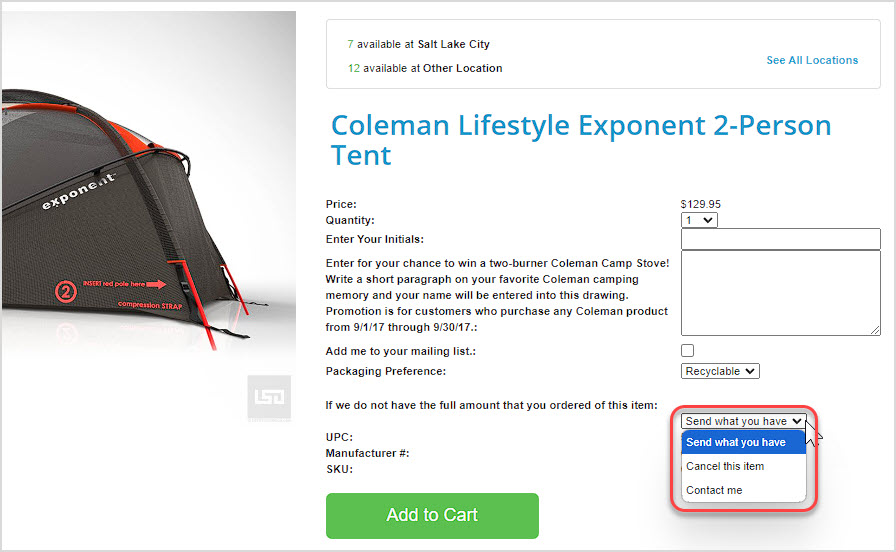
12. Notes Field - If you turn this feature ON, customers will see a Notes field on the detail page of the product. This field can be used for them to give you feedback on needs they have for the order, or for the product in particular.

13. 'Send What You Have' Option - This offers a drop-list of options for the customer's preference on what you should do if you don't actually have the quantity they want to order. Options include Send What You Have (default), Cancel This Item, or Contact Me.

14. Enable Selling of Wholesale Items - If you wish to use the Wholesale functionality in the Products module, you can set this to On. When editing a product, you will see price and description fields for Wholesale in addition to the normal ones. Only Wholesale Members of your site who have logged in will be able to see this information; your regular visitors will only see the standard product info. Click the link to learn more about setting up Wholesale (the link will open in a new browser tab for you): Wholesale Setup: Website Setup for Member Login

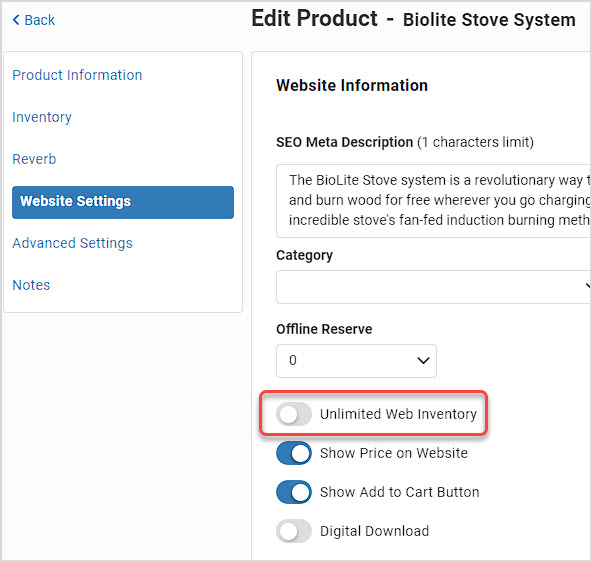
15. Default Unlimited Web Inventory - If you set this to Yes, any new products that you create that are set to display and sell on the web will have unlimited inventory, no matter what actual inventory numbers you have in the system for them. This option makes sense if it is a product you make, or if your restock turnaround time is low enough to fit within a reasonable shipping period. It also works well if all of your products are Digital Downloads. Most online retailers set this to No so they are using actual on-hand inventory numbers for the web.

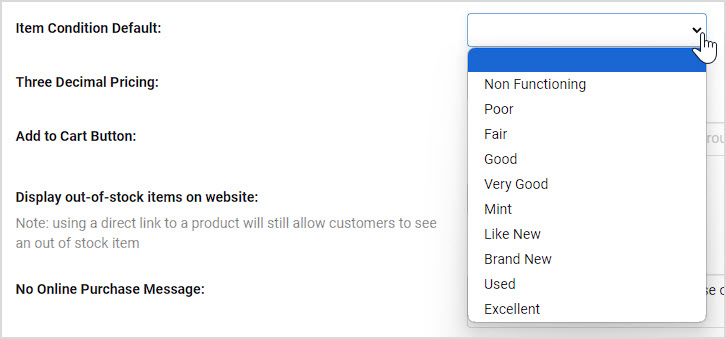
16. Item Condition- If you sell used goods online, this setting will enable an Item Condition field for you. By default, items will be listed as Brand New. Other conditions include Mint, Excellent, Very Good, Good, Fair, Poor, Non-Functioning. If you are unclear how to categorize item conditions, click here for an excellent outline from Ebay on item condition, with recommendation by product type.

17. Item Condition Default- If you sell used goods online, with this setting you can choose the default condition that any new products you create in your system will start with.

18. Three Decimal Pricing - If you need fractional cents in your prices, you can enable that by turning this setting on and your different Price fields for your products will go to three digits past the decimal point on the right.

19. Add to Cart Button - If you don't want to use the system default colors you see on your website, you can pick a Background Color and a Hover Color for the Add to Cart Button using the same hex-code for your colors. By default, you will have a green button.

20. Display Out of Stock Items on Website - If you don't want your out-of-stock items to display on your website, you can turn this setting off. Please note that anyone with a link to an out-of-stock item's page will still be able to view it even with this setting off.

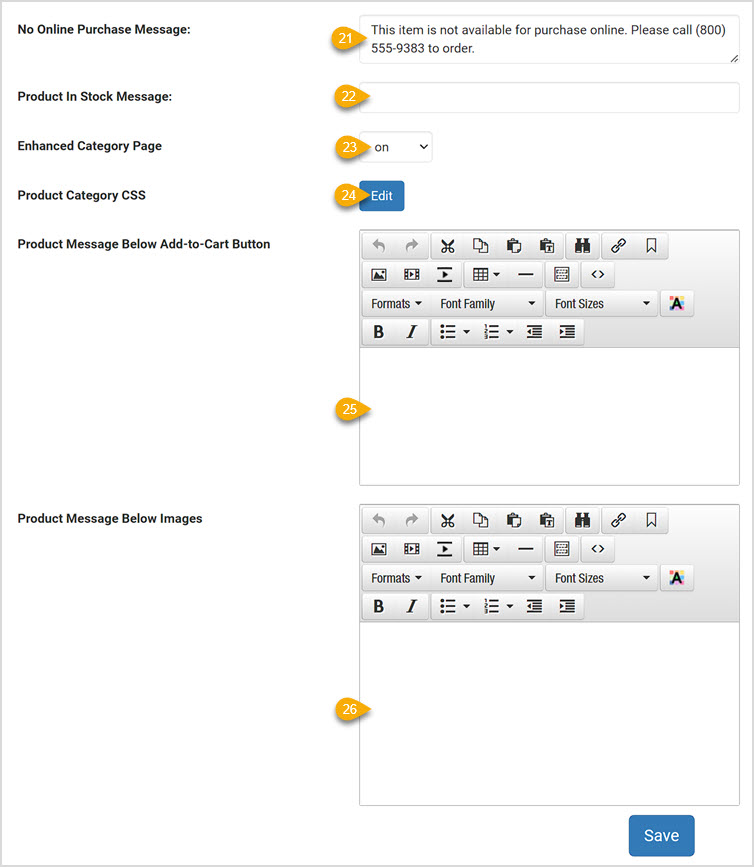
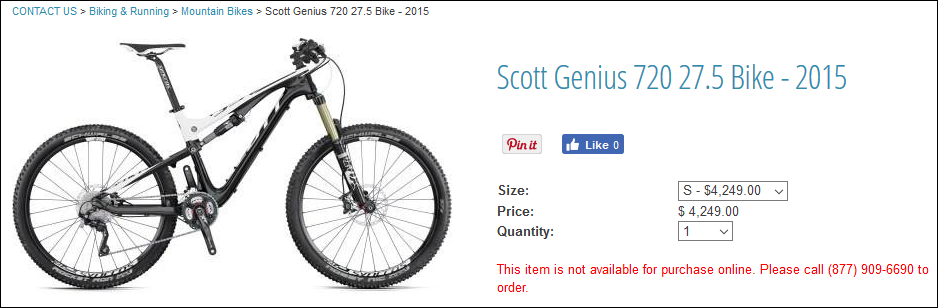
21. No Online Purchase Message - If you have a product set to be visible online but to not display the Add to Cart button, this No Online Purchase Message will display for that product, like the example below.

ps 17.png

22. Product In-Stock Message- You can enter a notice that your items are in stock or whatever text you like that will appear on each product you have in-stock, and you can change this as often as you like. So you can add promotional text, instructions on checkout, or really whatever you like that might apply to your in-stock products.

23. Enhanced Category Page - Please note, this is a non-Responsive website setting only, it will have no effect if your site is Responsive. If you have a non-Responsive website, you can turn this to On if you want your categories to display in the Responsive style. When you mouse-over a category, the image zooms a little and the title highlights in an animated fashion, as with the Shoes category below. Please note that in this view, your Category Short Descriptions will not display. Here is an example:

ps 06.png

24. Product Category CSS - If you want to edit the CSS styles that are set for your Products module, you can click the blue Edit button. This is for advanced users with knowledge of CSS and will work only with the Responsive websites.

25 & 26. Product Message Below Add to Cart Button and Product Message Below Images - The two areas described by these functions are often blank space on the page, so it you want to add content to these areas, you can do so using the respective Content Editors provided.

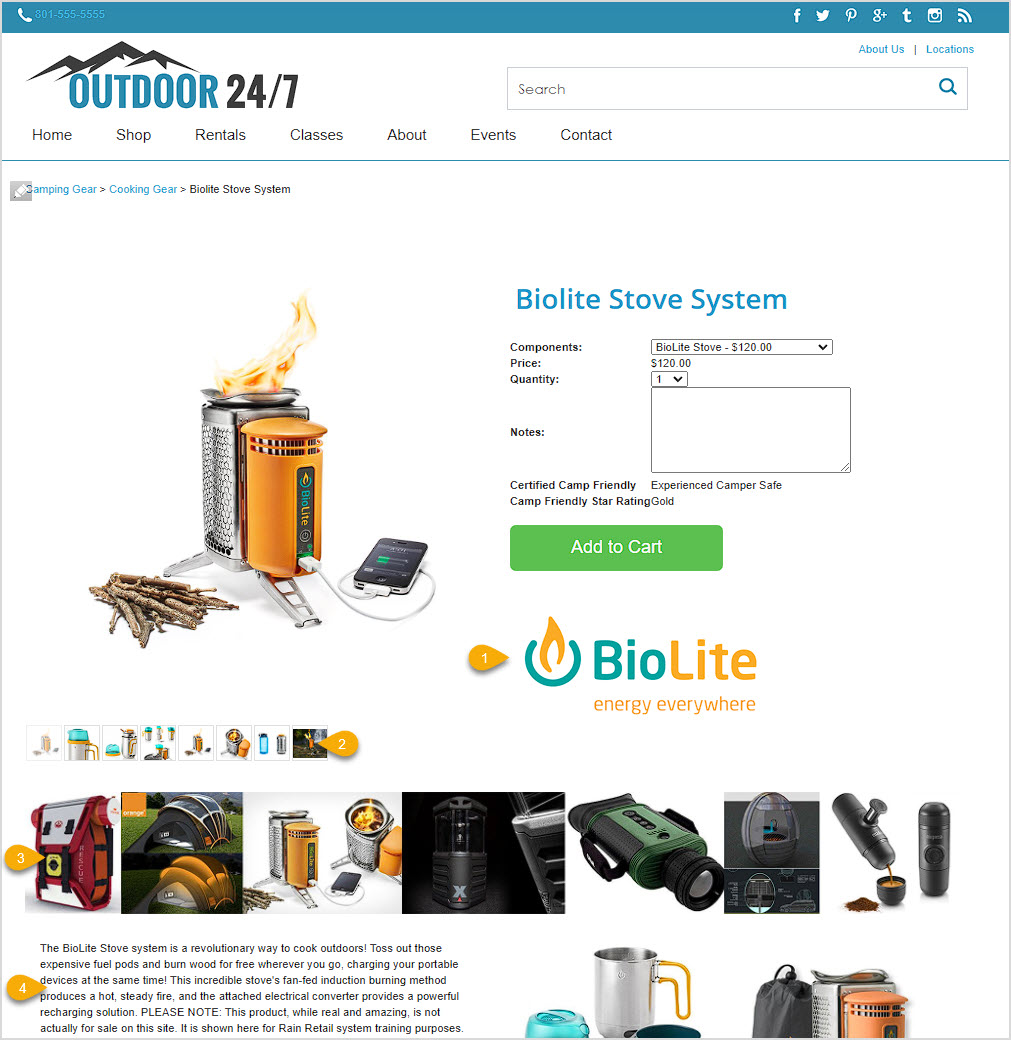
  • Please note that for the first option ( #1 below, the Product Message Below Add to Cart Button, not pictured) you have about 300px of width to work with, so create your content with care. This area is also where you can put product-specific content from the Edit Product > Website Settings > Brief Description Below Add-to-Cart Button, as pictured below with the logo.
  • If the product has multiple images, the micro-thumbnails for them will show up where you see #2 below.
  • The content in the area below the images, #3 below, will be full page width (about 1200 pixels).
  • The Product Description from the Website Settings tab of the product will display in the area indicated by #4 below.

Here is an example of where the content shows up:

PLEASE REMEMBER that the content for #1 and #3 above will appear for EVERY product listed on your website, so it needs to apply to everything you sell. Links to policies for your online store, shipping rates, promotions you are running, and many other types of content would work well in those areas.


What if I want some of my products to NOT have weights saved in the system for use with my ShipStation integration?

While we strongly recommend having weight values in place for all items using ShipStation shipping, you can set the system to allow items with no weight values in place to ship. Doing this can result in highly inaccurate shipping rates, so please proceed with caution. After logging into Rain POS, on the far right side of the blue bar click on the gear-shaped button and go to Settings > Website Settings > Shipping. Near the top of the list of options, click the Configure button for Enable Shipping Station Integration and scroll down below the methods and packaging. You will see a check box you can click to not require items to have weights in order to work with ShipStation. Check the box, then scroll to the bottom of the panel and click Save.


Why can't I use a gmail, AOL, hotmail, live, yahoo, or other common email provider for my From email address for system email notifications?

The reason such email addresses will not work for this system is because that spammers use email addresses like that to send bulk emails out at little risk to themselves. So bulk email provider services have trouble sending messages with From email addresses like that, so in the system, we do not allow them.