System Updates
March 15 - 28
New
Nothing New This Week
Improved
Purchase Order and Receiving Order Draft Improvements
We have improved the Receiving Order workflow so that when continuing to receive on a Purchase Order, the new RO no longer includes items that already exist in completed or draft ROs. The Continue Receiving button is now hidden when all PO items have already been accounted for across associated ROs.
Text Message Page Metering Instruction and Layout Update
We have updated the header design and wording on the Text Messaging page under the Marketing menu.
Shopify Integration Updated to Support Latest Integration Changes
We have updated the Shopify integration to accommodate recent API changes on Shopify's end. Existing connected stores are unaffected, but any new connections or reconnections will require setup using the updated method.
Digital Download Toggle Disabled for Certain Product Types
The Digital Download toggle is now disabled for Serialized, Variant, and Kit product types during both product creation and editing. A hover-tip explains why the setting is unavailable, and the change applies to both the new and legacy product pages.
Fixed
Items Duplicated in Special Order
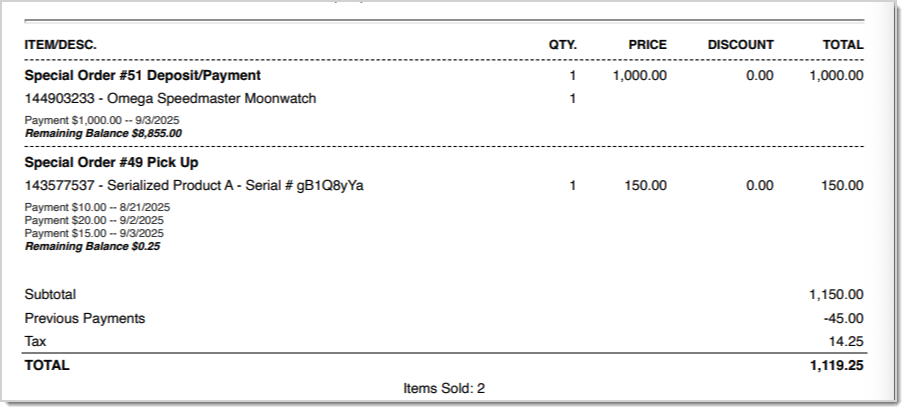
We fixed an issue where items were showing up twice in the transaction view after completing a Special Order, causing reporting to be off.
Class Materials Not Charging Sales Tax for Online OrdersWe fixed an issue where Classes with materials were not correctly calculating sales tax in some situations, resulting in online orders with no tax applied.
Checkout Not Reflecting Updated Class PricingWe have fixed an issue where customers could purchase a class for an outdated price if it had been sitting in their cart for an extended period. We added validation at checkout to ensure the current price is always applied.
Fractional Quantity Rounding Causing Incorrect Capture Amount on Web OrdersWe fixed an issue where fractional quantity rounding was resulting in a capture amount less than the authorized amount.
Scheduled Emails Not Sending at Correct TimeWe have fixed an issue where scheduled emails were not being sent. We have added improved timezone-aware time checks for more accurate delivery.
Error When Merging ProductsAn error was occurring when attempting to merge certain products, preventing the merge from completing. We have resolved this problem.
Marketing Email Defaults Not Applied on Newsletter Sign-UpWe have fixed an issue where the Newsletter Sign-Up Form was not respecting the default marketing email selections.
Marketing Email Defaults Not Applied Through Opt-In EmailWe fixed an issue where the confirm opt-in email was not respecting certain default marketing email selections.
Customer Group Coupons Not Recognized on Resumed TransactionsWe have fixed an issue where resuming a paused transaction would prevent Customer Group coupons from being applied, incorrectly reporting that the customer was not in the required group.
Purchase Queue Not Returning All Eligible ProductsWe fixed an issue where the Purchase Queue was not identifying all eligible products within the Purchase Order, resulting in fewer items than expected.
Extra Card Added to RegisterWe've made some fixes around extra credit and debit cards, or ghost cards showing up when completing a transaction. Typically, these cards were from paused or previous transactions.
Invalid Payment Response ObjectWe fixed an issue where the error "Oops! Error: Invalid Payment Response Object" was showing up when completing a transaction.
Fully Paid Special Order Charging Full Amount at PickupWe have fixed an issue where the full amount of a Special Order was due, even when it had been fully paid previously. This typically happened in some when return items were part of the same transaction.
Sales By Item Report Filtering Not Working ProperlyWe fixed an issue where the Category filter was not working properly for the Sales by Item report and the report was not saving the selections made.
Customer Percentage Discount Applying to Already Discounted Special OrderWe have fixed an issue where a Special Order was trying to reimburse the deposit amount paid during pickup. This was happening when a Special Order had a discount and then a Register discount was applied on top of that.
Customer Deletion Not Checking for SubscriptionsWe fixed an issue where a customer could be deleted but still remained visible due to having a subscription that was not deleted by the system.
Unable to Remove Product Till AlertWe fixed an issue where users were not able to remove Till Alerts for products they had created.
ShipStation Shipping Rate Mismatch Between Website and Actual ChargeWe have fixed an issue where shipping rates displayed on the website did not match the actual charge due to product dimensions not being included in the rate calculation.
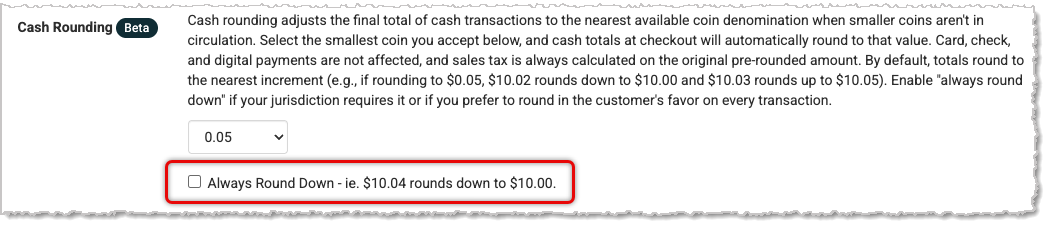
Cash Rounding Still Affecting Total When Cash Payment Is RemovedWe fixed an issue where removing cash as a payment after the total was rounded created a mismatch between the Total and Due fields.
Washington State Sales Tax Not Applied to Eligible Online OrdersWe have fixed an issue where sales tax was not being applied to certain Washington state online orders due to missing shipping address data.
Customers Not Being Added to Newsletter ListWe fixed an issue where new customers were not being added to newsletter lists because the default list selections from store settings were not being applied.
Deactivated Variants Appearing in Purchase Order SearchWe have fixed an issue where deactivated product variants were appearing in purchase order search results.
Sales Details Report Showing Incorrect Transaction TimesWe fixed an issue where the Sales Details report was not respecting the store's time zone, causing transactions to display with incorrect timestamps.
Logo on Form Style Being ReducedWe've fixed an issue where the logo size appeared correctly in the print preview for a Form Style, but was being reduced when printed.
One-Inch by One-Inch Barcodes Adding a Leading Zero for Option IDWe fixed an issue where the 1x1 barcode was adding a 0 before the Option ID, preventing the label from scanning.
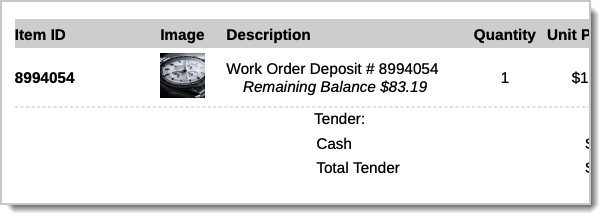
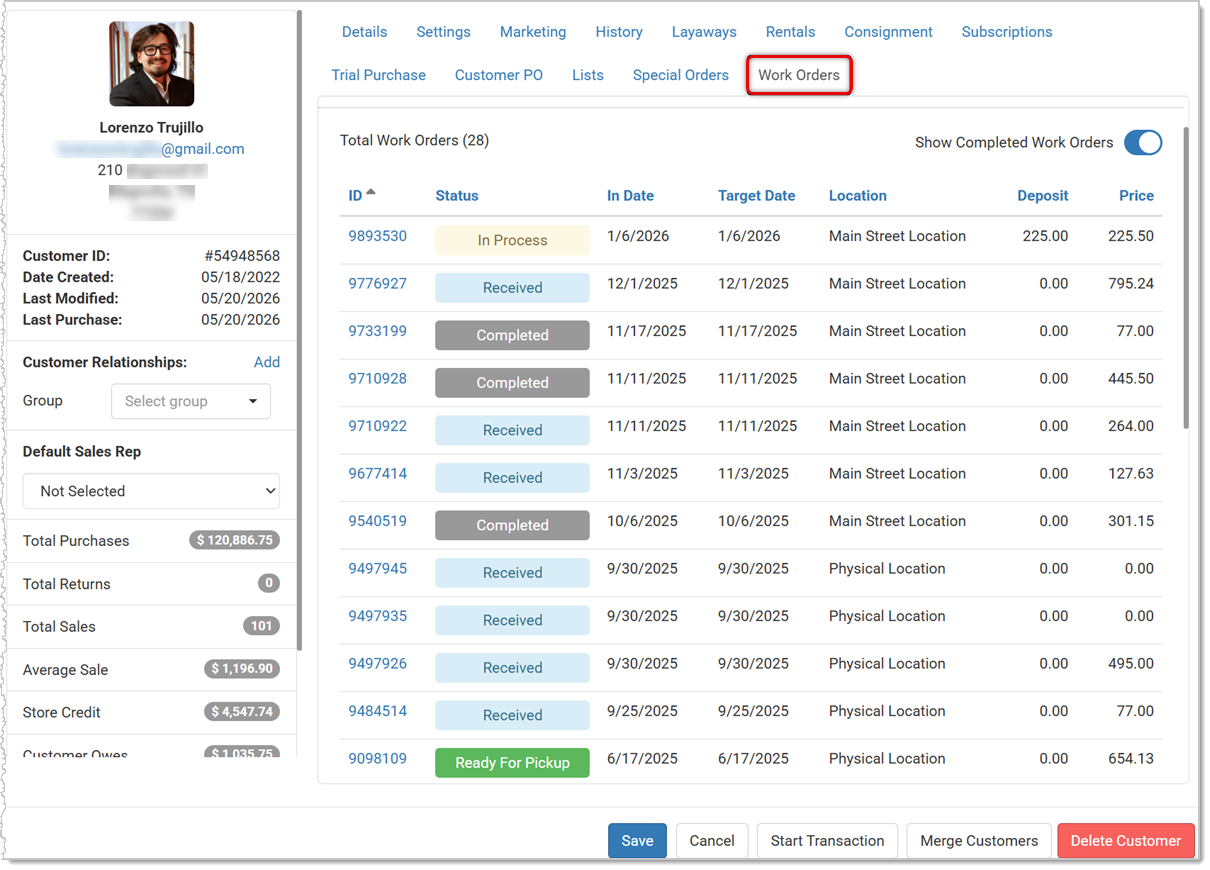
Work Order Requiring Payment When Already Paid in FullWe have fixed an issue where the Work Order was paid for, the customer returned at a later date to pickup it up, and the Work Order required the payment again.
Web Orders Applying Incorrect Discount With Rewards CouponWe fixed an issue where Reward Coupon discounts were not being calculated correctly at checkout, resulting in incorrect amounts on web orders.
Taxes Not Applied to Web Orders for Certain ItemsWe have fixed an issue where some items with a defined tax configuration were not being taxed on web orders.
Order Capture and Authorized Amounts Not Matching on Online OrdersWe fixed an issue where percent-off discount rounding during checkout was causing a mismatch between the authorized and capture amounts, preventing online orders from being processed.
Tax Calculations on Special Orders Affecting Balance DueWe have fixed an issue when a customer picked up part of a Special Order, the tax on the remaining balance was sometimes rounding incorrectly, causing the total due to be off by a cent or two.
Sales Tax for Classes Not Charged on PayPal OrdersWe fixed an issue where sales tax was not being applied to Class purchases on online orders paid via PayPal due to missing rate data. We also added cache invalidation for Washington state tax rates to prevent stale data.
Email Labeled as Optional but Required by SystemWe have fixed a confusing mismatch in the Credit Card Payment screen where the Email field was labeled Optional even when it was actually required. When the Save Card on File option is checked, the Optional label is now hidden so the field accurately reflects that an email address is needed.
Quickbooks Online Asset Entries Coming Over as $0We've resolved an issue where inventory asset journal entries were syncing to QuickBooks Online with a $0 value despite inventory cost changes occurring in the system. Entries will now accurately reflect those changes and Total Inventory values will import to QBO as expected.
Expired Coupons Appearing in Register Search ResultsWe fixed an issue where expired Reward Coupons were displaying alongside valid coupons in Register search results.
Serialized Items Incorrectly Set to Reserved State After ReturnWhen a serialized item was returned, it was being placed into a Reserved state instead of returning to an Available status.
We have fixed this issue.
Reserved Trial Purchase Items Incorrectly Included in Batch Inventory Unscanned ItemsWe have fixed an issue when bringing unscanned items into a Batch Inventory, items on Trial Purchase with a Reserved status were being pulled in despite not being physically present in the store. This caused those items to show a negative inventory count after reconciliation.
Batch Reconciliation Failing Without ErrorWe fixed an issue when clicking the Reconcile button on a Batch would appear to process but would fail without notification. The page remained unchanged and the Batch showed as Unreconciled after a refresh.
Transaction with Trade-In and Miscellaneous Item Charged Tax on the Misc Item OnlyWe've resolved an issue where adding a Miscellaneous product to a transaction containing a Trade-In caused sales tax to be calculated incorrectly.
Special Characters Not Saving in Product Title or Model NumbersWe've resolved an issue where products with special characters in their name or model number — such as degree symbols or parentheses — could not be updated or saved.
Customer Reward Coupon Applied to Wrong Customer's PurchaseWe fixed an issue where a customer's Reward Coupon could carry over and be applied to a different customer's transaction. Coupons are now properly cleared when loading a new customer.
That's all for this week. Thank you for being part of the family. Take care, we love you!!