Modules

Featured Articles
The Classes module is a powerful and flexible way to present your classes or other recurring events
The Form Styles module allows you to customize different types of documents you print from the syste
You can view invoices for each of your customers who has a balance by logging into the system and go
Layaways can be created from the blue Admin Toolbar at the top of the screen in Modules > Layaway
Suspend a Transaction There are two ways in Rain POS to save a transaction you've created: the first
You can create periodic subscription programs of any length with products you have created already b
You are able to allow your customers to 'try out' an item for whatever period of time you like using
The Website Settings Tab: Classes & Calendar You can get to this part of the system by clicking
Understanding the Work Order Process You can get to this part of the system by hovering over Modules
How to Process Special Orders You can create Special Orders by going to your Register by either clic

All Modules Articles

Helpful Blogs

Take a look at some creative ways to level up what you do.
How To Start a Boutique Retail Store: 6-Step Guide

Lorem ipsum dolor sit amet, consectetur adipiscing elit. Ut et massa mi.

image - 2025-04-28T114828.689
How To Start a Boutique Retail Store: 6-Step Guide

Lorem ipsum dolor sit amet, consectetur adipiscing elit. Ut et massa mi.

image - 2025-04-28T114835.188
How To Start a Boutique Retail Store: 6-Step Guide

Lorem ipsum dolor sit amet, consectetur adipiscing elit. Ut et massa mi.

Complete a Layaway

Steps for Completing a Layaway in the Register

Please note that you can also access any Layaway from Modules > Layaways.

  1. Go to the Register, you can click the Register Button in the upper left.
  2. Search for the Customer.
  3. Click any of the icons in the upper right, the Customer Actions panel will open. NOTE: If the customer has an active layaway, the open box icon will be highlighted in gold.

Customer Actions layaway.png

  1. Scroll down to Layaways in the left column and find the one the customer is picking up.
  2. Click the Pick Up button.
  3. The payment will load as a line item in the register. Fees, such as a late fee, will display as separate line items. Adjust fees and amounts as needed.
  4. Complete your transaction in the normal way.

Click here for more detail on working with layaways: Layaways.


Complete a Special Order

Steps for Completing a Special Order in the Register

  1. Go to the Register, you can click the Register icon in the upper left.
  2. Search for the Customer.
  3. Click any of the icons in the upper right, the Customer Actions panel will open. NOTE: If the customer has an active special order, the ticket icon will be highlighted in gold.

    Customer Actions special orders.png

  4. Scroll down to Special Orders in the left column.
  5. Find the Special Order the customer is picking up.


  6. Click the Pick Up button, your special order will load as a line item.
  7. Complete your transaction in the normal way.

Click here for more detail on working with Special Orders: Working with Special Orders.

Complete a Work Order from the Register

Steps for Completing a Work Order from the Register

  1. Click the Register icon in the upper left.
  2. Search for the Customer and click the name to add the Customer to the Register.
  3. If the Customer has active Work Orders in the system, you will see the Wrench icon highlighted in gold in the upper right, with the other Customer Action icons.
  4. Click any of the Customer Action icons in the upper right of the Register.

Customer Actions.png

  1. The Customer Actions panel will open, and the Work Order(s) are listed at the bottom of the left column. Click the Work Order to load it into the Register.

  1. You will see line items for each service and part, and you can apply any discounts you might need.
  2. Complete the transaction in the normal way.

Click here for more detail on processing your Work Orders: New Version of Work Orders.


Compliance Update to System Autopay Emails

To remain federally compliant with regulations governing autopay billing for recurring charges to credit cards on file we have updated the emails the system sends out for areas that apply, such as those for Subscriptions and Rental Contracts. In each of these areas, the system sends out an email regarding the recurring billing when the feature is initially started for the customer, and then also sends out a notification email each time a payment is made.


Subscription Email Updates

Here is an example email of what the system will send out whenever a customer starts a new Subscription:

We are required to show the terms of the automated billing, such as how much each payment and estimated tax will be, when the first payment will start, and for how many payments the subscription will run. We also show at what frequency payments will be charged, and the basic payment info for the card being used (card type and last 4 digits). Finally, the footer contains essential info and in the bottom paragraph, we are required by law to provide a link the customer can use if they want to opt out of the subscription, or info for contacting the store. Please note that just providing contact info is not enough for this requirement, the link must be present.

For each payment that is charged to the customer's card for the Subscription, we will send an email like the one below, which contains similar content also required to be compliant.


Rental Contract Email Updates

Since Rental Contracts also use recurring billing, we have updated the system notices for that area as well. Here is an example of an email a customer will get when they start a new Rental Contract:

For this area as well, we are required to show the terms of the automated billing, such as how much each payment and estimated tax will be, what fees will be charged if there are any, when the next payment will be, and for how many payments the contract is scheduled to run. We also show at what frequency payments will be charged, and the basic payment info for the card being used (card type and last 4 digits). The footer contains essential info and in the bottom paragraph the customer can see info for contacting the store if they have questions about their contract. Since it is a contract, we are not required by law to provide a link that can cancel the automated payments.

For each payment that is charged to the customer's card for the Rental Contract, we will send an email like the one below, which contains similar content also required to be compliant.

Create Short-Term Rental Products, Accessories, and Packages

To work with Rental Items and Packages, go to Modules > Rental Admin, and in the list on the left, click on the Rental Category for the Items and/or Packages.

rt 01.jpg

It is recommended that you read the Rental Settings article before proceeding.


Adding a New Rental Item

  1. Go to Modules > Rental Admin.
  2. Click either the white +Item button or the white +Package button. Both will take you to the same page and you can switch between either by changing the Item Type at the top right-hand corner. Please note, this is a two-step process, meaning you’ll add the items, then go back into them to enter inventory, edit categories, and input further details. Additionally, you can create items by selecting a category and adding the item with the +Item button. This will add the product directly to the appropriate category.
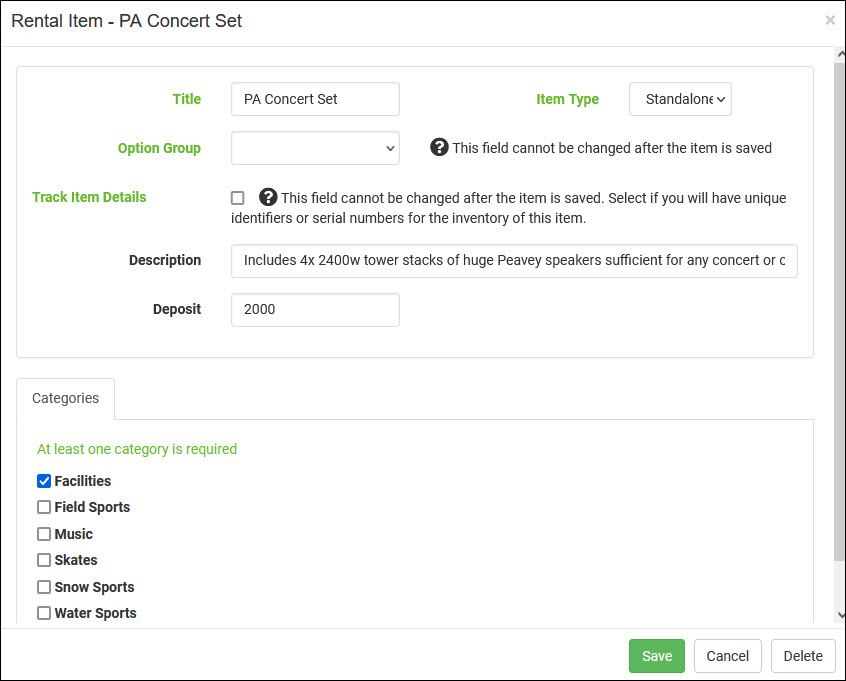
  3. Enter the Title – The item's name, ideally the same way the manufacturer writes it.
  4. Select the Item Type – Here are the different item types you can create:
    • Standalone: Single items (wetsuits, skis, mountain bikes, longarm sewing machines, etc.)
    • Package: These are bundled items (a diving package w/ goggles, regulator, and a scuba tank, full skiing set, or a classroom with a TV, sewing machine, etc.)
    • Accessory: Sort of like Suggested Items with a particular product. For example, if you rent a bike, you may also want to rent a helmet, or if you're renting skis, you may also want goggles. These can be added to items and packages after they’ve been created.
  5. Add the Option Group, if applicable * – This associates the necessary options with what the item requires for adding rental inventory. For example when you set up the Item Options (see Setting up Rentals), they may have included size options (sm, md, lg). When you set an Option Group for a product, you will add inventory to the option (i.e. size, color, style, etc.) during the item creation process.
  6. Track Item Details* – If the items being entered have specific ID number(s), this should be checked. However please note: this field cannot be changed after it is saved. If you don't check this box, the inventory will be added as pooled items, which means the system will not keep track of specific items and sell them simply as inventory. Tracked items will associate a specific item Id to the customer it was sold to.
  7. Add a Description – A brief description of the item or package. Used for Website and SEO, so be sure to have your major keywords in the description.
  8. Set the Deposit Amount – The security deposit amount that you will hold. Please note, this should be entered without any special characters, which means a deposit of $13.00 should be entered as 13.00
  9. Set Categories – Check the boxes you want this item to appear in.

*These fields do not apply to new packages.

rt 02.jpg


Entering Item Details

Once an item has been entered and saved, it can be found by going to the Category you assigned it to. Clicking on one of the categories to the left will show you all the items within it. You’ll notice there are columns that list the basic details for each item, including: the Name, Type (item, package, or accessory), Options, Inventory, Deposit amount, Accessories, and Renter Details count (the number of details required of a renter in order to rent the item).

2017-01-25_15h47_19.png

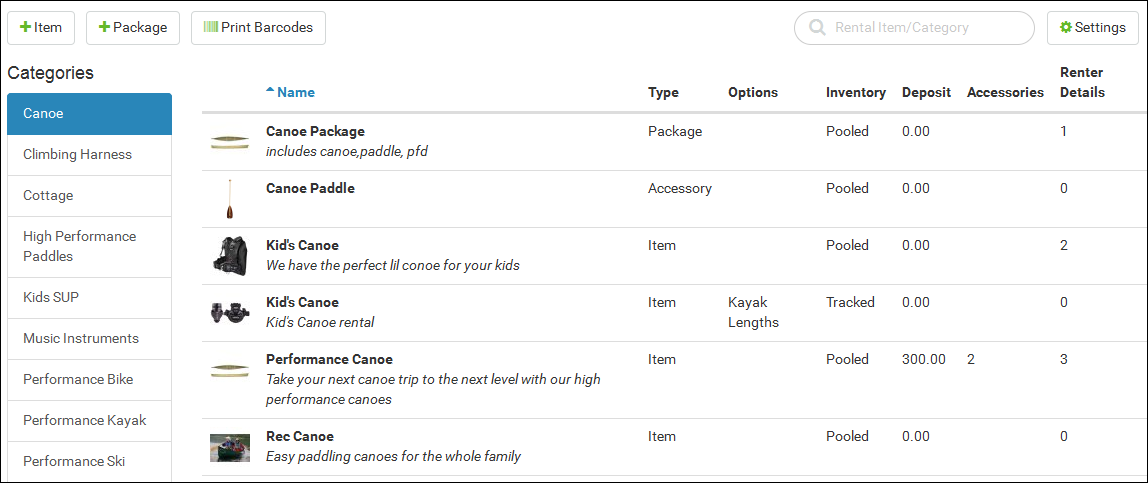
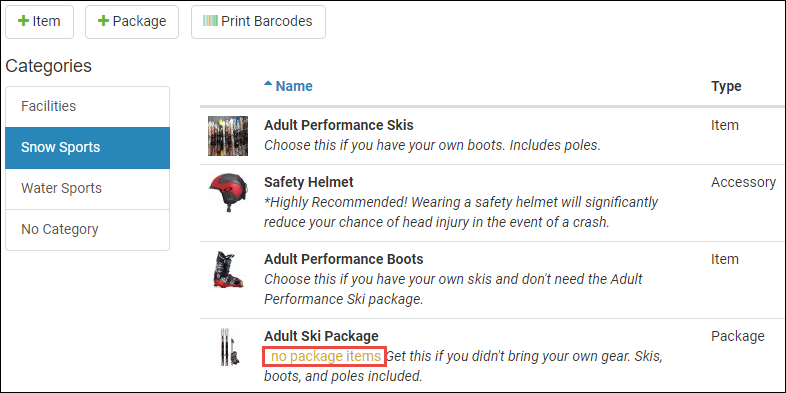
If an item is missing its price or if a package is missing items there will be a small warning in orange that will notify you.

orange warning.png

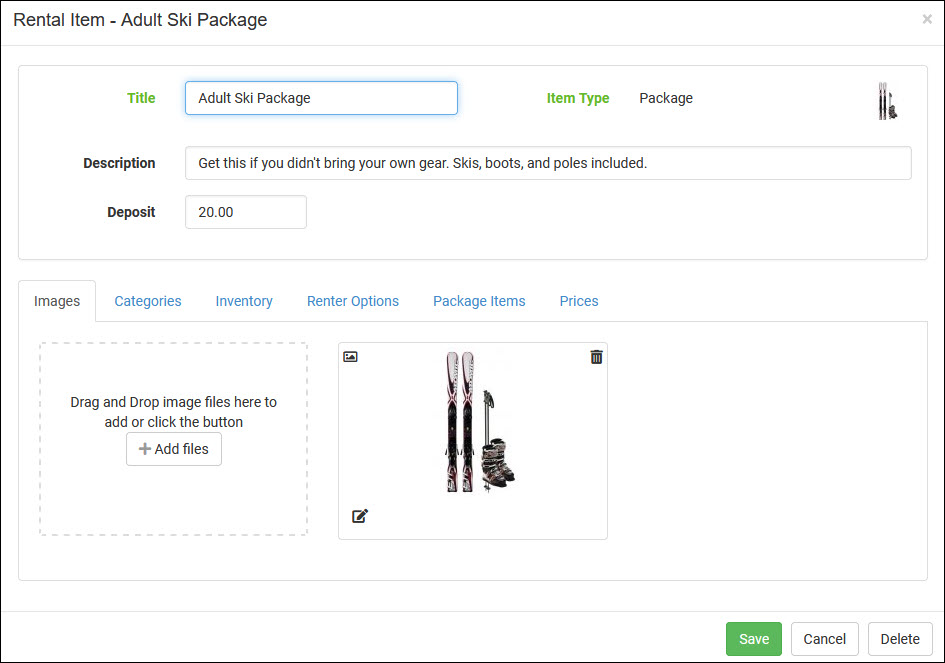
The green camera icon (not pictured: you will see it if you haven't yet entered an image for the item) indicates there are no images associated with the item. You can add images to an item by clicking on the item and adding the image in the Images tab. The images will be scaled automatically and you can select the default thumbnail image by pressing the small image icon in the top left of the uploaded image. The icon in the bottom left corner of the uploaded image allows you to enter a caption when you click it. You can remove images at any time by pressing the garbage can icon in the top right corner. You can add up to four images to any single rental item.

rt 03.jpg

Clicking on an item will allow you to enter or edit its details. Some of the fields will display product details from the information you originally added, but some new fields will be added in this area. Below is a full list of each tab that will need to be filled out.

Images – Follow the instructions provided in the Images tab to upload a picture of your rental item. The image(s) be displayed in the POS Register.

Categories – This should be pre-populated with what you entered when you created the item, but if you want to change the available categories, you can check or un-check them here. Please note, you may add items to multiple categories.

Inventory – To add inventory quantities, press the small green arrow in the right-hand corner. A new window will appear asking for the location to which you are adding inventory (for multi-store locations). Select an item option if applicable, and a Hold inventory amount. This inventory is reserved as backup inventory and will not be available to rent via the Web. It’s designed for in-store rentals only so as to prevent over-renting an item in the rare case of a physical shortage due to damage, theft, or missing inventory.

rt 04.jpg

To add additional inventory, press the white + Add button. With pooled items (items that are not tracked specifically, instead simply tracked by inventory amount) a new line will appear asking for the quantity to add and the cost per item. After you enter these fields, press the green Save button at the bottom. The records will be saved and you can edit them manually at any point, though we don’t recommend it. Tracked inventory items are the same, except that you have the option of adding a serial number, unique ID label, manufacturer, model, and cost. Please note, that the system will search by serial number, unique label, or item title.

rt 05.jpg

Renter Options – These come from the Renter Options you created in the Settings and you can add these details wherever applicable. For example, ski rentals may need renter age, height, foot size, etc.

Package Items – This only applies to packages, not standalone items or accessories. – Press the blue + sign to add the items you want to be in this package.

Prices – To enter your renting prices for this item, click the white Manage Prices button. A panel will slide out showing you fields for each day of the week. The Initial Price column is for an optional rental fee. For example, you may charge a standard $50 for all rentals, and then an additional $10/day. If no initial price is needed, then it should be left blank. The Time Periods that you entered in the Settings will display automatically, and you can remove them for an item by pressing the red X button. To add removed Time Periods back, you must navigate out of the page and back in again and you’ll see a green + button you can press. To clear the times you’ve entered, press the red circle with the line through it. You may also notice after the Monday column there is a green arrow icon pointing forward. Pressing that will populate all the other days with whatever you entered for Monday. When you're finished, press the green Save button.

Please note: To have a day NOT charge the customer, Sunday for example, set the Duration Price field to 0.00 for that day. If the 0.00 is not in place, the system will count the day in question as another day of rent at the same price as the previous day.

What's the difference between Days (24 Hours) and Daily?

Selecting the Time Period of Days (24 Hours) sets a pricing rate that will apply to whatever day the rental is started, and different rates could be set for different days, as in the example above. In this kind of Time Period, it applies to the 24-hour period that starts on the beginning day of the rental and ends the same time the next day.

Selecting the Time Period Daily sets a single rate that would apply to any single day, but if the rental goes into the next day, a second Daily rate would be applied to the rental.


Customizing Work Order Text Messaging

The work order text messaging feature allows users to customize text messages sent to customers regarding their work orders. This includes customizing the default message sent when orders are ready for pickup as well as customizing the signature appended to messages for each store location, if you have multiple stores.


Customize Your Text Signatures

  1. Click the Admin Button with your username in the upper right and go to Settings > POS Settings > Work Orders.

  2. Scroll down to the Signature section.

  3. Click the dropdown and choose Custom Signature.

    • Enter the custom signature you want in the field to the right.
    • Click Save at the bottom.


Ready for Pickup Notification

In the same area of Settings, you can configure the default message content that will be sent whenever a Work Order is ready to be picked up. In the section for Default Message for Notifying Customer, the system default message will be in place. You can edit the content, and if you want, you can add automated merging of the Customer's first name and the Work Order ID, as pictured below. Once you're done configuring the message, click to Save.

Please note, if you have also customized the signatures as described above, the text message notifications will have those custom signatures so the customer will know which location to go to.

In the Work Order, you will see the message when the system prompts you to notify the customer about pickup.

When you change the Status of a Work Order to Ready for Pickup and click to Save the Work Order, a window appears with a text message box and signature.

The Message Content will populate the default message you have saved in the settings, as described above, and will also include your customized signature, as pictured below.


How do I set my From email address for emails the system sends out?

After logging into the system, in the upper right click on the Admin Button with your username and go to Settings > Website Settings > Website Settings > Email, and you will see a field to enter your From Email Address. Please note the warning on the page about not using an email address provided by one of the big free email providers, such as AOL, Hotmail, Gmail, Yahoo, etc. The reason such email addresses will not work for this system is because that spammers use email addresses like that to send bulk emails out at little risk to themselves. So bulk email provider services have trouble sending messages with From email addresses like that, so in the system, we do not allow them.


How to Create a Link to a File

Create a Link to a File

1442439823_open-file.png

These steps will help you create a text or image link to a file hosted on our servers for your site. Our system will allow you to upload the following file types: Documents / Productivity - CSV, DOC, DOCX, PDF, PPT, PPTX, RTF, TXT, XLS, XLSX. Images - BMP, GIF, JPG, PNG. Audio - MP3, WAV. Video - AVI, FLV, MOV, MPG, MP4, QT, SWF, WMV. Compressed Files - ZIP.

  1. After logging into the system, click Website > Website Editor and go to the page where you want to create the link.
  2. Either create a new module for the link (click on the Add Body Content link at the top and click the Add button for the Content module at the top of the list) or click the Edit button (the fat little pencil) in the gray toolbar of an existing module where you want to create the link.
  3. If you are adding a link to an image, click on it to highlight it. If you are making a text link, type out your text and then highlight it with your mouse. (Example: Click here to view our Summer Catalog!)
  4. Click on the Insert/Edit Link button (in the functions above the Content editing box, in the top row of buttons: this button looks like three chain links).
  5. Click on the Browse Server button (the button on the far right of the Source field; it looks like a folder with a magnifying glass).
  6. If you have already uploaded the file, click on the folder it is in and find it in the list (or Search for it in the upper right) and then click on the file. If you have not uploaded the file yet, do the following steps:
    • Click on the blue Upload File button.
    • Click on the green Add Files button and search your computer for the file you want.
    • Either double-click on the file or click on it once and then click the Open button.
    • You will see a small thumbnail image of your file in the Upload Files window. Click on the blue Start Upload button.
    • Depending on the size of the file you are uploading and the speed of your connection, you may see a status bar for the upload. Once the file has finished uploading, the Upload Files window will disappear.
    • You will see your file at the top of the list. Click on it.
  7. You will see the URL for the file inserted into the URL field for the link. Click on the drop-list arrow for Target and then click on New Window (blank). The reason you will want the file to download in a new window is because in many cases a browser will take your visitor away from your site to load the file in the window. By having it load in a new window your visitor can download the file, and when they are done, they can close that window and they will be right back at your site.
  8. Click OK.
  9. Scroll down to the bottom of the screen and click the Save button.
  10. Test your new link to verify that it works correctly.
How to Create Links to Pages, Files, and Email Addresses

Create a Link to a Page on Your Site

1442429099_page.png

These steps will help you create a text or image link to a page on your site. For these steps, the page must appear in your All Pages list, so this kind of linking will not work if you need to link to one of your products, classes, events, or news items. Please see below for instructions on how to link to dynamic module pages.

  1. Go to Website > Website Editor and go to the page where you want to create the link.
  2. If you are creating a new module for the link: Click Add Body Content and click the Add button for the Content module at the top of the list. If you are adding the link to an existing module: Click the Edit button (the fat little pencil) in the gray toolbar of an existing module where you want to create the link.
  3. If you are adding a link to an imageclick on it to highlight it. If you are making a text linktype out your text and then highlight it with your mouse. (Example: Click here to see our best deals in our Huge Sale!)
  4. Click on the Insert/Edit Link button (in the functions above the Content editing box, in the top row of buttons: this button looks like chain links).
  5. Click on the Browse Server button (the button on the far right of the Source field; it looks like a folder with a magnifying glass).
  6. In the upper left click on Pages and then find the page you are linking to in the list and click on it. Please remember that links to unpublished pages will not work until you publish the page. Also, if you don't find the page in the list, it may have been moved to a sub-folder of pages on the left (you may need to click on the little triangle next to the folder to see the sub-folders). If you cannot find the page in any of the folders, it is most likely a dynamically generated module page (e.g. a product, category, event, news item, etc.). If that is the case, please follow the instructions on Creating a Link to a Dynamic Module Page below.
  7. In the Link Properties window click OK.
  8. Scroll to the bottom of the screen and click the Save button.
  9. Test your new link to verify that it works correctly.


Create a Link to a File

1442439823_open-file.png

These steps will help you create a text or image link to a file hosted on our servers for your site. Our system will allow you to upload the following file types: Documents / Productivity - CSV, DOC, DOCX, PDF, PPT, PPTX, RTF, TXT, XLS, XLSX.  Images - GIF, JPG, PNG, SVG. Audio - MP3, WAV.  Video - AVI, FLV, MOV, MPG, MP4, QT, SWF, WMV.  Compressed Files - ZIP.

  1. Go to Website > Website Editor and go to the page where you want to create the link.

  2. If you are creating a new module for the link: Click Add Body Content and click the Add button for the Content module at the top of the list. If you are adding the link to an existing module: click the Edit button (the fat little pencil) in the gray toolbar of an existing module where you want to create the link.

  3. If you are adding a link to an image: click on it to highlight itIf you are making a text linktype out your text and then highlight it with your mouse. (Example: Click here to view our Summer Catalog!)

  4. Click on the Insert/Edit Link button (in the functions above the Content editing box, in the top row of buttons: this button looks like three chain links).

  5. Click on the Browse Server button (the button on the far right of the Source field; it looks like a folder with a magnifying glass).

  6. If you have already uploaded the file: click on the folder it is in and find it in the list (or Search for it in the upper right) and then click on the file.

    If you have not uploaded the file yet, do the following steps:

    • Click on the blue Upload File button.
    • Click on the green Add Files button and search your computer for the file you want.
    • Either double-click on the file or click on it once and then click the Open button.
    • You will see a small thumbnail image of your file in the Upload Files window. Click on the blue Start Upload button.
    • Depending on the size of the file you are uploading and the speed of your connection, you may see a status bar for the upload. Once the file has finished uploading, the Upload Files window will disappear.
    • You will see your file at the top of the list. Click on the file.
  7. You will see the URL for the file inserted into the URL field for the link. Click on the drop-list arrow for Target and then click on New Window (blank). The reason you will want the file to download in a new window is because in many cases a browser will take your visitor away from your site to load the file in the window. By having it load in a new window your visitor can download the file, and when they are done, they can close that window and they will be right back at your site.

  8. Click OK.

  9. Scroll down to the bottom of the screen and click the Save button.

  10. Test your new link to verify that it works correctly.


Create a Link to an External Page or to a Dynamic Module Page

1442440698_applications-internet.png

These steps will help you create a text or image link to an External Page (a page that is not on your website) or to a Dynamic Module Page (these are pages that are generated by the system: for example, if you look at your Calendar and click on View Entire Calendar, the system takes you to a dynamic page for the current month based on the information you've put into the system). Dynamic Module Pages include Categories and Products in your online store, Categories and Events in your Calendar, Categories and Classes in your Classes module, and individual items in the following modules: FAQ, Job Listings, News, and Newsletter Archive. It is also possible to link to a specific search that you do in your Search module, and those results are also dynamically generated.

  1. Go to Website > Website Editor and go to the page where you want to create the link.

  2. If you are linking to an external web page: open a new tab or window in your browser and go to the page that will be the end destination of the link you are making. Highlight and copy the web page URL.

    If you are linking to a Dynamic Module Page: go to the page that will be the end destination of the link you are making. Highlight and copy the web page URL. IMPORTANT: If your website is not live yet and/or if you are still logging in with the mywebsite.rainadmin.com/admin address, you should copy everything after the .com, so the part of the link you will copy will start with the / after the .com and will look like this: /shop/shoes/nike-streak.htm

  3. After you have copied the URL, go to the page on your site where you want to create the link.

  4. If you are creating a new module for the link: Click Add Body Content and click the Add button for the Content module at the top of the list.

    If you are adding the link to an existing module: Click the Edit button (the fat little pencil) in the gray toolbar of an existing module where you want to create the link.

  5. If you are adding a link to an image: Click on it to highlight it.

    If you are making a text link: Type out your text and then highlight it with your mouse. (Example: Click here to go the Nike website.)

  6. Click on the Insert/Edit Link button (in the functions above the Content editing box, in the top row of buttons: this button looks like three chain links).

  7. Paste the web address you copied into the URL field. NOTE: If you are linking to an External Page, you need to also do the following:

    • Click on the drop-list arrow for Target and then click on New Window (blank). The reason you will want the external page to open in a new window is because the browser will take your visitor away from your site. By having it open in a new window, your visitor can view the page and when they are done, they can close that window and they will be right back at your site.
  8. In the Link Properties window click OK.

  9. Scroll to the bottom of the screen and click the Save button.

  10. Test your new link to verify that it works correctly.


Create a Link to an Email Address

1442445310_email_open.png

These steps will help you create a text or image link to an email address. This kind of link will open your visitor's default email program on their computer. In some cases your visitor might not use such software at all, preferring instead to use browser-based email such as Yahoo Mail or Gmail. If they don't have email software they use, their system will open a default program that may not even be set up for them yet, so it is a good idea to make sure that the link you create to your email address also shows the text of the email address. Please follow the steps and see the example below:

  1. Go to Website > Website Editor and go to the page where you want to create the link.

  2. If you are creating a new module for the link: Click Add Body Content and click the Add button for the Content module at the top of the list.

    If you are using an existing module: Click the Edit button (the fat little pencil) in the gray toolbar of an existing module where you want to create the link.

  3. If you are adding a link to an image: Click on it to highlight it.

    If you are making a text link: Type out your text and then highlight it with your mouse. (Example: Email us at info@outdoor24-7.com!)

  4. Click on the Insert/Edit Link button (in the functions above the Content editing box, in the top row of buttons: this button looks like three chain links).

  5. In the URL field, enter the following: mailto:

  6. Enter the email address the link will be sending to, e.g. mailto: info@outdoor24-7.com (please note there are no spaces in the URL field)

  7. Click the Target drop-list and then click on New Window. You will want this function in case they are using web mail, so it won't take them away from your site; it will open their web mail in a new tab.

  8. Click OK.

  9. Scroll to the bottom of the screen and click the Save button.

  10. Test your new link to verify that it works correctly.


Another type of link is an Anchor link, which will basically jump to a certain part of a page. If you want to learn more about Anchor links, click here: Link to Page Sections with Anchor Links.

I don't see the option to add Wait Lists for my Classes, how do I add that?

Once you have logged into the system as an Administrator, in the upper right you'll see the Admin Button with your username. In the drop-list, click on Settings > Website Settings, and in the first tab that comes up (Calendar & Classes), scroll down to the second section and you can check the box for Add to Waitlist in the area for Class settings. Be sure to click Save at the bottom if you made any changes.

Once you have enabled that option, in each class in the Pricing tab you will have the ability to activate a Wait List for the class. Any students that add their names to the Wait List for classes that are fully booked will appear under Reports > Wait Lists.


Short Term Rental Reservations and Returns

The area of the system where you'll create your Rentals is the Register. Begin by logging into the system and then on the left side of our blue Admin Toolbar, click the Register Button.

Entering a rental is very similar to completing a normal transaction. Rentals can be initiated in two ways. In both cases the customer's name must be entered first.

Please Note: The system will not allow a rental without customer information.

The first method of entering a rental item is to press the blue Rental link in the register. The second option is entering a unique rental item in the Item Search area as shown below. Please note, that a rental item will be displayed with two horizontal arrows next to it identifying the item as something that is available to rent. Clicking on an item from the search will load it in the Rental Panel.

When the rental panel appears, you’ll see the customer is added to the rental already and additional renters can be added for families or groups. If the customer is picking the item up now, click on the calendar icon and choose the return date and time from the available slots. If the customer is picking up the rental at a later date, press the blue Change to Reservation button and select the Pick Up and Return date(s) and time ranges.

Items can be added by using the search box below the Renter’s name or by scanning/entering the item number, or by pressing the white Browse button. Once an item is entered to rent, you’ll see the calendar appear with the available days and inventory counts. If there are any accessories attached to the item you’ll see a small window appear. If any of the accessories are needed, click on them to add them to the rental item then press the white Close button at the bottom or click on the main screen to exit. The rental item and its accessories will have their available dates shown to the right.

Additional renter's orders can be added at any time by pressing either of the white buttons below the search box and subsequently their name(s) can be edited by pressing the blue Pencil icon next to their name.

If renter information is required for any of the items there will be a green Renter Info button at the bottom of the page that is required before the rental can be saved. These are configured in the Rental Settings Tab. If a waiver/agreement is required, you can print that off at any time by pressing the white Print Waiver/Agreement button, which will open the waiver up in a new printable tab.

You can also configure some options for this Rental window by clicking the gear-shaped button in the upper right of the window. Try different settings to see which configuration will work best for you:

Once the rental has been completed, the details of the rental will be displayed in the Register and can be checked out. To submit a deposit, click the four small purple buttons next to the rental item and choose either cash or card.

Please Note: The deposit is done separately in the line item and then the main rental payment is done the normal way for a transaction.


Deposit Method (Rental Pickup)


Deposit Payment Panel

You can edit the rentals prior to checkout by clicking the orange Edit button in the Rental line-item.


Returning/Exchanging Rental Items

You can run returns on Rental transactions by scanning the receipt barcode or by pulling the customer’s name up in the register and clicking on the rental icon in the top right to find their rental transaction. Next to each rental transaction will have a Return button. Click on that to begin the return process. Upon return of Rental items, any late fees are automatically calculated. The sales clerk may edit the pricing. Any late fees and/or additional purchases, are subtracted from the rental deposit.

Additionally, details of any rental may be found in the Rental Status or Rental Calendar items under the Modules menu as pictured below.

Clicking on any rental item will pull up its full details, including renter contact information, dates/times, price, and item details.

In addition to viewing rental statuses, you can also return or exchange items by pressing either the white Open in Till button (for exchanges or edits) or the blue Return button (for full or specific item returns).


Special Order Placeholder Items

Overview of the Special Order Placeholder Feature

The Special Order Placeholder is designed to streamline the process of handling special orders when the exact product details are not immediately available. This feature is particularly useful for users who lack the necessary permissions to create products in the store's system but need to take down notes of what the customer is ordering.


Create a Special Order Placeholder Item

  1. Go to the Register by clicking the Register Button in the upper left. This is where you'll start the Special Order.
  2. Search for the Customer you want.
  3. Click on any of the Customer Actions icons in the upper right to open the Customer Actions panel. Please note: If the customer has any Special Orders, the Ticket icon will be highlighted in gold, as pictured here.

  1. In the Customer Actions panel, find the section for Special Orders and click the + button to start a new Special Order.

  1. In the New Special Order panel, next to the item search, click the New button and in the drop-list, click New Placeholder.

  1. In the Create Placeholder window that opens, enter the Placeholder item details:

    • Enter a Product Title.

    • Enter an Estimated Price and a Quantity of at least 1 (quantity is required).

    • It is optional for you to set a Department, Vendor, and Product Type.

    • Add any relevant notes and media, if available.

  2. Save the Placeholder item.

    • Click Save to return to the Special Order.

    • If you need to create additional Placeholders for the Special Order, click Save and New.

  3. Once you have created the Placeholder items you need, click the Add to Register button and finalize the Special Order by completing the initial transaction.

  4. Once you know the actual products the Placeholder items represent, you will need to change each Placeholder item into a real product:

    • Go to Modules > Special Orders and find the Special Order you want in the list. You will see each item in the Special Order as a separate line item.
    • Click on a Placeholder item to open it in the Special Order details panel.
    • Notice that a placeholder has a status of Incomplete. Click the Finish Creating Product link.

  1. After you click to Finish Creating Product, the item will open in an Edit Product window. Add all necessary product details in the product page and then Save and Close the product window.
  2. Notice that the product no longer has the Finish Creating Product link and the status has changed to Created. Now you can add the product to Purchase Orders or directly to the Register and it will function like any other standard product.


Fulfilling a Special Order with Placeholder Items

Placeholder items cannot be fulfilled. If you click the Fulfill Order button at the bottom of the Special Order, any Placeholders in the SO will not load into the fulfillment window. The example Special Order above has two Placeholders and one item that was converted into a standard Product. If a standard product and a Placeholder are in the same Special Order and click the Fulfill Order button, only the created product will show in the Manual Fulfillment window, as pictured below.


Creating a Product from a Placeholder in a Purchase Order

You can also view and create a product from a Placeholder item in a Purchase Order. Here is how to work with Placeholders in a PO:

  • Create a new Purchase Order by clicking the +Create New button in the upper right and clicking Purchase Order in the drop-list.
  • Click the Vendor drop-list and click on the vendor you want.
  • Click the Purchase Queue button on the right, and the Purchase Queue panel will open.
  • Find the section titled Incomplete Special Orders.
  • Click the View button next to the Placeholder you want to convert to a product.
  • The Special Order will open and you'll be able to click to Finish Creating Product as described above in steps 10-11.
  • Once the product has been created it will move from the Incomplete Special Order section to the Special Orders section where it can be added to the Purchase Order.

Please Note: For staff members who do not have the User Group permission to create new products but but who need to create special orders, this functionality will not allow them to convert Placeholders to products.


Frequently Asked Questions

Can I edit a placeholder after saving it? 

Yes, placeholders can be edited by accessing them through the special order's list page or through the purchase order queue.


What happens if I don't complete the product creation?

The placeholder will remain with an Incomplete status and cannot be fulfilled until you convert it to a product.


Is it mandatory to add media to a placeholder?

No, adding media is optional but can be helpful for reference.

The info on the Advanced tab of my class doesn't show up on the class's web page, how do I get it back?

This information does not display if you are using the 'Version 2 Preview' setting for your Classes. That setting enables the use of the Materials tab of your classes, so at this time, you cannot display both the Materials tab and the Advanced tab information for a class. To enable or disable that setting, once you have logged into Rain POS as an Administrator (your login link should look like ' yourwebsitename.rainadmin.com/admin';), on the far right side of the blue Admin Toolbar, click the gear-shaped button. In the drop-list, click on Settings > Website Settings, and in the first tab that comes up (Calendar & Classes), scroll down to the second section and you can check or un-check the box for Version 2 Preview. If you made any change on the settings page, be sure to scroll to the bottom of the page and click Save.