Layaways

August 22, 2024
Layaways can be created from the blue Admin Toolbar at the top of the screen in Modules > Layaways, or you can do it from the Register by adding the customer, clicking on the Customer Actions buttons, and finding the + button for Layaway.
Creating a Layaway
There are two areas you can create new Layaways. The one you are likely to use most often will be from the Register.

- First, you will need to add the Customer to the Register.
- Once they are in place, look to the far right of the Register to the icons displaying Customer Actions and click on any of them. If they already have an active Layaway, the box icon will be highlighted.
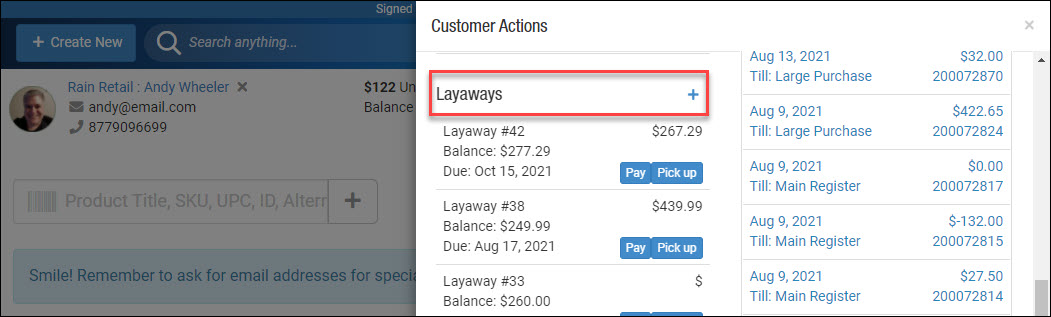
- The Customer Actions panel will open and you can click the + button next to Layaways to start a new one. You can also use this area to make a single scheduled payment with the Pay button, or if they are ready to complete the purchase, click the Pick Up button and they can pay the remaining balance. When a customer has come down to their last payment in the series, the Pay button will no longer display, they will be ready to Pick Up.
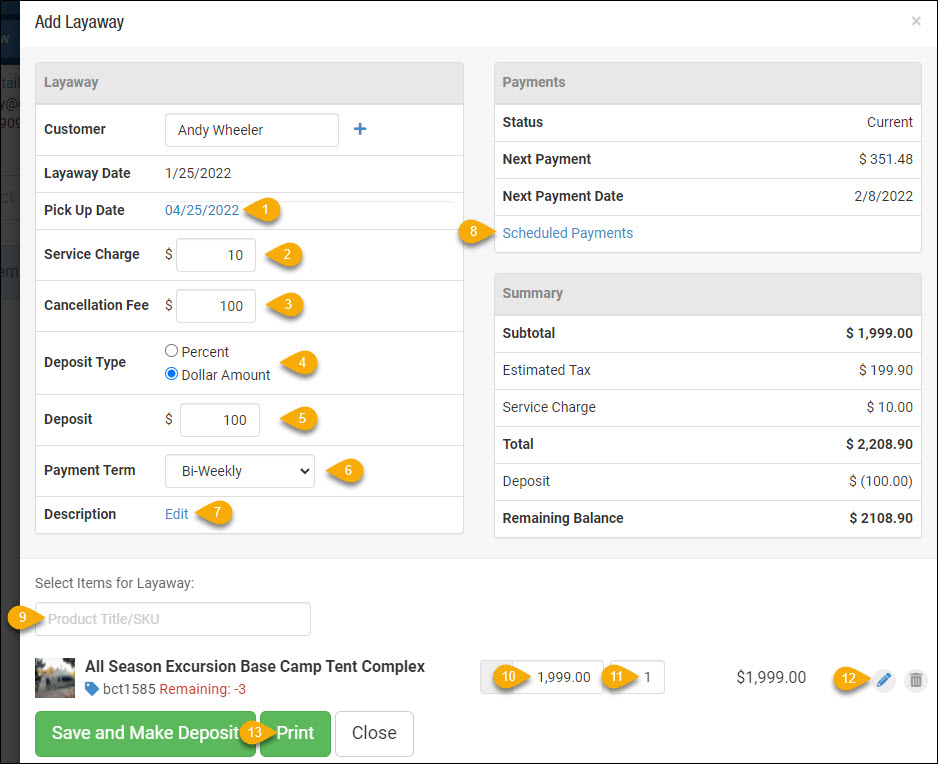
When you create the Layaway initially you can adjust the following settings:
- The initial Pick Up Date will be based on whatever period you set in Settings > POS Settings > Layaways, but you can adjust it if needed by clicking on the date.
- You can adjust or remove a Service Charge, if needed.
- If you have set a Cancellation Fee, it will display here, and you are free to adjust or remove it.
- You can set whether the Deposit Type will be a Percent of the Layaway total or a fixed Dollar Amount.
- If the Deposit is a percentage, it will be automatically added here based on the total amount of the Layaway, otherwise you can just enter a fixed dollar amount, or if it is set in your settings for Layaways this will already be populated.
- You can change the Payment Term as needed, your options are Weekly, Bi-Weekly, Monthly, Quarterly, or Yearly.
- If you need to save some notes about the Layaway, click on the Description link and you can enter as much text as needed.
- Clicking on the Scheduled Payments link will allow you to show the customer the number of payments they will have and the amount of each, and you can make adjustments to the Pick Up Date if they need to spread the payments out more, or if they'll be able to pick it up sooner than they originally thought.
- You will want to Add the Item(s) Being Purchased as one of your first actions in this panel. Simply scan in the barcode or search for the item title. NOTE: You won't see scheduled payments and some of the fees you might have set until you have done this step!
- You can adjust the Item Price if needed.
- The Quantity of the items being purchased can be changed just like in the Register.
- If the item(s) in the Layaway are eligible, you can set a Discount for each line item as either a percentage off or a set dollar amount off.
- You will want to Print out the agreement, which will clearly spell out all terms of the Layaway agreement and will also have the scheduled payments listed out. The printout will have a place for the customer to sign on the agreement. More info below on this feature.
The screen shot above is of a Layaway that has already been saved and opened from Modules > Layaways, so we have the ability to click to Make Payment or to Pick Up the item. The Make Payment button will just load the next scheduled payment into the Register under the customer's name. The Pick Up button will load whatever the remaining balance owed on the Layaway is into the Register under the customer's name so they can pay it off and take the item(s) home.

At any point, you can Print the Layaway terms and payment schedule for the customer, and it is a good idea to print a copy for them to sign that you can keep and a second copy for their records. Click the Adobe PDF icon to the left to see a sample of a Layaway agreement.
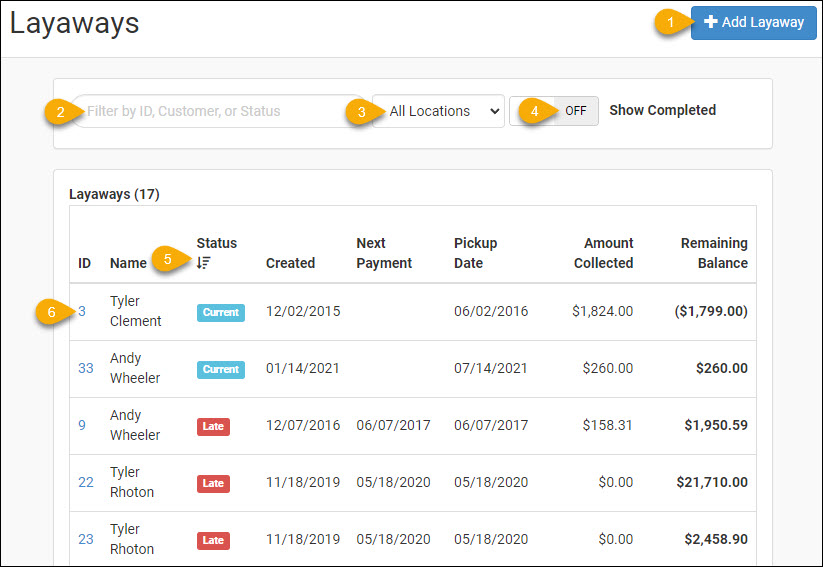
You can manage all of your Layaways directly from the Layaway Module by going to Modules > Layaways.
- You can create a new Layaway from here.
- If you have a long list, you can Search by Layaway ID, Customer name, or the Status of the order (Current or Late).
- If you have multiple Locations, you can filter to view the one you want, or All (default).
- You can toggle this control to see your Completed Layaways.
- You can Sort the list by any of the column headers, or reverse the sort by clicking again.
- You can click on the Layaway ID to open and view / edit a Layaway. Once open, you can click buttons to either Make Payment or pay the rest owed on the Layaway and Pick Up the item, either of which will load automatically into the Register.
Steps for Applying Discounts in the Register Click the Register icon in the upper left of the blue A
Steps for Attaching a Special Order to a Purchase Order Go to Modules > Special Orders, and make
Your Calendar module will use the same typeface that is your default for your website headings and b
Is this page helpful?
×Help us improve our articles
Comments