How to Process Special Orders
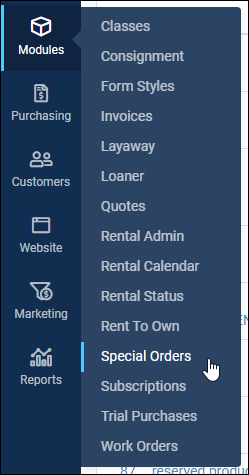
You can create Special Orders by going to your Register by either clicking the Register button in the upper left or by clicking POS in the blue Admin Toolbar, then clicking the Register button. You can see your list of special orders by hovering over Modules on the left and clicking Special Orders.
Creating Special Orders
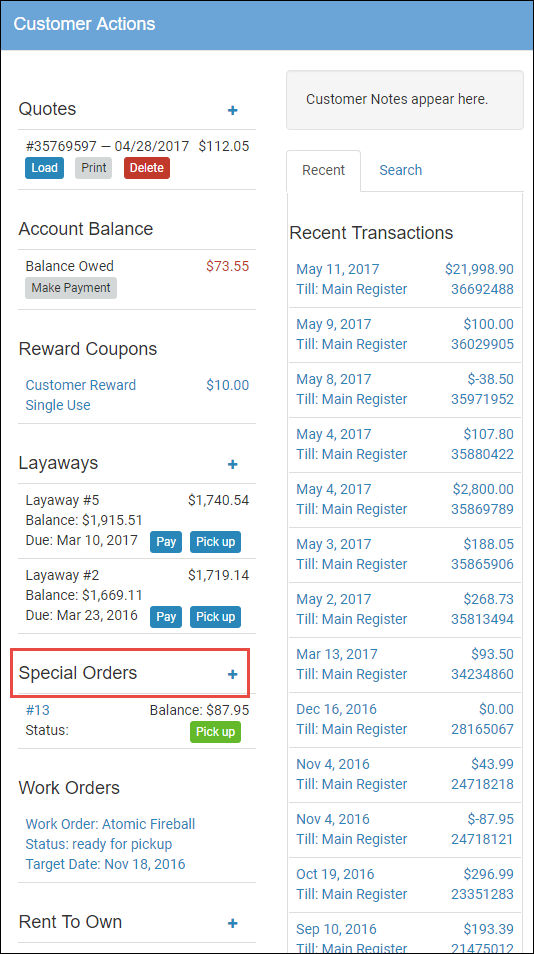
To start a new Special Order, go to your Register and first load the Customer. Once they are displaying, go to the upper right and click on any of the Customer Actions icons (the icon for Special Orders is the one that looks like a ticket on the far right).

The Customer Actions panel will open, and you can find Special Orders a short way down the list. To create a new one, click the blue + button.
The New Special Order panel will open and you can begin creating the Special Order:
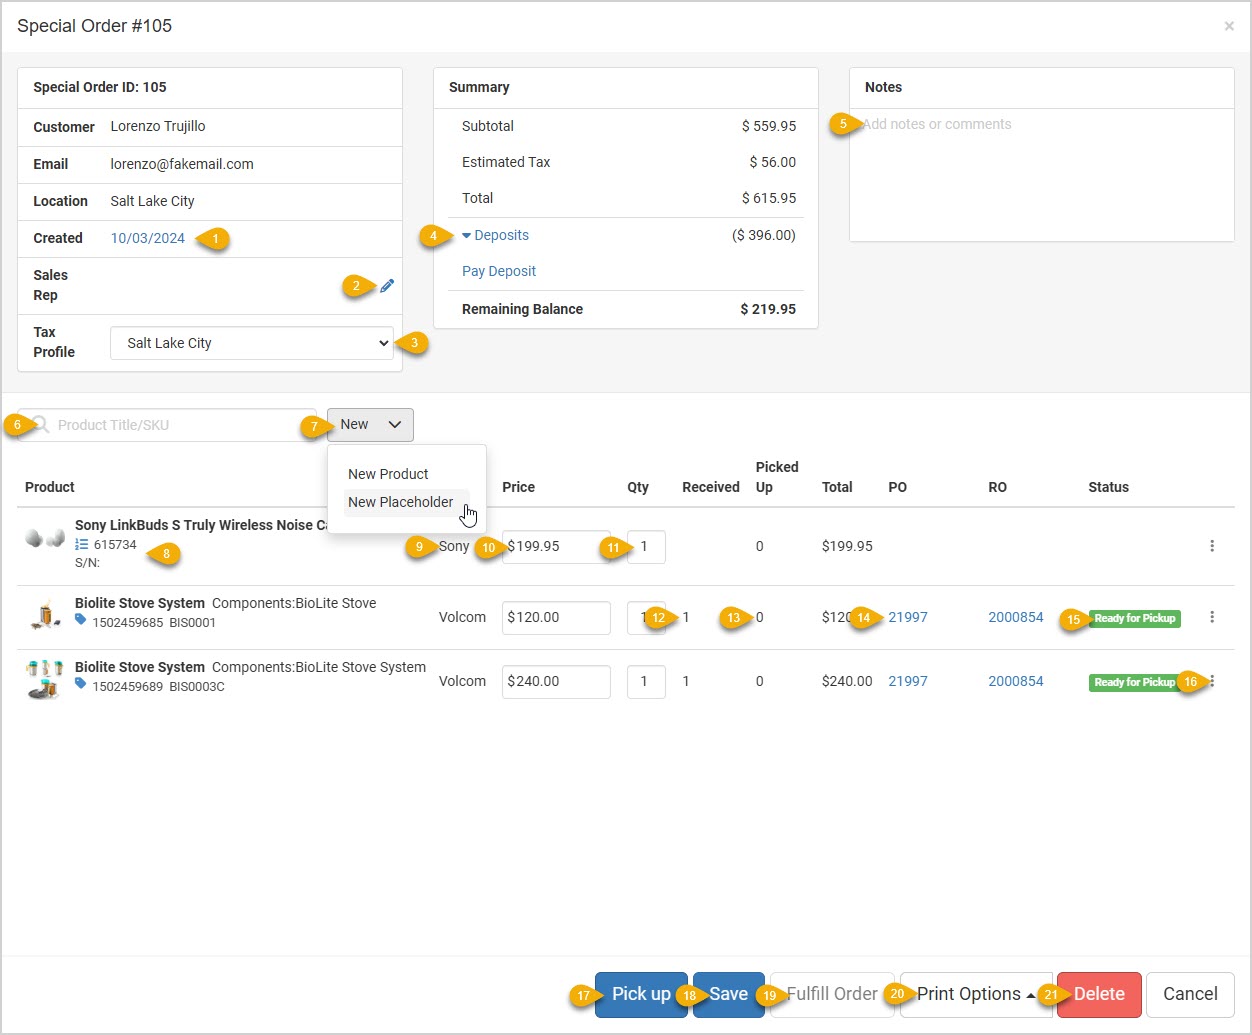
- Original Transaction - If you are working with a Special Order that is already in process and that has been saved, you can click the Created date to view and work with the original transaction.
- Sales Rep - If you need to add one or more Sales Representatives to the SO, you can do that by clicking the pencil. If you are adding more than one, you can set percentage of commissions exactly the same way it is done in the Register.
- Tax Profile - If you are using the Tax Profiles feature, you can apply the appropriate profile to the Special Order.
- Deposits - In order to start your Special Order, you must put in a Deposit value, even if that number is 0. Whatever amount you put in this field will be added to the Register to be paid by the customer right away to start the Special Order. If you add items to a Special Order, you can also add another Deposit and click to Pay Deposit, as pictured below.
- Notes - If you need to record any special things to be aware of about the order, enter them here.
- Item Search - You can scan in barcodes or search by keyword for items you will add to the Special Order.
- New Item - You can use this button to either create a full new Product or you can create a Placeholder for users who don't have product-creation permission or in situations where you don't have details yet about the product and want to have a placeholder for now and you'll finish creating the actual product later. For more info on Placeholders, click here (this link will open in a new browser tab for you): Special Order Placeholder Items
- Item Info - Item IDs will display as well as Variant names along with the product Title.
- Vendors - If the item is associated with a Vendor, that will display here. You can add items from any number of Vendors to a Special Order.
- Price - If you need to adjust the base price of the item, you can do so here just like in the Register.
- Quantity - If you are ordering more than one of an item, you can adjust the Quantity and the Total will adjust automatically.
- Received- If all or part of the Quantity for a line item has been Received in a Receiving Order, that quantity will display here.
- Picked Up - If all or part of the Quantity for a line item has been Picked Up by the customer, you'll see that quantity here.
- PO / RO - If you order an item in a PO, you'll see the Purchase Order Number listed here, and you can click to view the PO. RO - If you received an item in an RO, you'll see the Receiving Order Number listed here, and you can click to view the RO.
- Status- You will see the Status of each line item here.
- Actions - For any line item, you can add a Discount if you like, or Delete items you don't need.
- Add to Register (Not Pictured) / Pick Up - You'll see Add to Register when first creating your Special Order. Even if you're not taking a deposit you will need to do a transaction to start the Special Order. This also gives the customer a receipt for the start of the order. This button will save your Special Order and load the Deposit as a line item into the Register for you so the customer can pay the deposit. Once it's been saved, you'll see the Pick Up button, which loads items available to pick up into the Register.
- Save - Click this button if you have made any changes to the order you need to save. If you leave without saving, the system will NOT prompt you to save, it will just close the panel.
- Fulfill Order - If there are items in the order that have not been marked as received and ready for pickup, you can click on the Fulfill button and manually fulfill them from here. If you get the inventory in a Receiving Order, the system will automatically fulfill the inventory if it was associated with the Special Order.
- Print Options - Click this button to print the special order. If you aren't using the Special Order Form Style, you'll have the option to print to your thermal receipt printer. If you are using the Form Style, the Print Ticket option will let you print to letter size paper.
- Delete - If you are canceling the order, you can click the Delete button. You'll be asked to confirm deletion. The inventory will be available for general sale immediately after instead of being reserved for the special order.
Once the Deposit appears in the Register, if there is an amount due, the customer can pay for it in the normal way. If there is no amount due, the system will allow you to print out a Receipt for the customer so they have a record of having started the Special Order with you.

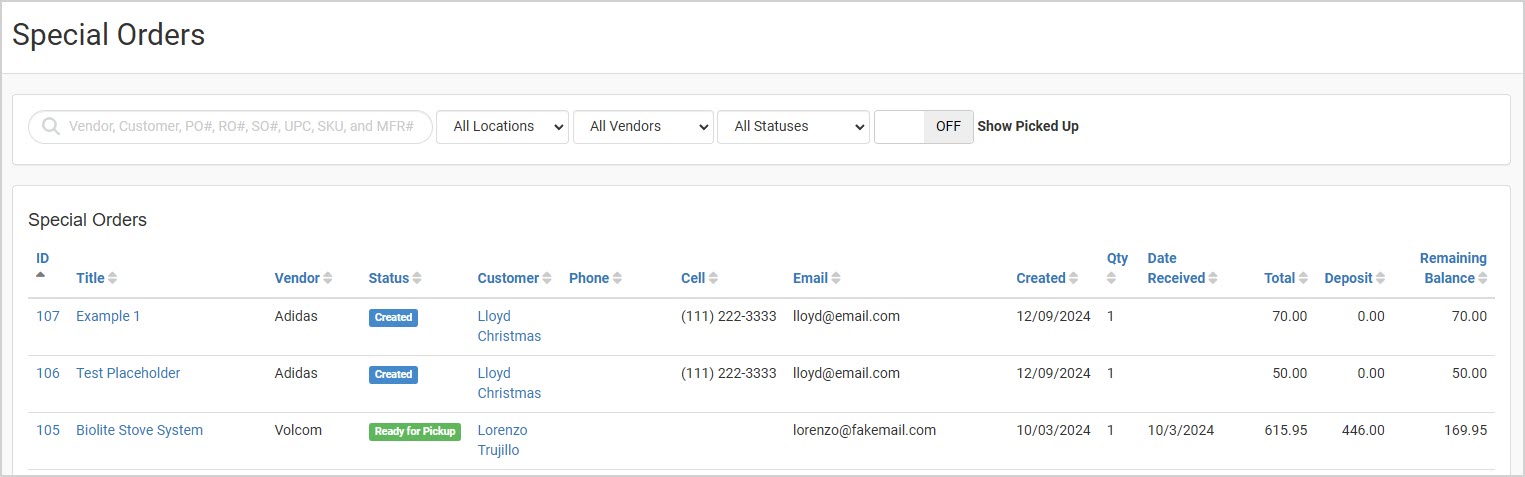
At this point, your new Special Order is in Draft status, which means it is ready to be added to a Purchase Order. You can see all of your Special Order Drafts by going to POS > Special Orders. You'll also be able to see your other Special Orders. You can click on the Special Order ID, the Item Title, or the Customer Name to open and view the item in the Special Order panel. You can click the Draft status for the order to start a new Purchase Order with the item and Vendor already loaded. This is a great option if you know you don't need to add multiple special orders to the same Purchase Order.
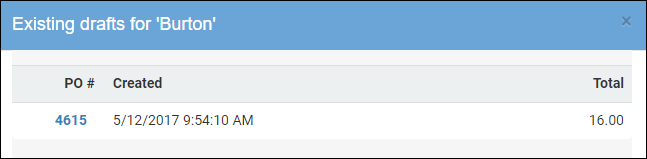
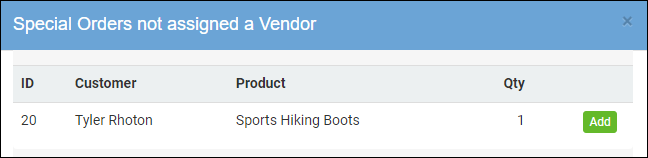
The other way to add your Special Order to a Purchase Order is to go to Inventory > New Purchase Order, and select the Vendor. Any Drafts associated with that Vendor will pop up in an Existing Drafts panel, and you can click on the PO Number to add them to the Purchase Order. Then, if you have other Special Orders that are not associated with a Vendor, a panel will pop up and list those for you. You can click the Add button for any you might want to order from the Vendor in question.
Once you have the Special Order item(s) in the new Purchase Order, you'll notice they are clearly identified. You can adjust whatever you might need for Quantity and the Cost you expect to pay. You can add other items as needed to the Purchase Order in the normal way, for more details on how to complete your Purchase Order and how to do a Receiving Order once the shipment comes in, please click here: Purchase Orders.
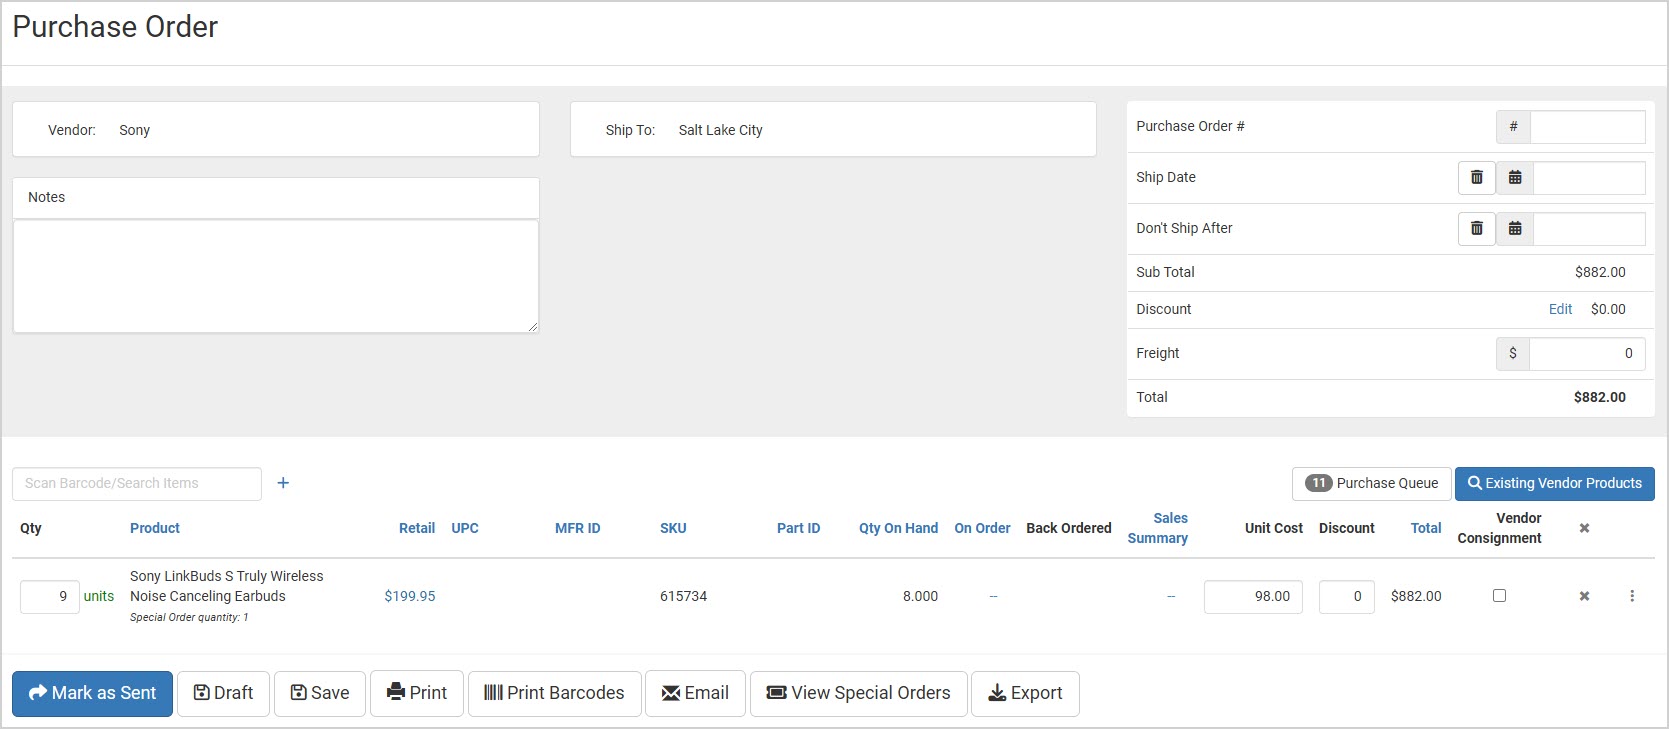
Special Order line items in Purchase Orders and Receiving Orders will show the Quantity that is just for the SO below the item name, as pictured above, and can have extra quantity being ordered for the store inventory.
Once you receive the inventory in a Receiving Order, the Special Order will once again separate from the PO/RO, meaning it will be visible under POS > Special Orders, and the other inventory that you received in that Receiving Order will be visible there for reference, if needed.
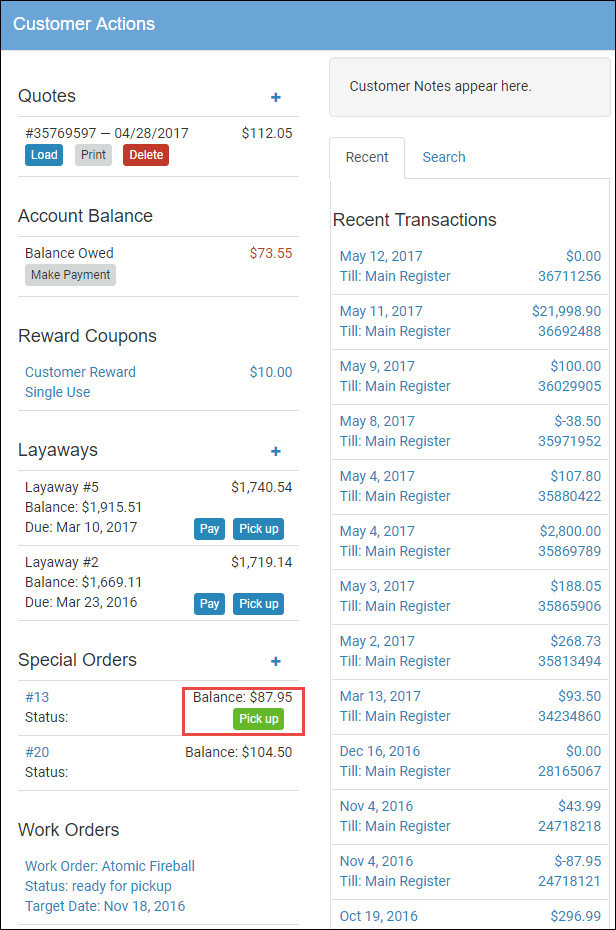
Once the inventory has been received, if you load the Customer into the Register and click on any of the Customer Actions icons in the upper right, you will have the ability for the Customer to Pick Up the item and finish the purchase.

 October 01, 2024
Is this page helpful?
×Help us improve our articles