Enter whatever you're curious about and we'll give you a smart summary of the best answers as well as relevant articles.

Congratulations, you are using the best system for integrated website and point of sale!

To begin using the system after you have logged in, please take a look at the following resources that are available to you:
This is the heart of the system, and you can access all of the functions and features of the system from the menus and buttons here. The buttons down the left side are the major modules, data tools, and reports of the system. Across the top are some useful utilities such as the system search, configuration and settings tools, Support, and some administrative functions such as the Time Clock.
The system Home page shown above is what you'll see whenever you log into the system, and has some useful features for you. You can get back to this page from anywhere by clicking the System Logo in the upper left corner.
You are able to set parts of the system you frequently use to appear in this convenient menu, accessible in the upper left from anywhere in the system. When you hover your cursor over the Favorites button, you'll see any you've saved in the flyout menu.
Our on-screen Register module will allow you to sell your in-store items, and has a wealth of features detailed fully here (this link will open in a new browser tab for you). When you open the app, you'll be asked to choose a Till, and you may need to enter a Register PIN code. Once you're all set you can start your first transaction, like the one below.
You can work with Website Orders that have come through in the Orders area on the left. This tool allows you to fulfill your web orders, refund them, mark them as shipped, and print out orders as needed.
If you hover over the Inventory area on the left, you'll see a flyout menu of many useful tools.

The Modules menu on the left will give you access to some important parts of the system:
The Purchasing section lets you work with all of your inventory ordering activities:
The system has excellent resources for working with your customers, from the main Customers list page where you can view one customer at a time, or bulk features and tools for groups and mailing lists in the Customer Filters area. Here are your options:
Our website CMS (Content Management System) has robust tools for you to easily add and update the content you need. Here are your options:
Our Marketing modules offer a wealth of tools for helping you to reach out to customers and potential customers and sell them what you offer. Here are the tools:
* The Marketing Package is required for this module to be active in your system, and requires an addition to your monthly billing.
The Reports area allows you great flexibility in how you view your sales and inventory data. Reports such as the End of Day, Transaction Detail, and Sales Details allow you many options in different ways you can filter your information. Other reports show you the current status in an area of the system, such as all current Class registrations and the current Inventory Value. The Reports page also has its own Favorites feature, so if you on the Reports button on the left, or click to View All, you can click Star buttons for the reports to which you need fast access.
}', 38='{type=number, value=0}', 39='{type=number, value=5}', 40='{type=number, value=0}', 9='{type=string, value=Getting to Know the System}', 22='{type=option, value={id=1, name='featured_content', order=0, label='Featured Content'}}', 25='{type=number, value=0}', 26='{type=list, value=[{id=190209692688, name='Getting Started'}]}', 28='{type=string, value=Getting to Know the System Congratulations, you are using the best system for integrated website and point of sale! To begin using the system after you have logged in, please take a look at the following resources that are available to you: The Admin Tools This is the heart of the system, and you can access all of the functions and features of the system from the menus and buttons here. The buttons down the left side are the major modules, data tools, and reports of the system. Across the top are some useful utilities such as the system search, configuration and settings tools, Support, and some administrative functions such as the Time Clock. System Home The system Home page shown above is what you'll see whenever you log into the system, and has some useful features for you. You can get back to this page from anywhere by clicking the System Logo in the upper left corner. On the right you'll see the System Updates from the previous week, listing New features, Improved areas of the system, and bugs and glitches that we have Fixed. Need Assistance? On the left you'll see info on how to contact Support if you have something to report or a question on how to use the system. The more details you can provide, the better! Below the support area is a Suggest button you can use to tell us your ideas for how we can make the system work better for you. We review your Insights daily and the ones with the most votes are the ones we work on first, so get in and let us know which improvement are the ones that will be the most impactful for you. Favorites You are able to set parts of the system you frequently use to appear in this convenient menu, accessible in the upper left from anywhere in the system. When you hover your cursor over the Favorites button, you'll see any you've saved in the flyout menu. Modules and Tools - Different major parts of the system, such as the main Products list page or the Work Orders module, can be saved as Favorites and will appear in the list on the left. Reports - For the reports you use most, you can get to them with a single click by saving them as Favorites, and they will appear in the list on the right side of the flyout menu. Custom Reports - Some reports, such as the Sales Details report, allow you to configure custom views that you can easily load again and that update over time. Any of those you've saved will appear below the list of standard reports on the right. Save Your Favorites - Click either one of the Manage links to load the Favorites page, where you'll be able to click Star buttons for the features and reports you want in your Favorites menu. Register Our on-screen Register module will allow you to sell your in-store items, and has a wealth of features detailed fully here (this link will open in a new browser tab for you). When you open the app, you'll be asked to choose a Till, and you may need to enter a Register PIN code. Once you're all set you can start your first transaction, like the one below. Orders You can work with Website Orders that have come through in the Orders area on the left. This tool allows you to fulfill your web orders, refund them, mark them as shipped, and print out orders as needed. Inventory If you hover over the Inventory area on the left, you'll see a flyout menu of many useful tools. Assemble / Disassemble - If you are assembling a custom item, such as a piece of jewelry, the Assemble / Disassemble module allows you to put the components together into a unique product. Assemble Kits - You can use the Assemble Kits module to combine multiple products into a single bundled product. Batch Inventory - The Batch Inventory module allows you to collect quantity information and add it to the tool in batches that accumulate quantities so you can update your actual on-hand inventory numbers. Bin Locations - If you want to define Bin Locations throughout your store, you can do so here and those will be available when creating products so you can assign them to whatever bin is appropriate. Bulk - You can manage your products and inventory by spreadsheet in the Bulk area. Departments- You can add or edit the Departments you use for organizing and reporting on your products. Gift Cards - You can work with your Gift Cards (usable both online and in the Register), create any you might need for store use, and view a log of Gift Card events, if needed. Packages- The Packages module will give you the ability to offer different combinations of products as package deals at a single combo price. Precuts- You can use the Precuts module to break a product up into multiple products (e.g. you can create 4 quarter-yard Fat Quarters from a yard of fabric). Products- In the Products area, you can create a New Product, access a searchable and filterable list of your Products, and do on-screen bulk edits, exports and imports to spreadsheets and purchase orders, label prints, and deletions, if needed. Serialized- The Serialized inventory tool will let you adjust or add serial numbers to serialized inventory you sell. Services- You can work with your Services you use in Work Orders, adding new ones and configuring them as needed. Stones- This module allows you to work with your stock of Stones by cut, weight, type, etc. if you work with and sell precious stones. Transfers- If you have multiple locations, you can do Transfers of inventory as needed between locations. Modules The Modules menu on the left will give you access to some important parts of the system: Appraisals- Your Appraisals are available from here, and you can create new ones as needed. Classes- You can access your Classes from here, and you can create and schedule them as needed. Consignment- If you do Consignment selling, you can access your contracts and work with payouts here. Form Styles - If you need to print documents at letter size, the Form Styles module allows you to configure unique receipts, invoices, work orders, etc. for each of your Locations. Gift Registry - If you have Gift Registry active on your website, you are able to work with those lists here. Invoices- For your Invoices, you can view the list and work with any of them in this area. Layaway- The Layaways module lists your open Layaway agreements and you can open and work with them from there. Live Selling - The Live Selling feature allows you to use social media in live events that can be a successful way to sell items. Loaner- If you do Work Orders, you may want to keep track of any Loaner items you have out, and this module allows you to do so. Online School Rentals - You can manage and work with your school rental contracts in the Online School Rentals module. Payment Plans - If you offer Payment Plans for store-financed purchases, you can track and work with those agreements here. Quotes- You can see the active list of saved Quotes in the system by clicking that link, and those are all saved directly in the Register. Rental Contracts - You can see and work with open Rental Contracts if that part of the system is active for you. Restricted Items - If you need to limit access to some of your inventory, you can configure that in the Restricted Items module. Short Term Rentals - Your Short Term Rental functions are also here for you, allowing you to look up the Rental Status of any active Rental, view your Rental Calendar, and configure the system how you need it to work in the Rental Admin area. Special Orders - The Special Orders page shows a list of all active Special Orders you've created from the Register, allowing you to open and work with them as needed. Subscriptions- If you wish to do periodical Subscription sales, you can set that up in this area. Trial Purchases - For some items, customers will want to do Trial Purchases to make sure the item will work for their preferences. Work Orders - In the Work Orders module you can track and bill for any labor-based work, such as repairs. Purchasing The Purchasing section lets you work with all of your inventory ordering activities: Customer Purchase Orders - If your store is a 'vendor' for organizations that purchase over time throughout a fiscal period from a budget, the Customer Purchase Orders module will allow you to facilitate those purchases, for products and for work orders, and invoice the client as needed. Purchase Orders - You can access and work with your inventory orders from your vendors in the Purchase Orders module, creating new orders as needed. Receiving Orders - You can use the Receiving Orders module to work with your list of orders, and you can create new ones out of PO's made in this system or from scratch if you've already sent in an order. Vendor Consignment - If you do consignment selling with any of your vendors, you are able to track that and manage it through the Vendor Consignment module. Vendor Return - When inventory arrives in an unsellable condition, or for whatever reason might come up, you are able to use the Vendor Return module to handle that inventory reduction in the system. Vendors- Important contact information and a history of your vendor orders are available to you in your main Vendors list page. You can also start new inventory orders for a vendor when viewing their card from this list. Customers The system has excellent resources for working with your customers, from the main Customers list page where you can view one customer at a time, or bulk features and tools for groups and mailing lists in the Customer Filters area. Here are your options: Customer Groups - If you have groups of customers with whom you need to work and communicate in different ways, such as club members or top customers, the Customer Groups module allows you to make as many groups as you need. You are able to add any number of your customers to a group and email to that group as often as you like. Customers- Every website customer that orders from you and every Register customer for whom you create a customer entry will be listed on this page, with full details accessible and bulk features available if needed. Filter Customers - If you like the idea of building marketing email lists based on the shopping history of your customers, this module allows you to do so and create as many filtered lists as you might need. Tailored Product Lists - If you're working on a consultative sale that might take a few visits to close, the Tailored Lists area can allow you to save lists of such items for individual customers so you can track how it's going. Website Our website CMS (Content Management System) has robust tools for you to easily add and update the content you need. Here are your options: Calendar- Our website Calendar allows you to schedule and display information on one-time or recurring events, and can be customized for specific areas, such as your individual locations or by topic, such as a calendar listing only your classes. Categories- You can organize your products for display on the website using the Categories module. You can add sub-categories that go down any number of levels you might need. Files- Our Files tool allows you to manage any files needed in the system, including documents such as PDF file, general files such as audio or video or executable files you might want to sell through your website, or the different images you use throughout the system. Forms- You are able to create and publish website Forms in this module, and you can view responses and form submissions in bulk from here. Navigation- You can create as many website Navigation menu links to pages and resources as you need and organize them into drop-lists under your header items in the main menu. News- Let the world know about what's going on with your organization using the News module to post updates to your website as often as you like. Pages- Create individual website Pages and manage their publication here. If you have a lot of pages, you can organize them in folders to make them easier to find and edit. Store Locator - This tool is great for multi-location stores, allowing you to enter the locations of each of your stores and displaying them automatically on an interactive map you can display on your website. Website Editor - Enter the Website Editor view of the system to update your website content and access all of the tools in this list, and more. Marketing Our Marketing modules offer a wealth of tools for helping you to reach out to customers and potential customers and sell them what you offer. Here are the tools: Communications- Use this module to see how all messages sent out by you and your team and by the system were delivered. Coupons - For both website and in-store promotions, create Coupons using this tool that allow discounts on all items or only specific ones. Email List - Using this module you can build and manage any number of Email Lists you might need. Email Newsletter - You can safely send Email messages to very large numbers of customers using this useful marketing tool. Newsletter Archive - If your newsletters have content that is valuable long-term, showcase those newsletters in the Newsletter Archive, which organizes and offers them to your website visitors. Request Review* - You can use the Request Review tool to send a review request by email or text to a satisfied customer. Scheduled Sale - This useful tool allows you to plan pricing changes for your sales events and set prices to change on specific days and times you need. Text Message* - You can send Text Messages to your customers you've flagged to be eligible to receive marketing text messages from you using this simple tool. * The Marketing Package is required for this module to be active in your system, and requires an addition to your monthly billing. Reports The Reports area allows you great flexibility in how you view your sales and inventory data. Reports such as the End of Day, Transaction Detail, and Sales Details allow you many options in different ways you can filter your information. Other reports show you the current status in an area of the system, such as all current Class registrations and the current Inventory Value. The Reports page also has its own Favorites feature, so if you on the Reports button on the left, or click to View All, you can click Star buttons for the reports to which you need fast access. Report Favorites - This list appears here, and also appears up in the Favorites menu in the upper right, and if you hover your mouse over Reports and have any Favorites saved, you will see them there as well. Custom Report Configurations - The Sales Details report allows you to configure it in different ways and save different views you need. Items each user saves will appear only for that user in this area, as well as in the Favorites at the top, and when you hover over the Reports button. Star Buttons - Each report on the page has a Star button that allows you to set it as a Favorite. The favorites you save will only appear that way for you, and other users can set their own. Getting Started / Help onboarding system basics}', 31='{type=number, value=3}'}, {id=191604258472, createdAt=1750439292545, updatedAt=1769704136706, path='how-to-avoid-scams-and-lawsuits-over-website-images', name='How to Avoid Scams and Lawsuits Over Website Images', 2='{type=string, value=http://rainpos.my.site.com/s/article/How-to-Avoid-Scams-and-Lawsuits-Over-Website-Images}', 4='{type=list, value=[{id=1, name='rain_pos', order=0, label='Rain POS'}, {id=2, name='like_sew', order=1, label='Like Sew'}, {id=3, name='jewel360', order=2, label='Jewel360'}, {id=4, name='music_shop_360', order=3, label='Music Shop 360'}]}', 6='{type=string, value=
Email scams are, unfortunately, still a major thorn in the side of many. One such type of email scam you may experience is a copyright infringement scam where the perpetrator tries to get you to believe that the pictures you have on your website were stolen. They may ask you to click a link, which can install malware on your computer in order to steal information. This article from Directive outlines the forms in which copyright infringement scams can come and how to detect when you are being scammed. Below are simple things to be on the lookout for when you aren’t sure if you are being scammed.
Do not open it. If you accidentally open it, don’t click on anything in the message.
Flag it as a Phishing email in your email site or app or just delete it. Note: Phishing is an attempt by the scammer to steal personal information.
Check for Grammatical Errors – One giveaway is spelling errors, poor grammar, and oddly placed words. Pay attention: if you see a lot of these errors, delete the message or send it to someone you trust about technical issues so they can take a look.
Check Links Before You Click – Scammers like this often try to conceal URLs leading to malware by showing you a trusted URL in the message. The best practice is to always hover over links in emails before you click. When you do, you’ll see the actual link URL pop up in your browser. This will reveal the true destination of the link, no matter what the linked text says.
Be Suspicious of Generic Subjects and Greetings – Any messages addressed generically, especially ones regarding financial transactions, are cause for concern. Make sure the message applies to you and something in which you are actually involved.
Avoid Attachments – You should never open unexpected attachments. If it doesn’t come from a trusted source, just delete the email without even looking.
Don’t Let Scammers Manipulate Your Emotions – Scam emails will often try to inflame your emotions and fears using threatening language. Some claim to be from a financial institution or even a law enforcement agency threatening dire consequences or arrest if you don’t act quickly. Police don’t email you when they’re about to arrest you, and banks send physical letters whenever there is a financial issue, so don’t be taken in by such scare tactics.
Please Note: The above content was largely quoted from this excellent article from Wedgewood Insurance about copyright infringement, and has just been updated for relevance.
If you have any doubts about the validity of images on your website, contact support. All website images provided in themes and designs we offer utilize images that are legal for you to use on your site. If you have acquired images from the internet, you may actually be using them illegally if you haven’t gotten permission. Read the following section to double-check that you’re on the right track.
Verify Image Sources - If you use images from the internet, ensure that they are legally licensed. Exceptions may include images from manufacturers you use for marketing purposes and any images listed as being public domain.
Avoid Unauthorized Use - Be cautious with images from competitors’ websites or generic internet searches. Companies like Getty Images actively enforce their intellectual property rights and may demand compensation for unauthorized use. Our advice if something like this happens is to consult your attorney on how best to proceed.
In addition to using images from the manufacturers of products you sell, the best thing you can do is to take your own photos. Here is an overview on how to take good website images: Beginner's Guide to Taking Great Photos. If you do find an image you want to use for your site that is owned by someone else, be sure to contact them to get permission to use it before doing so, or you can use images that do not have copyright protection.
}', 22='{type=option, value={id=2, name='recommended_extra', order=1, label='Recommended Extra'}}', 9='{type=string, value=How to Avoid Scams and Lawsuits Over Website Images}', 25='{type=number, value=0}', 26='{type=list, value=[{id=190209692688, name='Getting Started'}]}', 28='{type=string, value=How to Avoid Scams and Lawsuits Over Website Images Email Scams Are Not a Thing of the Past Email scams are, unfortunately, still a major thorn in the side of many. One such type of email scam you may experience is a copyright infringement scam where the perpetrator tries to get you to believe that the pictures you have on your website were stolen. They may ask you to click a link, which can install malware on your computer in order to steal information. This article outlines the forms in which copyright infringement scams can come and how to detect when you are being scammed. Below are simple things to be on the lookout for when you aren’t sure if you are being scammed. What to Do If You Receive an Email That Is Suspicious Do not open it. If you accidentally open it, don’t click on anything in the message. Flag it as a Phishing email in your email site or app or just delete it. Note: Phishing is an attempt by the scammer to steal personal information. How to Determine If It's a Phishing Email Check for Grammatical Errors – One giveaway is spelling errors, poor grammar, and oddly placed words. Pay attention: if you see a lot of these errors, delete the message or send it to someone you trust about technical issues so they can take a look. Check Links Before You Click – Scammers like this often try to conceal URLs leading to malware by showing you a trusted URL in the message. The best practice is to always hover over links in emails before you click. When you do, you’ll see the actual link URL pop up in your browser. This will reveal the true destination of the link, no matter what the linked text says. Be Suspicious of Generic Subjects and Greetings – Any messages addressed generically, especially ones regarding financial transactions, are cause for concern. Make sure the message applies to you and something in which you are actually involved. Avoid Attachments – You should never open unexpected attachments. If it doesn’t come from a trusted source, just delete the email without even looking. Don’t Let Scammers Manipulate Your Emotions – Scam emails will often try to inflame your emotions and fears using threatening language. Some claim to be from a financial institution or even a law enforcement agency threatening dire consequences or arrest if you don’t act quickly. Police don’t email you when they’re about to arrest you, and banks send physical letters whenever there is a financial issue, so don’t be taken in by such scare tactics. Please Note: The above content was largely quoted from this excellent article from Wedgewood Insurance about copyright infringement, and has just been updated for relevance. If you have any doubts about the validity of images on your website, contact support. All website images provided in themes and designs we offer utilize images that are legal for you to use on your site. If you have acquired images from the internet, you may actually be using them illegally if you haven’t gotten permission. Read the following section to double-check that you’re on the right track. Ensuring Image Use Legality Verify Image Sources - If you use images from the internet, ensure that they are legally licensed. Exceptions may include images from manufacturers you use for marketing purposes and any images listed as being public domain. Avoid Unauthorized Use - Be cautious with images from competitors’ websites or generic internet searches. Companies like Getty Images actively enforce their intellectual property rights and may demand compensation for unauthorized use. Our advice if something like this happens is to consult your attorney on how best to proceed. Ways to Ensure Your Images Are Safe In addition to using images from the manufacturers of products you sell, the best thing you can do is to take your own photos. Here is an overview on how to take good website images: Beginner's Guide to Taking Great Photos. If you do find an image you want to use for your site that is owned by someone else, be sure to contact them to get permission to use it before doing so, or you can use images that do not have copyright protection. Getting Started / Help legal advisory}'}, {id=191604258578, createdAt=1750439292581, updatedAt=1769704248579, path='marketing-package-automated-email', name='Marketing Package Automated Email', 2='{type=string, value=http://rainpos.my.site.com/s/article/Marketing-Package-Automated-Email}', 4='{type=list, value=[{id=1, name='rain_pos', order=0, label='Rain POS'}, {id=2, name='like_sew', order=1, label='Like Sew'}, {id=3, name='jewel360', order=2, label='Jewel360'}, {id=4, name='music_shop_360', order=3, label='Music Shop 360'}]}', 6='{type=string, value=
These highly requested features are part of the optional Marketing Package. If you do not yet have the Marketing Package and if you're interested in having us demo it for you, please give us a call at 385-354-6655 and use option 1 for our sales department.
You can get to this part of the system by clicking on the Admin Button with your username in the upper right and then clicking on Settings > Marketing > Emails.
Here is an overview of the automated email functions:
For more detail on how this functionality works, please take a look at this article about your automated Marketing Email settings in the system: Marketing Email Settings.
}', 22='{type=option, value={id=2, name='recommended_extra', order=1, label='Recommended Extra'}}', 9='{type=string, value=Marketing Package Automated Email}', 25='{type=number, value=0}', 26='{type=list, value=[{id=190209692538, name='Marketing'}, {id=190209692545, name='Settings'}]}', 28='{type=string, value=Marketing Package Automated Email These highly requested features are part of the optional Marketing Package. If you do not yet have the Marketing Package and if you're interested in having us demo it for you, please give us a call at 385-354-6655 and use option 1 for our sales department. You can get to this part of the system by clicking on the Admin Button with your username in the upper right and then clicking on Settings > Marketing > Emails. Here is an overview of the automated email functions: Upload your logo for use in all marketing email. Set your primary corporate color. Send yourself preview samples of the different marketing emails you have active. Customize message text and delivery day of the week for each different marketing email. Manage Coupon marketing emails. Manage Notification emails for classes and service anniversary reminders. For more detail on how this functionality works, please take a look at this article about your automated Marketing Email settings in the system: Marketing Email Settings. Marketing,Settings automated emails marketing}'}, {id=191604258594, createdAt=1750439292597, updatedAt=1769704279933, path='online-success-4-ten-ways-your-web-pages-can-sell-for-you', name='Online Success 4: Ten Ways Your Web Pages Can Sell for You', 2='{type=string, value=http://rainpos.my.site.com/s/article/Online-Success-4-Ten-Ways-Your-Web-Pages-Can-Sell-for-You}', 4='{type=list, value=[{id=1, name='rain_pos', order=0, label='Rain POS'}, {id=2, name='like_sew', order=1, label='Like Sew'}, {id=3, name='jewel360', order=2, label='Jewel360'}, {id=4, name='music_shop_360', order=3, label='Music Shop 360'}]}', 6='{type=string, value=
The system’s website tool makes building and publishing your website a breeze. But don’t assume that once your site is live there’s nothing left to do but wait for the sales to start coming in. Instead, make your web pages work for you all day, every day.
To maximize your site’s potential, use every single page to drive sales, even the strictly informational ones with your policies and/or privacy statement. By the way, if you don’t have these, you should.
Consider implementing at least a few of the web page essentials listed below to keep your online shoppers engaged:
Develop a consistent look and feel for your website that’s modern, clean, and quick to load. Look at other websites you admire and try to mimic their look and feel. A coherent design makes you look more professional and credible, and that will encourage shoppers to buy from you instead of your competitor.
Paint appealing pictures in the minds of your customers. While you may not be a professional writer, incorporating your unique voice into your product pages offers an authentic buying experience your customers will appreciate. A word of caution though: don’t take your casual language too far or it could end up feeling unprofessional.
Your content might be interesting, but without eye-catching graphics you run the risk of being overlooked. Make sure your content has images and, wherever possible, link them to your products. Ideally, something in addition to text should be visible to your shoppers at all times as they scroll down your pages. Consider adding a sidebar with links to add-ons or related products.
Attention spans are short for online visitors, and once you have their attention, keeping it is key. Make sure that your images are visible as you scroll down the page, and that at least one is always in view. The 'After' page below is a good example.
You should manually add images directly within your content and link them to other parts of your online store. Use active language and calls to action to encourage visitors to click on your links. Check out these topics for more tips:
Learn more about adding images manually to your content: How to Add or Change Images.
Learn more about linking to items in your online store: How to Create Links to Pages, Files, and Email Addresses.
Embed YouTube videos in the Long Description of a product, in a Content module, or wherever you see the Content Editor to boost your search engine relevance. If you don’t create your own videos or lack quality options from manufacturers, search for fan-created videos that you can use. If you use a video you didn’t create yourself, get permission from the creator then make sure you give them credit.
Click here to learn how to embed a video on a page: How to Put a Video on a Web Page.
If shoppers struggle to find what they’re looking for, they’ll become frustrated and leave. Make sure that categories are grouped together logically and that labels and buttons are positioned so your visitors can easily see them.
Call-to-action language encourages shoppers to DO something. Phrases like “20% Off Today Only!” and “Last Call: Get Your Faves While Supplies Last!” to drive people to buy. To encourage shoppers who are new to your offerings, try things like “Start your Free Trial Now” or “Get Your Free Sample.” Other effective calls-to-action might be “Follow Us on Instagram for Exclusive Offers” (where your posts can drive more sales) and “Unlock Your Deal Now” to appeal to a desire for a bargain. Whatever language you use, it should convey urgency or importance. Try to focus on a single call-to-action and place it where it will have the most impact.
Make sure your customers feel confident shopping with you. Despite the popularity of online shopping, there are shoppers who remain cautious about sharing personal data over the Internet. Help alleviate that fear by displaying security badges and SSL certificates. Help your visitors feel confident that their personal data is safe with you.
People like free stuff, so give them what they want. Write a tutorial or create a video of tips and tricks that people in your market will find useful and make it available for free. Offer free shipping. If it’s not cost-effective to do it on all of your orders, find an order amount over which you can offer it. Providing freebies can position you ahead of the competition.
Studies estimate that roughly 20% of online purchases are impulse-driven. Consider the placement of candy bars and drinks at store checkout lanes. That strategic product placement leads to impulse buys. You can mimic this by placing a Featured Products module below the page content, or somewhere in the middle. A good example is the Before and After sample pages below. Every page on your site should show your visitor some of your products. If they don't see it, they won't buy it.
Click here to learn more about using Featured Products and Featured Categories: Web Marketing Modules.
Search engines prioritize fresh content, so regularly updating your text, images, and links keeps your site relevant and improves your SEO. While you’re in there making updates, don’t forget to test your links to make sure they’re all still working. Broken links are frustrating and unprofessional.
In Rain POS, the URL changes when you rename something like an event, class, product, or category. That’s not a big deal if it’s a new page or category, but can be disastrous for established categories and pages. One small change can leave you with a new URL for every product on a page. Here are two great reasons why you want to avoid this.
To search engines, a new URL is a brand new web page with zero search relevancy. Don't reset your search engine ranking by changing your URLs.
Loyal customers bookmark their favorite pages. The next time they use their bookmarks to restock their favorite widget, all they’ll get is an error message.
Carefully consider your naming conventions before you go live so that you don’t run into URL problems later.
Below are examples of a page layout that is meh (the Before pic) and a layout that has had some good effort put into it that will keep a visitor engaged and hopefully inspire a click that will lead to a sale (the After pic). Please note that the After page showcases products as well as classes. Whatever you do, you should always be selling.
Online Success 1: So You've Got a New Website... What Now?
Online Success 2: Keep Your Content Fresh
Online Success 3: Make Your Product Listings Stand Out
Online Success 4: Ten Ways Your Web Pages Can Sell for You
Online Success 5: Beginner's Guide to Taking Great Photos
Online Success 6: Why You Don't Need to Pay for SEO
Online Success 7: Your Website Daily Dozen
}', 22='{type=option, value={id=2, name='recommended_extra', order=1, label='Recommended Extra'}}', 9='{type=string, value=Online Success 4: Ten Ways Your Web Pages Can Sell for You}', 25='{type=number, value=0}', 26='{type=list, value=[{id=190209692688, name='Getting Started'}]}', 28='{type=string, value=Online Success 4: Ten Ways Your Web Pages Can Sell for You The system’s website tool makes building and publishing your website a breeze. But don’t assume that once your site is live there’s nothing left to do but wait for the sales to start coming in. Instead, make your web pages work for you all day, every day. To maximize your site’s potential, use every single page to drive sales, even the strictly informational ones with your policies and/or privacy statement. By the way, if you don’t have these, you should. Engaging Essentials Consider implementing at least a few of the web page essentials listed below to keep your online shoppers engaged: Create a Compelling Design Develop a consistent look and feel for your website that’s modern, clean, and quick to load. Look at other websites you admire and try to mimic their look and feel. A coherent design makes you look more professional and credible, and that will encourage shoppers to buy from you instead of your competitor. Liven Up Your Language Paint appealing pictures in the minds of your customers. While you may not be a professional writer, incorporating your unique voice into your product pages offers an authentic buying experience your customers will appreciate. A word of caution though: don’t take your casual language too far or it could end up feeling unprofessional. Text is Boring: Fire Up Your Pages with Images Your content might be interesting, but without eye-catching graphics you run the risk of being overlooked. Make sure your content has images and, wherever possible, link them to your products. Ideally, something in addition to text should be visible to your shoppers at all times as they scroll down your pages. Consider adding a sidebar with links to add-ons or related products. Attention spans are short for online visitors, and once you have their attention, keeping it is key. Make sure that your images are visible as you scroll down the page, and that at least one is always in view. The 'After' page below is a good example. You should manually add images directly within your content and link them to other parts of your online store. Use active language and calls to action to encourage visitors to click on your links. Check out these topics for more tips: Learn more about adding images manually to your content: How to Add or Change Images. Learn more about linking to items in your online store: How to Create Links to Pages, Files, and Email Addresses. Motion Captures the Eye Embed YouTube videos in the Long Description of a product, in a Content module, or wherever you see the Content Editor to boost your search engine relevance. If you don’t create your own videos or lack quality options from manufacturers, search for fan-created videos that you can use. If you use a video you didn’t create yourself, get permission from the creator then make sure you give them credit. Click here to learn how to embed a video on a page: How to Put a Video on a Web Page. Use Intuitive Navigation If shoppers struggle to find what they’re looking for, they’ll become frustrated and leave. Make sure that categories are grouped together logically and that labels and buttons are positioned so your visitors can easily see them. Use Call-to-Action Language Call-to-action language encourages shoppers to DO something. Phrases like “20% Off Today Only!” and “Last Call: Get Your Faves While Supplies Last!” to drive people to buy. To encourage shoppers who are new to your offerings, try things like “Start your Free Trial Now” or “Get Your Free Sample.” Other effective calls-to-action might be “Follow Us on Instagram for Exclusive Offers” (where your posts can drive more sales) and “Unlock Your Deal Now” to appeal to a desire for a bargain. Whatever language you use, it should convey urgency or importance. Try to focus on a single call-to-action and place it where it will have the most impact. Help Shoppers Feel Secure Make sure your customers feel confident shopping with you. Despite the popularity of online shopping, there are shoppers who remain cautious about sharing personal data over the Internet. Help alleviate that fear by displaying security badges and SSL certificates. Help your visitors feel confident that their personal data is safe with you. Give Them What They Want People like free stuff, so give them what they want. Write a tutorial or create a video of tips and tricks that people in your market will find useful and make it available for free. Offer free shipping. If it’s not cost-effective to do it on all of your orders, find an order amount over which you can offer it. Providing freebies can position you ahead of the competition. Inspire Impulse Buys Studies estimate that roughly 20% of online purchases are impulse-driven. Consider the placement of candy bars and drinks at store checkout lanes. That strategic product placement leads to impulse buys. You can mimic this by placing a Featured Products module below the page content, or somewhere in the middle. A good example is the Before and After sample pages below. Every page on your site should show your visitor some of your products. If they don't see it, they won't buy it. Click here to learn more about using Featured Products and Featured Categories: Web Marketing Modules. Update Frequently Search engines prioritize fresh content, so regularly updating your text, images, and links keeps your site relevant and improves your SEO. While you’re in there making updates, don’t forget to test your links to make sure they’re all still working. Broken links are frustrating and unprofessional. ...But Don't EVER Change the URL In Rain POS, the URL changes when you rename something like an event, class, product, or category. That’s not a big deal if it’s a new page or category, but can be disastrous for established categories and pages. One small change can leave you with a new URL for every product on a page. Here are two great reasons why you want to avoid this. To search engines, a new URL is a brand new web page with zero search relevancy. Don't reset your search engine ranking by changing your URLs. Loyal customers bookmark their favorite pages. The next time they use their bookmarks to restock their favorite widget, all they’ll get is an error message. Carefully consider your naming conventions before you go live so that you don’t run into URL problems later. What Might This Mean for Your Design? Below are examples of a page layout that is meh (the Before pic) and a layout that has had some good effort put into it that will keep a visitor engaged and hopefully inspire a click that will lead to a sale (the After pic). Please note that the After page showcases products as well as classes. Whatever you do, you should always be selling. Before After Seven Steps to Online Success Online Success 1: So You've Got a New Website... What Now? Online Success 2: Keep Your Content Fresh Online Success 3: Make Your Product Listings Stand Out Online Success 4: Ten Ways Your Web Pages Can Sell for You Online Success 5: Beginner's Guide to Taking Great Photos Online Success 6: Why You Don't Need to Pay for SEO Online Success 7: Your Website Daily Dozen Getting Started / Help system blogs}'}, {id=191604258597, createdAt=1750439292600, updatedAt=1769704315148, path='online-success-7-your-website-daily-dozen', name='Online Success 7: Your Website Daily Dozen', 2='{type=string, value=http://rainpos.my.site.com/s/article/Online-Success-7-Your-Website-Daily-Dozen}', 4='{type=list, value=[{id=1, name='rain_pos', order=0, label='Rain POS'}, {id=2, name='like_sew', order=1, label='Like Sew'}, {id=3, name='jewel360', order=2, label='Jewel360'}, {id=4, name='music_shop_360', order=3, label='Music Shop 360'}]}', 6='{type=string, value=
Keeping your website in top shape is a key ingredient of success online. Click one or both of the links below to download the Daily Dozen document and find items on the list that you know you need to do. Set aside half an hour or more each day to running through your checklist and make it part of your day.
Okay, so that's more than a dozen, but they're all great things to keep an eye on. Keep your site in top shape!
If you would like to download the list, click below:
Daily Dozen, Adobe Acrobat PDF format.
Daily Dozen, Microsoft Word format.
Online Success 1: So You've Got a New Website... What Now?
Online Success 2: Keep Your Content Fresh
Online Success 3: Make Your Product Listings Stand Out
Online Success 4: Ten Ways Your Web Pages Can Sell for You
Online Success 5: Beginner's Guide to Taking Great Photos
Online Success 6: Why You Don't Need to Pay for SEO
Online Success 7: Your Website Daily Dozen
}', 22='{type=option, value={id=2, name='recommended_extra', order=1, label='Recommended Extra'}}', 9='{type=string, value=Online Success 7: Your Website Daily Dozen}', 25='{type=number, value=0}', 26='{type=list, value=[{id=190209692688, name='Getting Started'}]}', 28='{type=string, value=Online Success 7: Your Website Daily Dozen Keeping your website in top shape is a key ingredient of success online. Click one or both of the links below to download the Daily Dozen document and find items on the list that you know you need to do. Set aside half an hour or more each day to running through your checklist and make it part of your day. Products Check the Alarm Bell icon at the top of the system for new website orders. Go to Inventory > Products and check for products near the top of the list that don’t yet have full details, such as Reorder Points, Desired Stock Level, Departments, Categories, Vendors, and Descriptions. Search through products and go to the Advanced tab, add Suggested Products, at least four. Check your website shopping pages and make sure all Categories and Products have images. New Product Maintenance – If you have a New Products folder, clear out products that are no longer new, and add products that need to be added. Website Pages Check your Home page for any text that could benefit from an update. Aging pages: Have any promotional pages or items that are past their prime? Remove them. Use this free broken link checker to make sure all site links are good. Check Website > Pages and look for text that could benefit from an update. Check the load times and performance of your site and pages with a tool like this. Content Update your Home page slideshow, if present, if it has been a week since the last update. Look at existing Featured Products & Featured Categories modules and update listings. Check and update Calendar events. Check and update Classes. Go to Website > Forms and check form submissions. Marketing Visit every social media page you use (Facebook, Pinterest, etc.) and answer messages, make new posts. Check site pages for good places to add Featured Products and Categories, or add a linked product image to a large block of text. Work on Freebies: coupon codes, project downloads, videos with useful tutorials, eBooks, anything you can provide that’s a free bonus. Use email marketing and/or web pages to promote new upcoming products and events. Train your employee team in current conversation topics to promote events and items. Okay, so that's more than a dozen, but they're all great things to keep an eye on. Keep your site in top shape! If you would like to download the list, click below: Daily Dozen, Adobe Acrobat PDF format. Daily Dozen, Microsoft Word format. Seven Steps to Online Success Online Success 1: So You've Got a New Website... What Now? Online Success 2: Keep Your Content Fresh Online Success 3: Make Your Product Listings Stand Out Online Success 4: Ten Ways Your Web Pages Can Sell for You Online Success 5: Beginner's Guide to Taking Great Photos Online Success 6: Why You Don't Need to Pay for SEO Online Success 7: Your Website Daily Dozen Getting Started / Help system blogs}'}, {id=191604258616, createdAt=1750439292619, updatedAt=1790601669576, path='review-request-tool', name='Review Request Tool', 2='{type=string, value=http://rainpos.my.site.com/s/article/Review-Request-Tool}', 4='{type=list, value=[{id=1, name='rain_pos', order=0, label='Rain POS'}, {id=2, name='like_sew', order=1, label='Like Sew'}, {id=3, name='jewel360', order=2, label='Jewel360'}, {id=4, name='music_shop_360', order=3, label='Music Shop 360'}]}', 37='{type=number, value=0}', 6='{type=string, value=
Please Note: This module is available only to clients who have the marketing package.
You can get to this part of the system by logging into the system and then on the left click Marketing > Request Review.
Building a base of five-star reviews is a powerful way to drive more business your direction: positive reviews can be a significant motivator in making a purchase decision, and this tool is designed to help you collect them!
Whenever you find a customer who is a good candidate, send them a review request. If they are in your list of Customers, you can do a Customer Search, and if their First and Last Name, Cell Phone, and Email are saved in the system, the info will auto-fill in the fields below. Clicking Request Review will send them a Text request, if you are using Text Message Marketing and have the customer set to receive marketing texts (on the Settings tab of the Customer's info). If that is not in place, or if you don't have their Cell Number, the system will send an email.
Wherever possible, you will want to sent Review Requests by text: the success rate with them is significantly higher than with email. All of these guidelines are summarized for you down below the tool.
You also have the ability to send customers Review Requests directly from the Register. After completing the transaction, when you go to print the receipt in the Receipt Options panel, one of the options is to Request Review.
The tool will send the request to either the customers cellphone or email, not both. If the customer does not have a phone number in their profile then the tool will default to sending the email. You may change the phone number and email in the request review checkbox.
If you don't have a Customer loaded into the transaction, or if the customer is set to NOT receive marketing text messages (on the Settings tab of their Customer info page), the Request Review check-box will not appear in the panel.
Once you start requesting reviews, periodically, you'll want to go to Reports > Reviews in the Marketing section and see what's coming in for you. The report graphically breaks down requests sent by email and by text (see the blue part of the bar graph), the number of customers that clicked to do a review (yellow), the different positive and negative reviews that they submitted (orange and light orange, respectively), and how many proceeded on to the review page (the rose colored column showing Google and Facebook). You can mouse-over the columns at the top to see the actual numbers involved, as pictured below.
It also breaks out very useful information in the bottom area so you can see specifics of how you're doing in the various areas. To see actual reviews, go to either Google or Facebook and click on your Reviews, and you can see them there.
}', 22='{type=option, value={id=2, name='recommended_extra', order=1, label='Recommended Extra'}}', 38='{type=number, value=1}', 9='{type=string, value=Review Request Tool}', 25='{type=number, value=0}', 26='{type=list, value=[{id=190209692538, name='Marketing'}, {id=190209692541, name='Register'}]}', 28='{type=string, value=Review Request Tool Please Note: This module is available only to clients who have the marketing package. Request Review Tool You can get to this part of the system by logging into the system and then on the left click Marketing > Request Review. Building a base of five-star reviews is a powerful way to drive more business your direction: positive reviews can be a significant motivator in making a purchase decision, and this tool is designed to help you collect them! Whenever you find a customer who is a good candidate, send them a review request. If they are in your list of Customers, you can do a Customer Search, and if their First and Last Name, Cell Phone, and Email are saved in the system, the info will auto-fill in the fields below. Clicking Request Review will send them a Text request, if you are using Text Message Marketing and have the customer set to receive marketing texts (on the Settings tab of the Customer's info). If that is not in place, or if you don't have their Cell Number, the system will send an email. Wherever possible, you will want to sent Review Requests by text: the success rate with them is significantly higher than with email. All of these guidelines are summarized for you down below the tool. Request Reviews From the Register You also have the ability to send customers Review Requests directly from the Register. After completing the transaction, when you go to print the receipt in the Receipt Options panel, one of the options is to Request Review. The tool will send the request to either the customers cellphone or email, not both. If the customer does not have a phone number in their profile then the tool will default to sending the email. You may change the phone number and email in the request review checkbox. If you don't have a Customer loaded into the transaction, or if the customer is set to NOT receive marketing text messages (on the Settings tab of their Customer info page), the Request Review check-box will not appear in the panel. See Your Results: The Reviews Report Once you start requesting reviews, periodically, you'll want to go to Reports > Reviews in the Marketing section and see what's coming in for you. The report graphically breaks down requests sent by email and by text (see the blue part of the bar graph), the number of customers that clicked to do a review (yellow), the different positive and negative reviews that they submitted (orange and light orange, respectively), and how many proceeded on to the review page (the rose colored column showing Google and Facebook). You can mouse-over the columns at the top to see the actual numbers involved, as pictured below. It also breaks out very useful information in the bottom area so you can see specifics of how you're doing in the various areas. To see actual reviews, go to either Google or Facebook and click on your Reviews, and you can see them there. Marketing,Register}'}, {id=191604258644, createdAt=1750439292647, updatedAt=1769704470078, path='web-marketing-best-practices', name='Web Marketing Best Practices', 2='{type=string, value=http://rainpos.my.site.com/s/article/Web-Marketing-Best-Practices}', 4='{type=list, value=[{id=1, name='rain_pos', order=0, label='Rain POS'}, {id=2, name='like_sew', order=1, label='Like Sew'}, {id=3, name='jewel360', order=2, label='Jewel360'}, {id=4, name='music_shop_360', order=3, label='Music Shop 360'}]}', 6='{type=string, value=
Marketing tactics are the specific actions you take as part of a broader marketing strategy. Before you start working on your tactics, be sure you have a comprehensive strategy and campaign plan. Ultimately, your goal should be to build relationships, showcase your expertise, and be an essential solution. Do these things well and you should see success in the digital world.
Know your audience. Identify your target audience for each marketing strategy. What are their interests? Where are they located? How do they shop? What’s their buying power? What resonates with this group?
Adapt to the trends. Monitor industry trends and adapt your strategy accordingly. If the trends indicate one thing and your strategy another, it might be time to consider a different strategy. Technology and shopping trends move at an alarming rate and you have to keep up to stay relevant to shoppers.
Create a New Product checklist. Go through your checklist for each new product you want to post on your website making sure you’ve done as many of the things on that checklist as possible for each item. This might include:
Add the new product line to a Featured Category module on your website that hasn't been updated in a while.
Pick a few new products and add them to a few Featured Products modules on the site that need an update.
Add the new products to Suggested Products on the Website tab of Product Page 3.0 for any products that match.
Link to the new product line in your next newsletter or email.
Link to the top new products and categories on your social sites.
If the new product line is significant, send out a message about it with Text Message Marketing.
Do your Website Daily Dozen. Set aside half an hour or more each day for running through your checklist to make sure your website stays in top shape.
Update your socials. Whichever social media sites you use (and you should be using at least one), make sure to regularly update your content with new posts, videos, and stories. Use built-in analytics to track the performance of your posts and repeat the format and style of the ones that work best. Do this regularly so that your followers learn to expect content on a reliable schedule. Consider joining different chat rooms for your industry and answering questions there. Always reply to messages on your social channels.
Send promotional emails. Send personalized emails to your subscribers targeting your marketing campaign goals. Use clear calls-to-action (CTAs). Send emails regularly but not so often that they become spam.
Create and share valuable content. Create a calendar schedule for releasing new content and make sure you hit those dates. Write your own compelling content that boosts your campaign goals or find and share other quality content (make sure you ask permission and give credit). Great, usable content will help you attract and retain new customers who will look to you as an industry leader.
Take care of your SEO. Identify a few important keywords for your campaign and use them strategically in your content, emails, and social media posts.
Consider alternative marketing routes. Advertise using pay-per-click platforms like Google Ads, team up with other business or social media influencers to promote your products, or create videos that highlight your products and engage your audience. Webinars and other online events can also be fun and engaging for your customers. Building relationships with other industry leaders and influencers will give you some street cred with your shoppers.
Incentivize. Offer gifts with purchase, promotions, or exclusive content to your subscribers. You’ll have access to emails and other information about your subscribers that you can use to tailor your marketing plans.
Use analytics to track and analyze your marketing effort making adjustments where necessary. If you’ve been successful, you’ll have created new connections with your audience, generated new leads, and converted prospects. By adopting the methods discussed here, even those new to marketing can effectively implement tactics that contribute to achieving broader strategic goals.
}', 22='{type=option, value={id=2, name='recommended_extra', order=1, label='Recommended Extra'}}', 9='{type=string, value=Web Marketing Best Practices}', 25='{type=number, value=0}', 26='{type=list, value=[{id=190209692538, name='Marketing'}, {id=190209692539, name='Website'}, {id=190209692688, name='Getting Started'}]}', 28='{type=string, value=Web Marketing Best Practices Marketing tactics are the specific actions you take as part of a broader marketing strategy. Before you start working on your tactics, be sure you have a comprehensive strategy and campaign plan. Ultimately, your goal should be to build relationships, showcase your expertise, and be an essential solution. Do these things well and you should see success in the digital world. Preliminary Steps Know your audience. Identify your target audience for each marketing strategy. What are their interests? Where are they located? How do they shop? What’s their buying power? What resonates with this group? Adapt to the trends. Monitor industry trends and adapt your strategy accordingly. If the trends indicate one thing and your strategy another, it might be time to consider a different strategy. Technology and shopping trends move at an alarming rate and you have to keep up to stay relevant to shoppers. Implement Your Marketing Tactics Create a New Product checklist. Go through your checklist for each new product you want to post on your website making sure you’ve done as many of the things on that checklist as possible for each item. This might include: Add the new product line to a Featured Category module on your website that hasn't been updated in a while. Pick a few new products and add them to a few Featured Products modules on the site that need an update. Add the new products to Suggested Products on the Website tab of Product Page 3.0 for any products that match. Link to the new product line in your next newsletter or email. Link to the top new products and categories on your social sites. If the new product line is significant, send out a message about it with Text Message Marketing. Do your Website Daily Dozen. Set aside half an hour or more each day for running through your checklist to make sure your website stays in top shape. Update your socials. Whichever social media sites you use (and you should be using at least one), make sure to regularly update your content with new posts, videos, and stories. Use built-in analytics to track the performance of your posts and repeat the format and style of the ones that work best. Do this regularly so that your followers learn to expect content on a reliable schedule. Consider joining different chat rooms for your industry and answering questions there. Always reply to messages on your social channels. Send promotional emails. Send personalized emails to your subscribers targeting your marketing campaign goals. Use clear calls-to-action (CTAs). Send emails regularly but not so often that they become spam. Create and share valuable content. Create a calendar schedule for releasing new content and make sure you hit those dates. Write your own compelling content that boosts your campaign goals or find and share other quality content (make sure you ask permission and give credit). Great, usable content will help you attract and retain new customers who will look to you as an industry leader. Take care of your SEO. Identify a few important keywords for your campaign and use them strategically in your content, emails, and social media posts. Consider alternative marketing routes. Advertise using pay-per-click platforms like Google Ads, team up with other business or social media influencers to promote your products, or create videos that highlight your products and engage your audience. Webinars and other online events can also be fun and engaging for your customers. Building relationships with other industry leaders and influencers will give you some street cred with your shoppers. Incentivize. Offer gifts with purchase, promotions, or exclusive content to your subscribers. You’ll have access to emails and other information about your subscribers that you can use to tailor your marketing plans. Evaluate Your Results Use analytics to track and analyze your marketing effort making adjustments where necessary. If you’ve been successful, you’ll have created new connections with your audience, generated new leads, and converted prospects. By adopting the methods discussed here, even those new to marketing can effectively implement tactics that contribute to achieving broader strategic goals. Marketing,Website,Getting Started / Help ecommerce social media marketing website marketing system blogs}'}, {id=191604258649, createdAt=1750439292652, updatedAt=1769704463773, path='website-settings-order-notifications', name='Website Settings: Order Notifications', 2='{type=string, value=http://rainpos.my.site.com/s/article/Website-Settings-Order-Notifications}', 4='{type=list, value=[{id=1, name='rain_pos', order=0, label='Rain POS'}, {id=2, name='like_sew', order=1, label='Like Sew'}, {id=3, name='jewel360', order=2, label='Jewel360'}, {id=4, name='music_shop_360', order=3, label='Music Shop 360'}]}', 6='{type=string, value=
The system allows you to send a variety of notifications about website orders to your customers, and you can configure different conditions and time frames for them to be sent.
You can get to this part of the system by clicking on the Admin Button with your username in the upper right and then going to Settings > Website > Order Notifications.
It's a good idea to have notifications sent by email whenever an order is Shipped and whenever an order is Ready for Pickup, if you use that option. For your Pickup Reminders, you can schedule those to repeat on whatever days of the week you like and you can also set what time of day the notifications will be sent.
You can have the system email notification if an order has been Picked Up, if you like. This is usually used in cases where the customer is having someone else pick the order up, so if that situation happens for you, this can be a nice courtesy to provide. It is also courteous to notify your customers if an order gets Cancelled for any reason.
You will see this option of you have Text Messaging enabled for your system. This feature is part of our Marketing Package.
If you enable the Send Text Messages feature, the system will send notifications by text message to customers who have a mobile phone number saved in the system. The notifications will follow the same settings used in the email setup section, and will just be duplicated via text.
}', 22='{type=option, value={id=1, name='featured_content', order=0, label='Featured Content'}}', 9='{type=string, value=Website Settings: Order Notifications}', 25='{type=number, value=0}', 26='{type=list, value=[{id=190209692539, name='Website'}, {id=190209692545, name='Settings'}]}', 28='{type=string, value=Website Settings: Order Notifications The system allows you to send a variety of notifications about website orders to your customers, and you can configure different conditions and time frames for them to be sent. You can get to this part of the system by clicking on the Admin Button with your username in the upper right and then going to Settings > Website > Order Notifications. Configuring Your Order Notifications Here are your options for the configuration of your Order Notifications via Email: It's a good idea to have notifications sent by email whenever an order is Shipped and whenever an order is Ready for Pickup, if you use that option. For your Pickup Reminders, you can schedule those to repeat on whatever days of the week you like and you can also set what time of day the notifications will be sent. You can have the system email notification if an order has been Picked Up, if you like. This is usually used in cases where the customer is having someone else pick the order up, so if that situation happens for you, this can be a nice courtesy to provide. It is also courteous to notify your customers if an order gets Cancelled for any reason. Here are your options for the configuration of Order Notifications via text messaging: You will see this option of you have Text Messaging enabled for your system. This feature is part of our Marketing Package. If you enable the Send Text Messages feature, the system will send notifications by text message to customers who have a mobile phone number saved in the system. The notifications will follow the same settings used in the email setup section, and will just be duplicated via text. Website,Settings ecommerce website settings}'}, {id=191604258668, createdAt=1750439292671, updatedAt=1770138527389, path='adding-and-editing-customers-part-2-settings-marketing-history-layaways-and-lists', name='Adding and Editing Customers - Part 2: Settings, Marketing, History, Layaways, and Lists', 2='{type=string, value=https://rainpos.my.site.com/s/article/Adding-and-Editing-Customers-Part-2-Settings-Marketing-History-Layaways-and-Lists}', 4='{type=list, value=[{id=1, name='rain_pos', order=0, label='Rain POS'}, {id=2, name='like_sew', order=1, label='Like Sew'}]}', 6='{type=string, value=
You can get to this part of the system by clicking Customers > Customers. Search for and click on the ID Number for the customer you want to edit, or to start a new one, click the +New Customer button. If you're just creating a new customer, from anywhere in the system you can click on the +Create New button at the top and in the drop-list, click Customer.
Other Customer Articles in This Series:
Adding and Editing Customers - Part 1: Details Tab
Adding and Editing Customers Part 3: Specialty Tabs
Customer Discount - For employees or other customers who are entitled to a Discount, you can add that percentage here. NOTE: this discount will be added to any other discounts applied in the Register, so be careful about the discounts you apply.
Accept Checks - By default, all new customers have this setting toggled to ON. You can change that for customers who do not qualify to use personal checks in your store.
Sales Lead - You can toggle this On if the Customer is a sales prospect for something you sell so you can actively market to them. There is a setting in the main Customers list that allows you to view only your Sales Leads to help you with your marketing.
Wholesale - If the Wholesale functionality is active for your store, you will see this toggle. If you set a customer as Wholesale, they will use your Wholesale pricing and will not be taxed for their purchases. If the customer logs into your website as a Wholesale member, they will see the wholesale pricing and descriptions, if they are not logged in, they will see the retail info only. Customers cannot purchase both wholesale and retail in the same transaction.
Inactive - If you set a Customer as Inactive, of course they can still shop with you and they will still function normally in all parts of the system. In the Bulk area of Customers when you download your Customers spreadsheet, you can see which customers have been flagged as Inactive and use that information in your marketing efforts.
Allow Payments On Account - By default this is toggled ON for all customers, and it allows you to create Invoices for the customer, if needed. If this is enabled, you also have the option of adding refund amounts to the customer's account as a credit balance.
Send Notification Text Messages - If you have had us set up the optional Text Messaging service either by itself or with the The Marketing Package, you have the ability to have the system Send Notification Text Messages from parts of the system such as Work Orders, Rent to Own, and Rentals.
Send Marketing Text Messages - Also a feature of our optional Text Messaging service with the Marketing Package, this function allows you to Send Marketing Text Messages to customers in bulk from the Marketing area of Rain POS. Please note that both #8 and #9 require that the customer has a valid Mobile Phone number saved in the appropriate field in the Details tab of the Edit Customer panel.
Reward Program Eligibility - If you do not want to have the Customer receive Reward Points for items they purchase, toggle this setting to Off.
Reward Points - This field shows the current number of Reward Points the customer has. Please note that this is not their lifetime total; it is just how many they've generated since they earned their most recent Reward Coupon. You can manually adjust this number, if your login permission level allows.
View Coupons - If you click to View Coupons, the Coupons panel will open, showing the customer's most recent coupons at the bottom. A) You can manually create a Reward Coupon (this is a great way to console a customer whose Reward Coupon may have expired) by clicking the Add Reward Coupon button. B) You can view the transaction in which a Reward Coupon was Issued by clicking on the reward Transaction ID link. C) You can Delete a Reward Coupon. For Reward Coupons that were D) Redeemed, you can click the Transaction ID link to see the transaction in which they were used. If needed, and E) you can see the Expiration Date for each of your Reward Coupons, if you have them set to expire.
Rewards History - Clicking the Rewards History button will bring up a panel showing you the full history of all reward points earned in the customer's history with you, with a line item for each transaction and manual edit. You can click on any transaction to see full details, and you can also click to see Notes on manual changes that were made.
Tax Exempt - For non-profit organizations and other customers that qualify to be Tax Exempt, you can set that for them here.
Tax ID - Be sure to enter this for anyone set to be Tax Exempt for reference if your tax jurisdiction inquires about the customer tax-free purchases.
If you have put in an Email Address for the customer, it will be displayed here, along with all Email Marketing Lists the customer is currently subscribed to. It's important to note that before checking a box to add a Customer to one of your mailing lists (all lists you have created under Marketing > Email Lists will appear here) that you verify with the customer verbally that it's okay for you to do so. If you just automatically add every customer, it is likely several will flag you as a spammer for receiving unwanted emails from you. The more times that happens, the more likely it is that one of the big email providers (Gmail, Yahoo, AOL, etc.) will begin blocking your emails.
Customer Groups the customer has been added to will also have their boxes checked here. You can create groups for your customers in the Customers > Customer Groups tool. This functionality is explained more fully below, but to add a Customer to a Customer Group you've created, check the box for the group of which you would like them to be a part, then click Save at the bottom.
If you are using the Marketing Package, you'll see the different Automated Marketing Emails that are active for your organization.
The Marketing Unsubscribes (not pictured) is something you will only see if you have the Marketing Package and if the customer has chosen to unsubscribe from any of the automated marketing emails. You have the ability, at the request of the customer, to Resubscribe them to marketing emails of which they have opted out.
Serial Number History will display the data below, and you can click on the serial number to view more details about the item. You can also see the original transaction by clicking the Event ID.
Serial Number Detail:
Only the customer's active layaways will display in this view. To view completed ones, you will need to go to Modules > Layaways, and click to Show Completed Layaways. Clicking on the Layaway ID will open the Edit Layaway panel to let you view and edit the Layaway as needed. For more information on working with your Layaways, click here: Layaways. You can click the Pay button to allow the customer to make a payment toward their Layaway purchase. Note that if the customer wants to pay the whole thing off, it is best to click the Layaway ID and click the Pick Up button at the bottom, which will load all remaining charges for the Layaway into the Register.
There are two possible areas for this tab: If your store has Tailored Lists active, you will see a sub-tab for those. You will also see Gift Registry.
For Tailored Lists, if the customer has any, they will appear under the sub-tab. You can click on the list name to add items or edit the list. For more information on working with Tailored Lists, click here.
If your customer has created a Gift Registry, you will see it listed in the sub-tab as pictured below. Unlike Tailored Lists, you cannot view a Gift Registry from this area.
For information about specialty tabs in the Customer page, such as Subscriptions, Consignment, and more, click here to view part three: Adding and Editing Customers Part 3: Specialty Tabs
}', 8='{type=string, value=
You can get to this part of the system by clicking Customers > Customers. Search for and click on the ID Number for the customer you want to edit, or to start a new one, click the +New Customer button. If you're just creating a new customer, from anywhere in the system you can click on the +Create New button at the top and in the drop-list, click Customer.
Other Customer Articles in This Series:
Adding and Editing Customers - Part 1: Details Tab
Adding and Editing Customers Part 3: Specialty Tabs
Customer Discount - For employees or other customers who are entitled to a Discount, you can add that percentage here. NOTE: this discount will be added to any other discounts applied in the Register, so be careful about the discounts you apply.
Accept Checks - By default, all new customers have this setting toggled to ON. You can change that for customers who do not qualify to use personal checks in your store.
Sales Lead - You can toggle this On if the Customer is a sales prospect for something you sell so you can actively market to them. There is a setting in the main Customers list that allows you to view only your Sales Leads to help you with your marketing.
Wholesale - If the Wholesale functionality is active for your store, you will see this toggle. If you set a customer as Wholesale, they will use your Wholesale pricing and will not be taxed for their purchases. If the customer logs into your website as a Wholesale member, they will see the wholesale pricing and descriptions, if they are not logged in, they will see the retail info only. Customers cannot purchase both wholesale and retail in the same transaction.
Inactive - If you set a Customer as Inactive, of course they can still shop with you and they will still function normally in all parts of the system. In the Bulk area of Customers when you download your Customers spreadsheet, you can see which customers have been flagged as Inactive and use that information in your marketing efforts.
Allow Payments On Account - By default this is toggled ON for all customers, and it allows you to create Invoices for the customer, if needed. If this is enabled, you also have the option of adding refund amounts to the customer's account as a credit balance.
Send Notification Text Messages - If you have had us set up the optional Text Messaging service either by itself or with the The Marketing Package, you have the ability to have the system Send Notification Text Messages from parts of the system such as Work Orders, Rent to Own, and Rentals.
Send Marketing Text Messages - Also a feature of our optional Text Messaging service with the Marketing Package, this function allows you to Send Marketing Text Messages to customers in bulk from the Marketing area of Rain POS. Please note that both #8 and #9 require that the customer has a valid Mobile Phone number saved in the appropriate field in the Details tab of the Edit Customer panel.
Reward Program Eligibility - If you do not want to have the Customer receive Reward Points for items they purchase, toggle this setting to Off.
Reward Points - This field shows the current number of Reward Points the customer has. Please note that this is not their lifetime total; it is just how many they've generated since they earned their most recent Reward Coupon. You can manually adjust this number, if your login permission level allows.
View Coupons - If you click to View Coupons, the Coupons panel will open, showing the customer's most recent coupons at the bottom. A) You can manually create a Reward Coupon (this is a great way to console a customer whose Reward Coupon may have expired) by clicking the Add Reward Coupon button. B) You can view the transaction in which a Reward Coupon was Issued by clicking on the reward Transaction ID link. C) You can Delete a Reward Coupon. For Reward Coupons that were D) Redeemed, you can click the Transaction ID link to see the transaction in which they were used. If needed, and E) you can see the Expiration Date for each of your Reward Coupons, if you have them set to expire.
Rewards History - Clicking the Rewards History button will bring up a panel showing you the full history of all reward points earned in the customer's history with you, with a line item for each transaction and manual edit. You can click on any transaction to see full details, and you can also click to see Notes on manual changes that were made.
Tax Exempt - For non-profit organizations and other customers that qualify to be Tax Exempt, you can set that for them here.
Tax ID - Be sure to enter this for anyone set to be Tax Exempt for reference if your tax jurisdiction inquires about the customer tax-free purchases.
If you have put in an Email Address for the customer, it will be displayed here, along with all Email Marketing Lists the customer is currently subscribed to. It's important to note that before checking a box to add a Customer to one of your mailing lists (all lists you have created under Marketing > Email Lists will appear here) that you verify with the customer verbally that it's okay for you to do so. If you just automatically add every customer, it is likely several will flag you as a spammer for receiving unwanted emails from you. The more times that happens, the more likely it is that one of the big email providers (Gmail, Yahoo, AOL, etc.) will begin blocking your emails.
Customer Groups the customer has been added to will also have their boxes checked here. You can create groups for your customers in the Customers > Customer Groups tool. This functionality is explained more fully below, but to add a Customer to a Customer Group you've created, check the box for the group of which you would like them to be a part, then click Save at the bottom.
If you are using the Marketing Package, you'll see the different Automated Marketing Emails that are active for your organization.
The Marketing Unsubscribes (not pictured) is something you will only see if you have the Marketing Package and if the customer has chosen to unsubscribe from any of the automated marketing emails. You have the ability, at the request of the customer, to Resubscribe them to marketing emails of which they have opted out.
Serial Number History will display the data below, and you can click on the serial number to view more details about the item. You can also see the original transaction by clicking the Event ID.
Serial Number Detail:
Only the customer's active layaways will display in this view. To view completed ones, you will need to go to Modules > Layaways, and click to Show Completed Layaways. Clicking on the Layaway ID will open the Edit Layaway panel to let you view and edit the Layaway as needed. For more information on working with your Layaways, click here: Layaways. You can click the Pay button to allow the customer to make a payment toward their Layaway purchase. Note that if the customer wants to pay the whole thing off, it is best to click the Layaway ID and click the Pick Up button at the bottom, which will load all remaining charges for the Layaway into the Register.
There are two possible areas for this tab: If your store has Tailored Lists active, you will see a sub-tab for those. You will also see Gift Registry.
For Tailored Lists, if the customer has any, they will appear under the sub-tab. You can click on the list name to add items or edit the list. For more information on working with Tailored Lists, click here.
If your customer has created a Gift Registry, you will see it listed in the sub-tab as pictured below. Unlike Tailored Lists, you cannot view a Gift Registry from this area.
For information about specialty tabs in the Customer page, such as Rental Contracts, Subscriptions, Consignment, and more, click here to view part three: Adding and Editing Customers Part 3: Specialty Tabs
}', 9='{type=string, value=Adding and Editing Customers - Part 2: Settings, Marketing, History, Layaways, and Lists}', 43='{type=option, value={id=1, name='featured_content', order=0, label='Featured Content'}}', 44='{type=option, value={id=1, name='featured_content', order=0, label='Featured Content'}}', 16='{type=list, value=[{id=4, name='music_shop_360', order=3, label='Music Shop 360'}]}', 17='{type=string, value=
You can get to this part of the system by clicking Customers > Customers. Search for and click on the ID Number for the customer you want to edit, or to start a new one, click the +New Customer button. If you're just creating a new customer, from anywhere in the system you can click on the +Create New button at the top and in the drop-list, click Customer.
Other Customer Articles in This Series:
Adding and Editing Customers - Part 1: Details Tab
Adding and Editing Customers Part 3: Specialty Tabs
Customer Discount - For employees or other customers who are entitled to a Discount, you can add that percentage here. NOTE: this discount will be added to any other discounts applied in the Register, so be careful about the discounts you apply.
Accept Checks - By default, all new customers have this setting toggled to ON. You can change that for customers who do not qualify to use personal checks in your store.
Sales Lead - You can toggle this On if the Customer is a sales prospect for something you sell so you can actively market to them. There is a setting in the main Customers list that allows you to view only your Sales Leads to help you with your marketing.
Wholesale - If the Wholesale functionality is active for your store, you will see this toggle. If you set a customer as Wholesale, they will use your Wholesale pricing and will not be taxed for their purchases. If the customer logs into your website as a Wholesale member, they will see the wholesale pricing and descriptions, if they are not logged in, they will see the retail info only. Customers cannot purchase both wholesale and retail in the same transaction.
Inactive - If you set a Customer as Inactive, of course they can still shop with you and they will still function normally in all parts of the system. In the Bulk area of Customers when you download your Customers spreadsheet, you can see which customers have been flagged as Inactive and use that information in your marketing efforts.
Allow Payments On Account - By default this is toggled ON for all customers, and it allows you to create Invoices for the customer, if needed. If this is enabled, you also have the option of adding refund amounts to the customer's account as a credit balance.
Send Notification Text Messages - If you have had us set up the optional Text Messaging service either by itself or with the The Marketing Package, you have the ability to have the system Send Notification Text Messages from parts of the system such as Work Orders, Rent to Own, and Rentals.
Send Marketing Text Messages - Also a feature of our optional Text Messaging service with the Marketing Package, this function allows you to Send Marketing Text Messages to customers in bulk from the Marketing area of Rain POS. Please note that both #8 and #9 require that the customer has a valid Mobile Phone number saved in the appropriate field in the Details tab of the Edit Customer panel.
Reward Program Eligibility - If you do not want to have the Customer receive Reward Points for items they purchase, toggle this setting to Off.
Reward Points - This field shows the current number of Reward Points the customer has. Please note that this is not their lifetime total; it is just how many they've generated since they earned their most recent Reward Coupon. You can manually adjust this number, if your login permission level allows.
View Coupons - If you click to View Coupons, the Coupons panel will open, showing the customer's most recent coupons at the bottom. A) You can manually create a Reward Coupon (this is a great way to console a customer whose Reward Coupon may have expired) by clicking the Add Reward Coupon button. B) You can view the transaction in which a Reward Coupon was Issued by clicking on the reward Transaction ID link. C) You can Delete a Reward Coupon. For Reward Coupons that were D) Redeemed, you can click the Transaction ID link to see the transaction in which they were used. If needed, and E) you can see the Expiration Date for each of your Reward Coupons, if you have them set to expire.
Rewards History - Clicking the Rewards History button will bring up a panel showing you the full history of all reward points earned in the customer's history with you, with a line item for each transaction and manual edit. You can click on any transaction to see full details, and you can also click to see Notes on manual changes that were made.
Tax Exempt - For non-profit organizations and other customers that qualify to be Tax Exempt, you can set that for them here.
Tax ID - Be sure to enter this for anyone set to be Tax Exempt for reference if your tax jurisdiction inquires about the customer tax-free purchases.
If you have put in an Email Address for the customer, it will be displayed here, along with all Email Marketing Lists the customer is currently subscribed to. It's important to note that before checking a box to add a Customer to one of your mailing lists (all lists you have created under Marketing > Email Lists will appear here) that you verify with the customer verbally that it's okay for you to do so. If you just automatically add every customer, it is likely several will flag you as a spammer for receiving unwanted emails from you. The more times that happens, the more likely it is that one of the big email providers (Gmail, Yahoo, AOL, etc.) will begin blocking your emails.
Customer Groups the customer has been added to will also have their boxes checked here. You can create groups for your customers in the Customers > Customer Groups tool. This functionality is explained more fully below, but to add a Customer to a Customer Group you've created, check the box for the group of which you would like them to be a part, then click Save at the bottom.
If you are using the Marketing Package, you'll see the different Automated Marketing Emails that are active for your organization.
The Marketing Unsubscribes (not pictured) is something you will only see if you have the Marketing Package and if the customer has chosen to unsubscribe from any of the automated marketing emails. You have the ability, at the request of the customer, to Resubscribe them to marketing emails of which they have opted out.
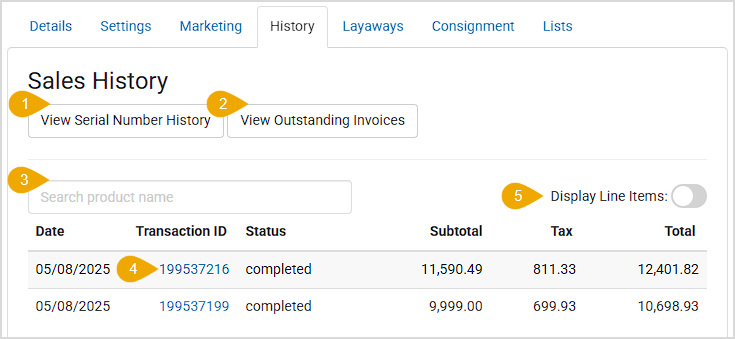
Serial Number History will display the data below, and you can click on the serial number to view more details about the item. You can also see the original transaction by clicking the Event ID.
Serial Number Detail:
Only the customer's active layaways will display in this view. To view completed ones, you will need to go to Modules > Layaways, and click to Show Completed Layaways. Clicking on the Layaway ID will open the Edit Layaway panel to let you view and edit the Layaway as needed. For more information on working with your Layaways, click here: Layaways. You can click the Pay button to allow the customer to make a payment toward their Layaway purchase. Note that if the customer wants to pay the whole thing off, it is best to click the Layaway ID and click the Pick Up button at the bottom, which will load all remaining charges for the Layaway into the Register.
There are two possible areas for this tab: If your store has Memo (Tailored Lists) active, you will see a sub-tab for those. You will also see Gift Registry.
For Memo, if the customer has any lists, they will appear under the sub-tab. You can click on the list name to add items or edit the list. For more information on working with Memo, click here.
If your customer has created a Gift Registry, you will see it listed in the sub-tab as pictured below. Unlike Tailored Lists, you cannot view a Gift Registry from this area.
For information about specialty tabs in the Customer page, such as Subscriptions, Consignment, Care Plans and more, click here to view part three: Adding and Editing Customers Part 3: Specialty Tabs
}', 18='{type=list, value=[{id=3, name='jewel360', order=2, label='Jewel360'}]}', 22='{type=option, value={id=1, name='featured_content', order=0, label='Featured Content'}}', 25='{type=number, value=0}', 26='{type=list, value=[{id=190209692536, name='Admin'}, {id=190209692540, name='Customers'}]}', 28='{type=string, value=Adding and Editing Customers - Part 2: Settings, Marketing, History, Layaways, and Lists You can get to this part of the system by clicking Customers > Customers. Search for and click on the ID Number for the customer you want to edit, or to start a new one, click the +New Customer button. If you're just creating a new customer, from anywhere in the system you can click on the +Create New button at the top and in the drop-list, click Customer. Other Customer Articles in This Series: Adding and Editing Customers - Part 1: Details Tab Adding and Editing Customers Part 3: Specialty Tabs Edit Customer: Settings Tab Customer Discount - For employees or other customers who are entitled to a Discount, you can add that percentage here. NOTE: this discount will be added to any other discounts applied in the Register, so be careful about the discounts you apply. Accept Checks - By default, all new customers have this setting toggled to ON. You can change that for customers who do not qualify to use personal checks in your store. Sales Lead - You can toggle this On if the Customer is a sales prospect for something you sell so you can actively market to them. There is a setting in the main Customers list that allows you to view only your Sales Leads to help you with your marketing. Wholesale - If the Wholesale functionality is active for your store, you will see this toggle. If you set a customer as Wholesale, they will use your Wholesale pricing and will not be taxed for their purchases. If the customer logs into your website as a Wholesale member, they will see the wholesale pricing and descriptions, if they are not logged in, they will see the retail info only. Customers cannot purchase both wholesale and retail in the same transaction. Inactive - If you set a Customer as Inactive, of course they can still shop with you and they will still function normally in all parts of the system. In the Bulk area of Customers when you download your Customers spreadsheet, you can see which customers have been flagged as Inactive and use that information in your marketing efforts. Allow Payments On Account - By default this is toggled ON for all customers, and it allows you to create Invoices for the customer, if needed. If this is enabled, you also have the option of adding refund amounts to the customer's account as a credit balance. Send Notification Text Messages - If you have had us set up the optional Text Messaging service either by itself or with the The Marketing Package, you have the ability to have the system Send Notification Text Messages from parts of the system such as Work Orders, Rent to Own, and Rentals. Send Marketing Text Messages - Also a feature of our optional Text Messaging service with the Marketing Package, this function allows you to Send Marketing Text Messages to customers in bulk from the Marketing area of Rain POS. Please note that both #8 and #9 require that the customer has a valid Mobile Phone number saved in the appropriate field in the Details tab of the Edit Customer panel. Reward Program Eligibility - If you do not want to have the Customer receive Reward Points for items they purchase, toggle this setting to Off. Reward Points - This field shows the current number of Reward Points the customer has. Please note that this is not their lifetime total; it is just how many they've generated since they earned their most recent Reward Coupon. You can manually adjust this number, if your login permission level allows. View Coupons - If you click to View Coupons, the Coupons panel will open, showing the customer's most recent coupons at the bottom. A) You can manually create a Reward Coupon (this is a great way to console a customer whose Reward Coupon may have expired) by clicking the Add Reward Coupon button. B) You can view the transaction in which a Reward Coupon was Issued by clicking on the reward Transaction ID link. C) You can Delete a Reward Coupon. For Reward Coupons that were D) Redeemed, you can click the Transaction ID link to see the transaction in which they were used. If needed, and E) you can see the Expiration Date for each of your Reward Coupons, if you have them set to expire. Rewards History - Clicking the Rewards History button will bring up a panel showing you the full history of all reward points earned in the customer's history with you, with a line item for each transaction and manual edit. You can click on any transaction to see full details, and you can also click to see Notes on manual changes that were made. Tax Exempt - For non-profit organizations and other customers that qualify to be Tax Exempt, you can set that for them here. Tax ID - Be sure to enter this for anyone set to be Tax Exempt for reference if your tax jurisdiction inquires about the customer tax-free purchases. Edit Customer: Marketing Tab If you have put in an Email Address for the customer, it will be displayed here, along with all Email Marketing Lists the customer is currently subscribed to. It's important to note that before checking a box to add a Customer to one of your mailing lists (all lists you have created under Marketing > Email Lists will appear here) that you verify with the customer verbally that it's okay for you to do so. If you just automatically add every customer, it is likely several will flag you as a spammer for receiving unwanted emails from you. The more times that happens, the more likely it is that one of the big email providers (Gmail, Yahoo, AOL, etc.) will begin blocking your emails. Customer Groups the customer has been added to will also have their boxes checked here. You can create groups for your customers in the Customers > Customer Groups tool. This functionality is explained more fully below, but to add a Customer to a Customer Group you've created, check the box for the group of which you would like them to be a part, then click Save at the bottom. If you are using the Marketing Package, you'll see the different Automated Marketing Emails that are active for your organization. The Marketing Unsubscribes (not pictured) is something you will only see if you have the Marketing Package and if the customer has chosen to unsubscribe from any of the automated marketing emails. You have the ability, at the request of the customer, to Resubscribe them to marketing emails of which they have opted out. Edit Customer: History Tab View Serial Numbers Purchased - Clicking the View Serial Numbers Purchased button will open a list of all serialized items the customer has purchased from you. If you click on a serial number, it will open a Serialized Item Report, showing the full details of the item, including any Repairs / Work Orders you have done for the item. Serial Number History will display the data below, and you can click on the serial number to view more details about the item. You can also see the original transaction by clicking the Event ID. Serial Number Detail: View Classes Purchased - If you click on the View Classes Purchased button you'll see a list of all class sessions purchased with the most recent at the top. View Outstanding Invoices - If the customer has any Invoices you can view outstanding invoices here. You are able to either print or email a statement that will combine open invoices into a single statement. You can also click on an Invoice ID to open an work with it further. Search - Whether viewing Transactions or Items (see #6 below) you can search for items using this area. Transactions - Each Transaction the Customer has done with you will be listed in order with the most recent at the top. You can click on a Transaction ID to open and work with the transaction. Display Line Items - If you want to view a list of all items the customer has purchased, toggle this On, the view will look like the example below, with items in the same transaction grouped together like the two highlighted here: Edit Customer: Layaways Tab Only the customer's active layaways will display in this view. To view completed ones, you will need to go to Modules > Layaways, and click to Show Completed Layaways. Clicking on the Layaway ID will open the Edit Layaway panel to let you view and edit the Layaway as needed. For more information on working with your Layaways, click here: Layaways. You can click the Pay button to allow the customer to make a payment toward their Layaway purchase. Note that if the customer wants to pay the whole thing off, it is best to click the Layaway ID and click the Pick Up button at the bottom, which will load all remaining charges for the Layaway into the Register. Edit Customer: Lists Tab There are two possible areas for this tab: If your store has Tailored Lists active, you will see a sub-tab for those. You will also see Gift Registry. For Tailored Lists, if the customer has any, they will appear under the sub-tab. You can click on the list name to add items or edit the list. For more information on working with Tailored Lists, click here. If your customer has created a Gift Registry, you will see it listed in the sub-tab as pictured below. Unlike Tailored Lists, you cannot view a Gift Registry from this area. For information about specialty tabs in the Customer page, such as Subscriptions, Consignment, and more, click here to view part three: Adding and Editing Customers Part 3: Specialty Tabs Admin,Customers serialized classes invoices customers automated emails email list email newsletter pos settings wholesale}'}, {id=191604258681, createdAt=1750439292684, updatedAt=1779220615642, path='bulk-email-newsletters', name='Bulk Email Newsletters', 32='{type=number, value=1}', 2='{type=string, value=https://rainpos.my.site.com/s/article/Bulk-Email-Newsletters}', 4='{type=list, value=[{id=1, name='rain_pos', order=0, label='Rain POS'}, {id=2, name='like_sew', order=1, label='Like Sew'}, {id=3, name='jewel360', order=2, label='Jewel360'}, {id=4, name='music_shop_360', order=3, label='Music Shop 360'}]}', 37='{type=number, value=1}', 6='{type=string, value=
To start, click Marketing on the left and then click on the Email button.
The Email Marketing tool is your hub for all of your bulk mailing activity. Whether you’re sending out your latest newsletter or getting a new online promotion to your client list, the Email Module is where you’ll go to actually send out your messages. This module doesn't work like traditional email: you won't have an Inbox. It is for mailing out to large numbers of people in a way that is safe.
Once you open the Email Module, you will see a list of all Sent Messages you have mailed from the system. They are listed chronologically. Clicking on a message will show you the statistics for its delivery (see below) for 30 days after the message has been sent. It's best to give the system time to complete sending, so checking after four to six hours to give your recipients time to check their email and open it would be best.
You also have tabs on this page for any saved Templates you might have, any Drafts, and for any messages you have Scheduled to go out. In all of these areas, you can click on messages to edit the Subject and Body as needed.
Click the New Email Message button to start composing your message. Here are the steps to compose and send an Email Marketing message from Rain POS:
Please Note: This will clear all your work on this page and you will not be able to get it back.
For more detail on working with your Email Marketing module, click here: Email Marketing.
}', 22='{type=option, value={id=1, name='featured_content', order=0, label='Featured Content'}}', 38='{type=number, value=0}', 9='{type=string, value=Bulk Email Newsletters}', 25='{type=number, value=0}', 26='{type=list, value=[{id=190209692538, name='Marketing'}]}', 28='{type=string, value=Bulk Email Newsletters To start, click Marketing on the left and then click on the Email button. The Email Marketing tool is your hub for all of your bulk mailing activity. Whether you’re sending out your latest newsletter or getting a new online promotion to your client list, the Email Module is where you’ll go to actually send out your messages. This module doesn't work like traditional email: you won't have an Inbox. It is for mailing out to large numbers of people in a way that is safe. Once you open the Email Module, you will see a list of all Sent Messages you have mailed from the system. They are listed chronologically. Clicking on a message will show you the statistics for its delivery (see below) for 30 days after the message has been sent. It's best to give the system time to complete sending, so checking after four to six hours to give your recipients time to check their email and open it would be best. You also have tabs on this page for any saved Templates you might have, any Drafts, and for any messages you have Scheduled to go out. In all of these areas, you can click on messages to edit the Subject and Body as needed. Compose and Send an Email Marketing Message Click the New Email Message button to start composing your message. Here are the steps to compose and send an Email Marketing message from Rain POS: Enter the title of the message in the Subject field exactly the way you will want it to appear to your readers. A Subject is required in order to send out your message. In the Body area, you have the opportunity to add rich content using our Content Editor. You can add images, links, tables, and you can embed special content with html code, if you like, such as YouTube video. Compose your message here. If you wish to add the message to your Newsletter Archive, put a check in the box. You can use the Newsletter Archive module to list your newsletters on your website, if you like. Be sure to select the E-mail List(s) to send to. A mailing list selection is also required in order to send out your message. You can click the Filtered List button and send your message to any saved Filtered List from the Filters module. Click here to learn how to work with the Filters module: Filter Customers. You can enter your e-mail address and click on the Send Test Email button to see if the message will go through spam filters. Please see the note below about how to correctly format your content to avoid being blocked by email providers that have very strong message filtering. If your message has not come through within ten minutes, most likely you need to decrease the amount of image content and increase the amount of text content. When you’re ready to send the message, click the Send button. You can click to Schedule your email with the date and exact time you want the email to be sent. If you need to work on your message some more, but don't have time, click Save Draft. Drafts are saved under the Drafts tab until you send them out, so they are not permanently saved like your Templates. When your message is ready, it's a good idea to click the Save Template button if you are sending a newsletter or similar mailout that will follow the same format. Save Template makes a permanent save of the message. You can access any of your saved templates on the Templates tab. If you do not wish to keep what you have started in this window, click the Cancel link and it will go back to the main Email Marketing page without saving what you have done. Please Note: This will clear all your work on this page and you will not be able to get it back. For more detail on working with your Email Marketing module, click here: Email Marketing in the Rain POS System. Marketing communications email newsletter website settings}', 31='{type=number, value=0}'}]
Filter by Category
Sort by Relevance
Description

.png?width=2353&height=679&name=Primary%20Logo%20(1).png)