Product Page 3.0: Part 5 - Product Information Tab

October 01, 2024
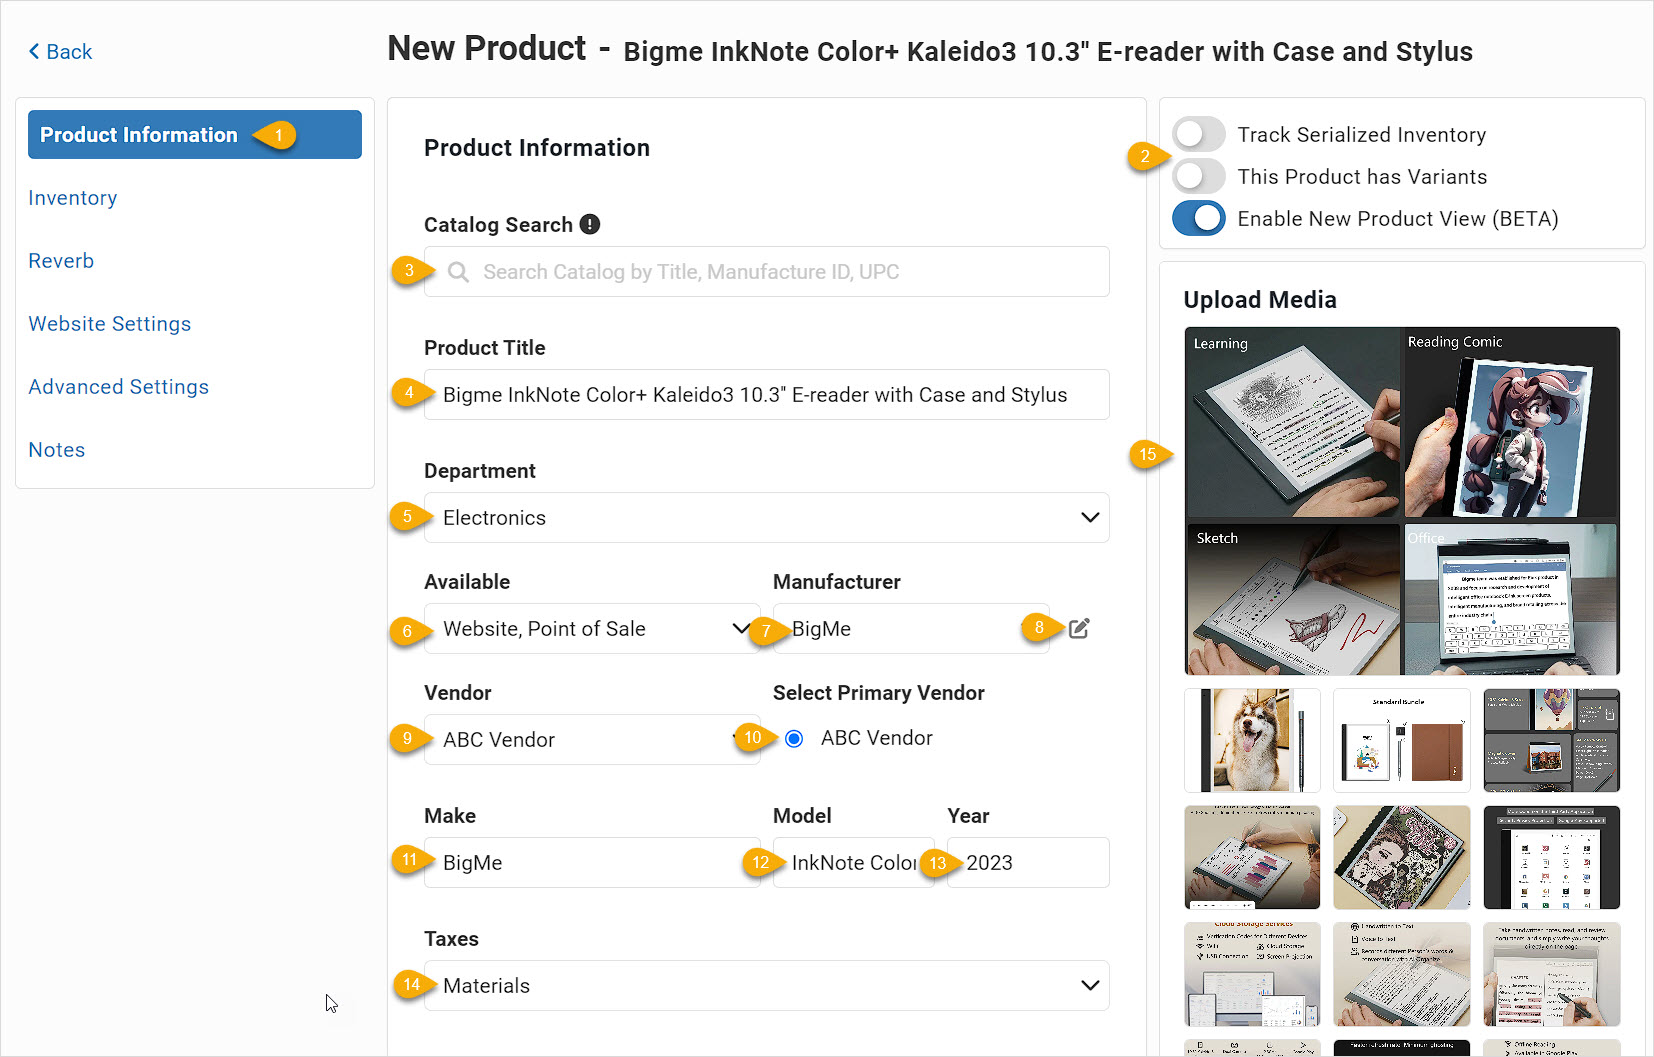
The primary details about your product will be in the Product Information tab.
Product Information
At the top of the Product Information tab you are able to work with the following areas:
-
Product Page Tabs - The Product Information tab loads by default when creating a new product, and you can switch freely between tabs without needing to save.
-
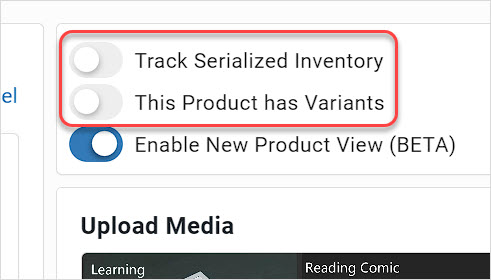
Serialized and Variant Settings - Be sure to toggle whichever of these might apply to your new product to On before saving your product for the first time, or you will not be able to do so later.
-
Catalog Search - Our Catalog contains many products across many industries. You can search by keyword or product identifier (UPC / Manufacturer Number) and if you find a match, clicking on the result in the catalog will load basic data, images, and descriptions into your product.
-
Product Title - Enter a complete Title for the product here, using an exact match to what the manufacturer uses is recommended so searches will match with higher reliability for your customers.
-
Department - If you use Departments, click on the one appropriate for this product in the drop-list. A product can have only one Department.
-
Availability - By default, new products will be available on both your Website and in your Point of Sale, but you can change it to one or the other if needed.
-
Manufacturer - Click on the appropriate Manufacturer in the drop-list if it has already been entered. Clicking will also allow you to search for a match.
-
Add / Edit / Remove Manufacturer - Clicking the edit button will pop up a window that will allow you to search for existing Manufacturers on your list and either edit or delete them, if needed. You can also enter new ones from here.
-
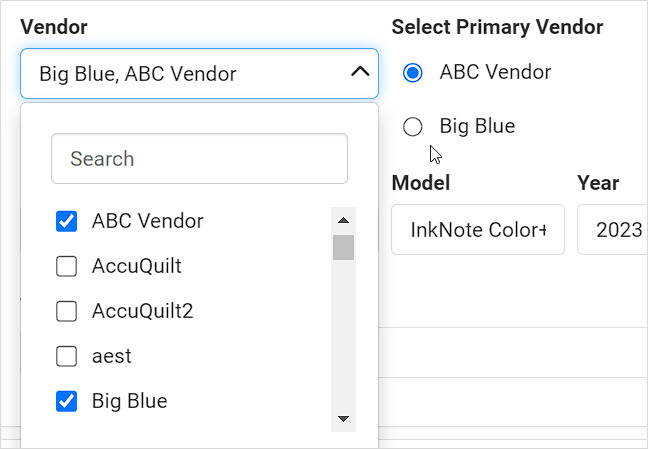
Vendor - Clicking this field will allow you to select as many Vendors from your list as you need for this product.
-
Select Primary Vendor - If you choose more than one, you can select whichever one will be your Primary Vendor for the item. The Primary vendor will be the one that displays by default for the item and will come up in vendor item searches when creating a new Purchase Order. In addition, the Low Inventory report and the Low Inventory view of the Inventory report will display the Primary Vendor of the item if it's inventory is at or below its Reorder Point (see the section below on Purchasing).
-
Make - You can list the name of the maker brand here, and this can be different than the base Manufacturer if needed.
-
Model - Enter the model name of the item here.
-
Year - Enter the year of the model here.
-
Taxes - By default, the item will use your primary physical product tax rate, which in the system is labeled as your Materials tax. If it needs to use a different rate or if the item is not taxable and needs no rate at all, you can click the drop-list and check / uncheck whatever boxes are necessary.
-
Upload Media - As mentioned above, this area is actually visible from all tabs of the product and you can add images or animated media (GIF files) if you like at any point in your product creation process. You can drag and drop multiple files at once and all will load simultaneously. Once loaded, you can drag and drop the thumbnails into whatever order you need. Please see the article linked below on Images if you want further details on creating the best product shopping experience for your customers in this area.
Product Details
This area allows you to enter important information about the item. Here are the data points you can set in this section:
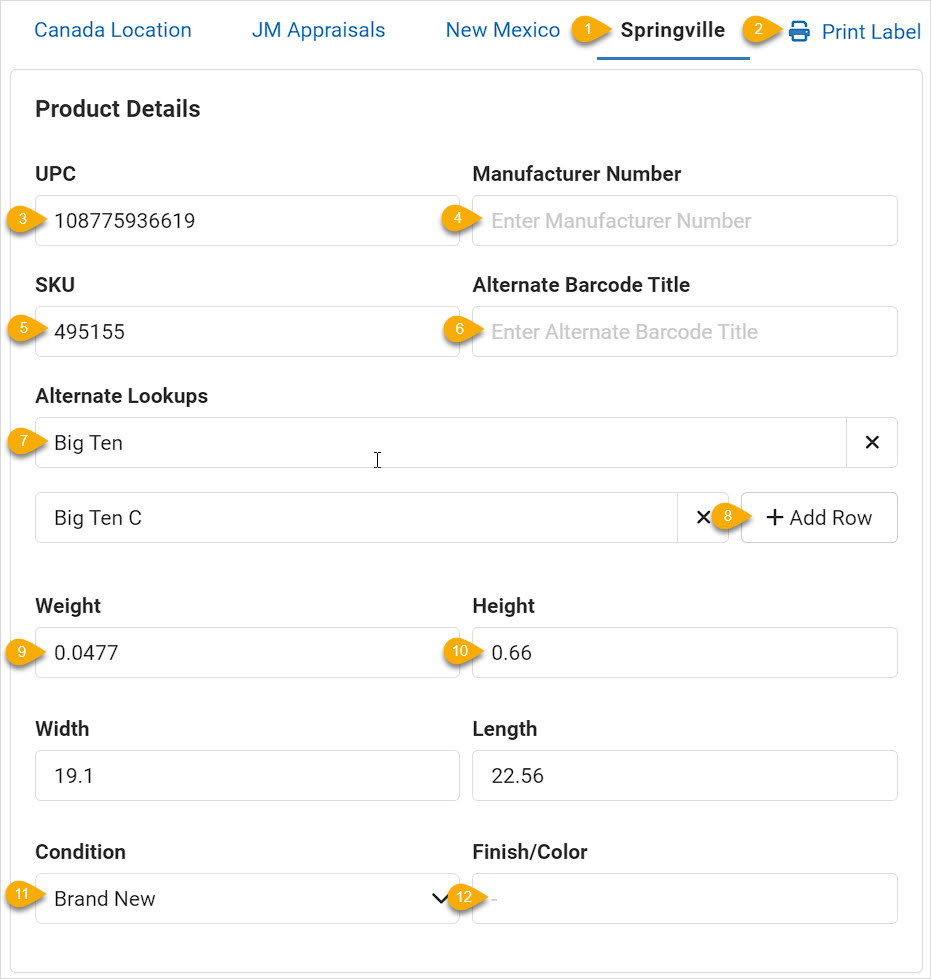
- Store Location - If you have multiple store locations in the system, you will see each of them in this area, either as they appear above or in a drop-list. As you enter data for the item, it will apply to the selected Location, but most data points here can be applied to all of your locations. As you're entering information, you'll see a link to Apply to All Locations, which will save you data entry time.
- Print Label - If you click this button at the top, it will load a label line item for every variant in the product, if it has variants as pictured below. All line items will default to print one label, but you can set whatever quantities you need.
- UPC - If the product has a Universal Product Code that is officially registered with the UPC organization, you can list it here. Codes of this type are always numbers only, and is a 12-digit identifier. It is also known as a GTIN (Global Trade Identifier Number) since it is used globally. Entering a code that is not registered can result in failed searches for the item, so it is recommended to enter only actual UPC codes for your items.
- Manufacturer Number - If the manufacturer for the item has an identifier code they use you can enter it here for reference and searches. You can enter alphanumeric characters and common punctuations and symbols if needed.
- SKU - By default, a unique SKU will appear here with each new product you create. You can adjust this to whatever you need, using alphanumeric characters as well as common punctuations and symbols.
- Alternate Barcode Title - By default, when you print a barcode label, the title for the barcode itself will be the Product Title Plus any Variant Name, but if you want to display something different on the label for the product you can enter an Alternate Barcode Title here and the system will use that when printing the label for the product.
- Alternate Lookups - If you have alternative names for a variant that you use internally, you can enter those terms here and when searching for the items anywhere in the system, e.g. Register, Products page, etc., the item will come up in searches using those terms.
- Add Alternate Lookup Row - If you need more Alternate Lookups you can click this button and add as many as you like.
- Weight - You can enter weight values for your items here. This will use your store default measurement system, which will either decimal values of pounds or kilograms for Weight. The values you enter here for weight will work with system weight-based shipping methods. The values you enter for weight will work for our integrations with Shipstation, Reverb, and Shopify.
- Product Dimensions - You can also enter dimension values for your item this area. These will use your store default measurement system, which will either be inches or centimeters for Height, Width, and Length. The values you enter for dimensions will also work for our integrations with Shipstation, Reverb, and Shopify.
- Condition - If you have non-serialized Conditions enabled (under Settings > Website Settings > Products) you can select the Condition of the item here. Conditions include Brand New, Like New, Mint, Excellent, Very Good, Good, Used, Fair, Poor, Non-Functioning, and Floor Model.
- Finish / Color - If the item has a special Finish, e.g. glossy or matte, or a particular Color, you can enter a brief description here of those features.
Pricing
In this section, you can enter price values for all prices you have enabled in the system for your items.
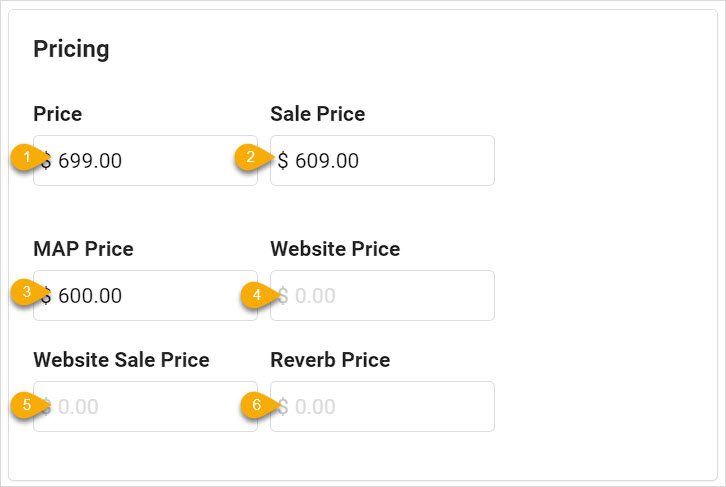
- Price - Enter your normal selling Price for the item here. If you do not use Website Price fields, this price will be used for your sales online and in-store.
- Sale Price - If you sell the item at a discounted price, you can enter that manually here. Transactions in the Register will show the original Price and your Sale Price so customers will know how much you love them. Online, if you're not using the website price fields, the Price will be crossed out and the Sale Price will display. Useful tools such as the Scheduled Sale tool under the Marketing menu allow you to schedule sale prices to be put into products and removed again when the sale is finished.
- MAP Price - If you have manufacturers that require you to respect MAP Price (minimum advertised price) you can enter that value here and the system will warn you whenever you try to save a price for the item that would be below your MAP guideline.
- Website Price - If you need to have different pricing in-store and online, you can use the Website Price to enter the standard price for the item that will appear online. If you don't see this field and want to use website pricing, you can enable it under Settings > Features > Website Pricing.
- Website Sale Price - If you want to sell online at a discount you can either enter a Website Sale Price here manually or schedule the pricing to be saved here automatically using the Scheduled Sale tool, which will also remove the online sale price after your sale is over. When a price is in this field, the regular Website Price will display crossed out, and the website sale price will be active.
- Reverb Price - If you are integrated with Reverb and if the item is synced to your Reverb online store, you can enter the selling price for it here.
- Wholesale Price (Not Pictured) - If you use our online Wholesale selling system, you can list the Wholesale Price for your item here. Only customers with active wholesale login credentials will be able to see this pricing.
Purchasing
If this is a product you plan to re-order in the future, you can enter purchasing information here that will be used by our Purchase Order / Receiving Order system.
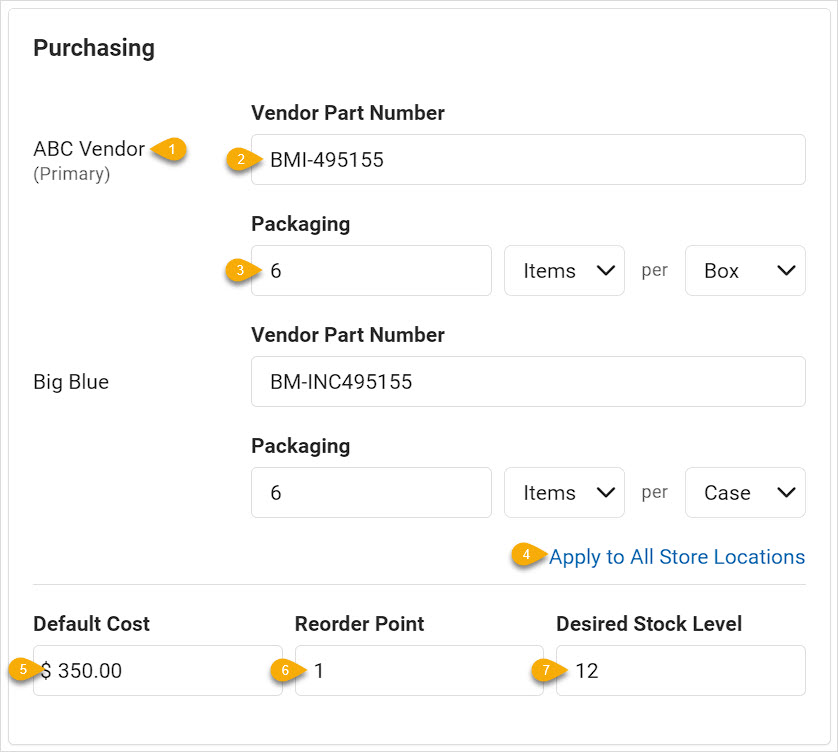
- Vendor Name - Each of the Vendors you have set for the product will appear here, and whichever is the Primary Vendor will be indicated.
- Vendor Part Number - If the vendor has a part number they need to see on purchase orders, you can enter that part number here. These codes can use alphanumeric characters and common symbols and punctuation and will be visible on the PO as well as in the Low Inventory report and the Inventory report's low inventory view.
- Packaging - If the item has consistent packaging used by the vendor, you can enter that here so the system will order it according to the specifications. Enter how many of the items are in each container, the item type in the second dropdown (if the item is individual Items, or if it's sold by Inches, Feet, Yards, or Meters), and the packaging type in the final dropdown (if it's sold by the Case, Bolt, Box, Roll, or Pack).
- Apply to All Store Locations - If you will use the same Vendor information for your purchasing from all of your store locations, you can click this link to apply what you've entered across all your stores.
- Default Cost - This is what you expect your cost to be the next time you order the item. This field updates automatically based on the last Receiving Order cost for the item. Please note that for each shipment you receive for the item a unique Cost will be saved and tracked for your reporting so your profit margins will be accurate historically. Your Default Cost is not used in the reports.
- Reorder Point - If you want this product to be included in our automated reordering recommendations, you will want to set the Reorder Point value. When the product's inventory gets down to this value, it will appear on the Low Inventory report or in the Low Inventory view of the main Inventory report. It will also display in the Purchase Queue when doing a Purchase Order for any of the Vendors saved for the product.
- Desired Stock Level - Again, if you are wanting this product to be included in our automated reordering recommendations, you can set a Desired Stock Level. When adding the item to a Purchase Order or Receiving Order, the system will make sure the quantity being ordered will result in an inventory level that is at or above the number entered here. For example, If the product pictured above is down to 1 item in stock and it's added to a Purchase Order, the system will recommend ordering a case of 6 items, which will bring the stock level to 7.
Deactivating and Saving
At the bottom of every tab, you'll have the saving and closing options detailed below, but only on the Product Information tab will you see your options for deactivating the item. Here is what you can do with those functions:
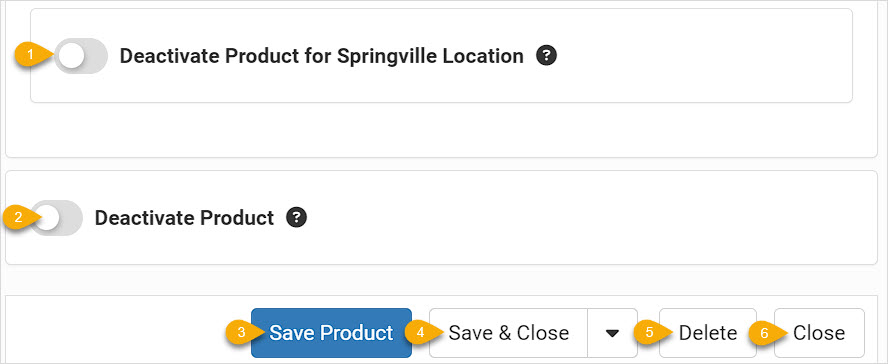
- Deactivate Item for This Location - If you don't need to have the item active at the specific Location you are currently viewing, you can Deactivate it with this toggle. It will still be active for your other locations. Deactivated items do not display online, in searches in your system, or in the Register.
- Deactivate Product - This toggle will Deactivate the product for all of your store locations. Deactivating is like a light version of deleting the product and is useful for temporarily making a product inactive until you are able to reorder it and get it back in stock. It will not display online, will not come up in any system searches for you, and will not be available in the Register. You can find your deactivated items from Inventory > Products by clicking Filters and in the Product Status area, selecting Deactivated. Please note, if the product has multiple variants, this function deactivates all of them for all locations.
- Save Product - Clicking this will save whatever changes you might have made in the item, but will keep the product window open in case you need to continue working.
- Save Actions - If you are done making changes in the item, the default Save & Close button will save those updates and then close the window, taking you to the main Products list page. If you click the down arrow, you can see the option to Save & Duplicate, which will save the current product and copy everything except identifiers and images into a new product that will open for you as a copy. In the dropdown you also have the option to Save & New, which will save the current product and open a new blank one for you to start on.

- Delete - Our system uses what is known as a 'soft-delete', and that means if you decide to delete the item and later need it back, you can reactivate it. Deleting a product is good if it's sold out and you're sure you won't be reordering it again, and removes it from searches in the system, from the website, and from the Register. If you need to find it again, you can go to Inventory > Products, click the Filters button in the upper right, go to Product Status, and filter for Deleted items. Reopen the item from there and you can activate it again at the bottom.
- Close - Clicking to Close the product will close the window. If you have unsaved changes, you will be reminded to save them just in case.
* Example images, the BigMe logo, and Bigme InkNote Color+ Kaleido3 are copyright BigMe and are used here for not-for-profit demonstration purposes only.
Explore Version 3.0 of the Product Page:
Overview
Images
Variants
Serialized Items
Product Information Tab
Inventory Tab
Website Settings Tab
Advanced Settings Tab
Notes Tab
The catalog system contains many thousands of products across multiple industries, and while it is n
The system catalog contains millions of products across multiple industries, and while it is not a c
Steps for Creating a Kit Go to the + button in the upper left and click Product and enter the Title
Is this page helpful?
×Help us improve our articles