Shopify Integration Setup

October 01, 2024October 01, 2024

Shopify Beta Information

Our beta for Shopify is nearing completion and this feature will be released in the near future. Please note: Activation of this feature is an add-on to the system, contact support or sales for pricing. Stores that have been part of our alpha trial will not be charged the add-on amount.

Just to recap, here is what the integration can and cannot do:

  • Just to recap, here is what the integration can and cannot do:

  • Syncs to a single store Location only, but will allow inventory from other store locations to be 'pooled' for sale. Those locations must be set in the system to provide website inventory.
  • Initially Sync Products from Rain POS to Shopify and from Shopify to Rain POS - Includes primary image, title, description (up to 5,000 characters, title used as description if there is none), variants, UPC, SKU, Price / Sale Price / Website Price / Website Sale Price, primary vendor, and quantity on hand.
  • After initial integration, all product and category updates and inventory work should be done in Rain POS. New products and updated data manually entered into Shopify will NOT sync back to Rain POS after the initial sync is complete, only inventory updates from web orders, new customers, etc. will come through the integration moving forward.
  • There is a limit of 100 variants in a single product listing in Shopify.
  • Products with variants that have different names in Shopify from what is in Rain POS or that have different ID codes (UPC / SKU) may not sync correctly or at all. 
  • It is highly recommended that if you have products already in Shopify, the SKU codes or UPC codes should be identical before integrating, or products will be able to duplicate.
  • Availability in Rain POS (POS Only, Website, or Both) needs to be set to either Website or Both for the item to sync with Shopify. Changes to Availability to POS Only will set the item to Draft status in Shopify. Changes in availability in Rain POS will update to Shopify, but not the other way around.
  • Deactivating an item in Rain POS will Archive the item in Shopify, but not vice versa (the next time the item is updated in Rain POS, it will become active again in Shopify).
  • Syncs Rain POS Categories to Shopify Collections. It does NOT bring Shopify collections over to Rain POS in the same way, so it is best to have your categories in Rain POS set up to match before integrating.
  • Please note that Shopify does not do sub-Collections the way we do sub-categories, so all categories will be at the same level in a single list. You may want to reorganize your Rain POS Categories before integrating with Shopify.
  • Also, because of this, it is highly recommended that you make sure you don't have duplicated Category names in our system. For example, if you have a category called Gifts with a subcategory titled Accessories, and another category called Women with a subcategory also called Accessories, it is recommended you make the subcategory names unique. In this example, renaming them Gift Accessories and Women's Accessories respectively would be a good solution.
  • Does not sync classes, per yard / per meter fractional quantities (yardage or meterage products in Rain POS will sell only whole yards / meters in Shopify), packages, subscriptions, Rental Contract products, digital downloads, Rain POS Gift Cards, specific serial numbers, or items set to not display price and/or add-to-cart button.
  • Consignment items in Rain POS can be listed to sell on Shopify but will not update the Consignment contract or track payout information to the Consignment seller.
  • Works with unlimited inventory products. After the initial sync, changing this setting will only sync from the Rain POS side to Shopify.
  • Serialized items sync over to Shopify as pooled inventory, and when an order comes in for such an item, the system finds the next available serial number and assigns it.
  • Orders from Shopify sync to Rain POS, must be fulfilled from Shopify but status will update in Rain POS for shipping / refunds / cancellations. You will need to do refunds and voids from Shopify. Partial refunds done in Shopify will NOT sync back to Rain POS, only full ones.
  • During initial integration, sync Customers from Rain POS to Shopify and Shopify to Rain POS. After initial integration, new customers come through web orders from Shopify, but updated changes to email, phone, address or other manual changes will only work from Rain POS to Shopify for customer info.
  • Sync occurs within seconds for timely  inventory updates so both systems stay current.
  • For full details on how data syncs between Rain POS and Shopify, please click here (this link will open in a new tab of your browser).
  • For information on best practices and how to prepare your data for integration, click here.

You have several options on how you can integrate with Shopify and operate your online store. Either of the following are possible:

  • Online stores through both Shopify and Rain POS, with one or the other being your primary website domain, and the other tied to a subdomain such as store.mywebsitename.com. Both stores will sync with the inventory in Rain POS and update the other store as inventory quantities changed, new items are added, new customers, etc.
  • You can have Shopify become your exclusive online store and not use the Rain POS website at all. In this case, Shopify would use your primary website domain.

POSIM customers that have moved to Rain POS or from any POS system with an active Shopify integration may still have the integration app in Shopify in a 'live' connected state. It is critical to delete this app or disconnect that integration before you integrate Shopify with Rain POS, as it will cause old data and duplicates in both systems.


Integrating With Shopify

To start, you will need to sign into your Shopify account and from your account Home page, in the lower left, go to Settings.

sh 01.jpg

On your Settings page, in the list of items on the left, click on Apps and Sales Channels. After the page loads, at the top, click Develop Apps as pictured:

sh 02.jpg

On the App Development page, click to Create an App in the upper right.

sh 03.jpg

In the window that opens, you will need to create a name for your app. The ONLY use of this app is you integrating your Shopify store with Rain POS so it will only be used once, so the name needs to be there but can be anything you like. You will also need to select the Shopify User that is making the app, and you can read the license and terms of use if you like, but by creating the app, you are agreeing to them. When you're ready, click the Create App button in the lower right.

sh 04.jpg

The next part is where you set what areas of Shopify the app can work with, and this part is a little long. Once your app is created, you'll be looking at the Overview tab as pictured below, and to begin configuring your app, start with Configure Admin API Scopes.

sh 05.jpg

There are a total of 48 areas of Shopify you will want to enable, most of which Rain POS can work with in the initial integration, but all of which might be used and offered in the future. Here is what the first one looks like and the Selected count at the top is what you want to see when you're done with the list. Please note that the item Assigned Fulfillment Orders has checkboxes for both Read and Write, and in all cases in the list below, you will want to select all checkboxes under a listed item (so there are a total of 48 boxes to check, and 24 item titles like the one pictured below):

So as you scroll down the list, look for the following item headings and check all boxes under each heading. Areas not listed below you will skip entirely, but for each area listed you will check a box for Write and for Read for that item:

1 & 2 - Assigned Fulfillment Orders - Check 'Write' and 'Read' (pictured above)

3 & 4 - Customers - Check 'Write' and 'Read'

5 & 6 - Discounts - Check 'Write' and 'Read'

7 & 8 - Draft Orders - Check 'Write' and 'Read'

9 & 10 - Files - Check 'Write' and 'Read'

11 & 12 - Fulfillment Services - Check 'Write' and 'Read'

13 & 14 - Inventory - Check 'Write' and 'Read'

15 & 16 - Locations - Check 'Write' and 'Read'

17 & 18 - Merchant-Managed Fulfillment Orders - Check 'Write' and 'Read'

19 & 20 - Order Editing - Check 'Write' and 'Read'

21 & 22 - Orders - Check 'Write' and 'Read'

23 & 24 - Packing Slip Management - Check 'Write' and 'Read'

25 & 26 - Payment Customizations - Check 'Write' and 'Read'

27 & 28 - Payment Terms - Check 'Write' and 'Read'

29 & 30 - Product Feeds - Check 'Write' and 'Read'

31 & 32 - Product Listings - Check 'Write' and 'Read'

33 & 34 - Products - Check 'Write' and 'Read'

35 & 36 - Publications - Check 'Write' and 'Read'

37 & 38 - Purchase Options - Check 'Write' and 'Read'

39 & 40 - Reports - Check 'Write' and 'Read'

41 & 42 - Returns - Check 'Write' and 'Read'

43 & 44 - Sales Channels - Check 'Write' and 'Read'

45 & 46 - Shipping - Check 'Write' and 'Read'

47 & 48 - Third-Party Fulfillment Orders - Check 'Write' and 'Read'

Once you finish the checkboxes, scroll back to the top and make sure you got all 48. Once confirmed, click Save in the upper right.

Next, click on the API Credentials tab, as pictured below, and then click to Install App.

Further down on the same page, you will need to get your API Access Token. This is a special code that will only be shown to you once, and you will use it to integrate with Rain POS. Before you click to view it, please prepare a place that is safe where you can keep the code, preferably a secure, password protected area where you keep passwords and other sensitive information safe. Once that is ready, click Reveal Token Once:

sh 07.jpg

Once revealed, click the button to the right of the token to copy it, then you can paste it in your secure area first. We'll go to Rain POS in the next step to enter the token.

sh 08.jpg

After your token is safe, in a separate browser tab sign into Rain POS (be careful to keep your Shopify tab open! Do not go to Rain POS in the same browser tab you're viewing Shopify!). Click the Admin button with your username in the upper right and go to Settings > Integrations > Omnichannel and make sure the Shopify tab is highlighted as pictured below. Click in the API Access Token field and paste the token again into that area. Do not click anything else in this area after that, instead, go back to the open tab for Shopify.

Down below the area where you viewed and copied the Admin API Access Token, find the area for API Key and Secret Key. In the API Secret Key area, click the Copy button as pictured below. You will see confirmation that the code is copied. Next, go back to the browser tab where you have Rain POS open.

sh 10.jpg

There are a few more things to do in the Rain POS Settings area:

  1. In Rain POS browser tab, find the API Secret Key area and paste what you copied into it.
  2. You will then need to enter the full Store URL for your Shopify store, including the https://. If you go back to the Shopify tab in your browser, in the upper left you can see your Shopify store URL and copy it from there then paste it into your Rain POS settings. Copying the URL pictured below will also automatically include the https:// part of the web address.


3. You will choose the Location in Rain POS that will connect to your Shopify store. One location needs to be the primary one for Shopify, but later you will have the option to have website inventory from your other store locations sell through the main one you choose here, if you wish.
4. You will also choose which system will have data priority during the initial sync. So if you have products that are only in one system and not in the other, choose the system where the products are. If you have products in both systems and one system has more complete product information than the other, choose the system that has the best data. The integration will use your selected system as the source of authority only in the initial matching of products, and that system's data for products will overwrite the data in the other system.
5. Finally, if you have multiple stores in the system that offer inventory for online sale from the Rain POS side, you can toggle the setting at the bottom of the settings page to Allow all website inventory locations to sell inventory online through the Shopify-synced location. The Location you chose will still be the primary, but inventory will be able to pull from the other locations, and when you go to fulfill the orders, the system will let you fulfill from the location that has the inventory. (This setting is pictured two images down the page.)

Please Note: Products are matched by SKU and UPC as primary identifiers, so if you have different code numbers in one system from the other for SKU or for UPC, those products will appear to duplicate because they didn't match, even if they have the same title, so you may want to double check your products and make sure identifiers like that match, and that each product has the correct SKU or UPC in both systems.

Once you have everything in place, click Connect Channel.

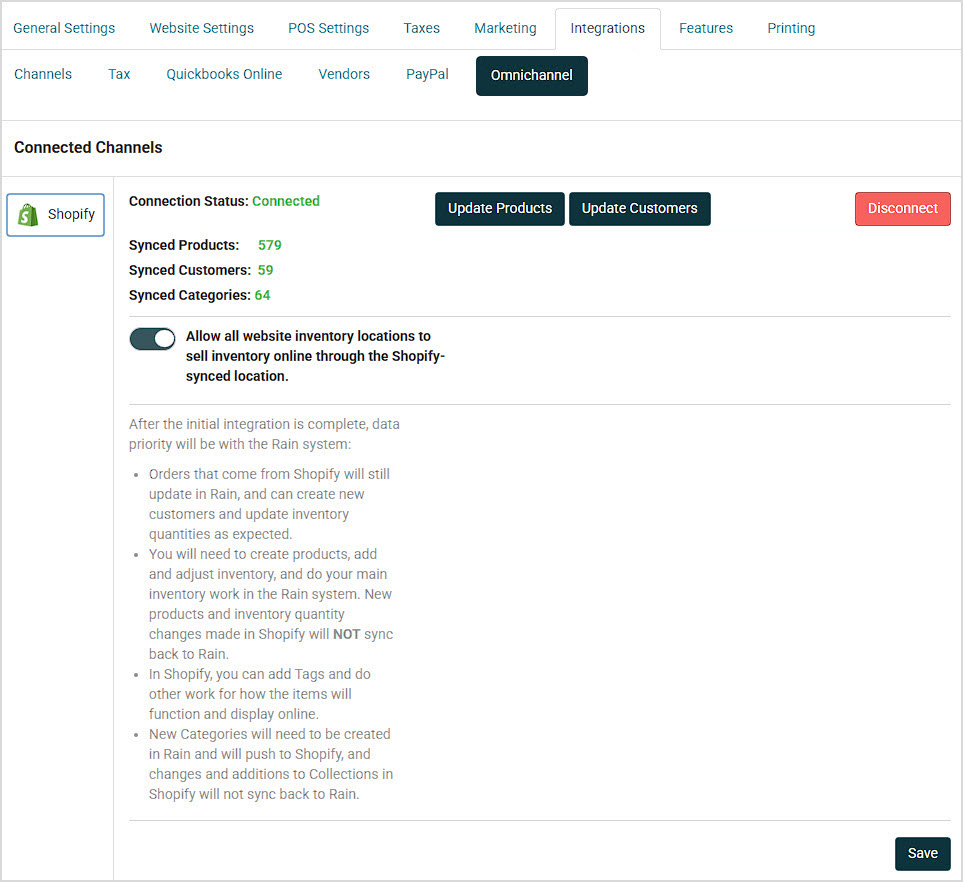
After you are connected, you will see information like what is listed below showing synced data counts and the connection status. If you decide not to use the integration, you can Disconnect but you will need to take care with that option. It is not a temporary function and you will lose your secret key and access token. If you disconnect, you may have to go through the entire integration process again from the start if you decide to use Shopify again.