Integrated Payments: How to Set Up Cloudflare DNS on Windows, Mac, Android, and iOS

October 01, 2024
Network issues can result in your integrated Payments card processing terminal devices losing connectivity and displaying various errors. Below is a list of the possible error codes that could be resolved by this article:
- Error: No established connection to the Reader. Make sure you call ‘discoverReader()’ and then ‘connectReader() to one of the resolved discovered readers. You should not make any other calls to the SDK until the ‘connectReader()’ response resolves without an error or until the connectionStatus changes to ‘connected’.
- no_established_connection
- network_error
- network_timeout
These errors should result in the Reader Diagnostics tool indicating a failure on the 2nd and 4th items. If those icons are appearing red then the following article is the first step in resolving it. See the Integrated Payments - Reader Diagnostics Tool article for more information.
Cloudflare DNS on Windows
- Get to the Network Properties
This process can sometimes be a little different depending on the Windows version. Basically, you just need to get to the Wi-Fi properties page.
- Open the Start menu and click on the cog symbol, just above the shutdown button. This will open the Windows Settings system.
- Click on Network and Internet to get to the Network Settings page. Click on Change adapter options. This will open a list of network connections.
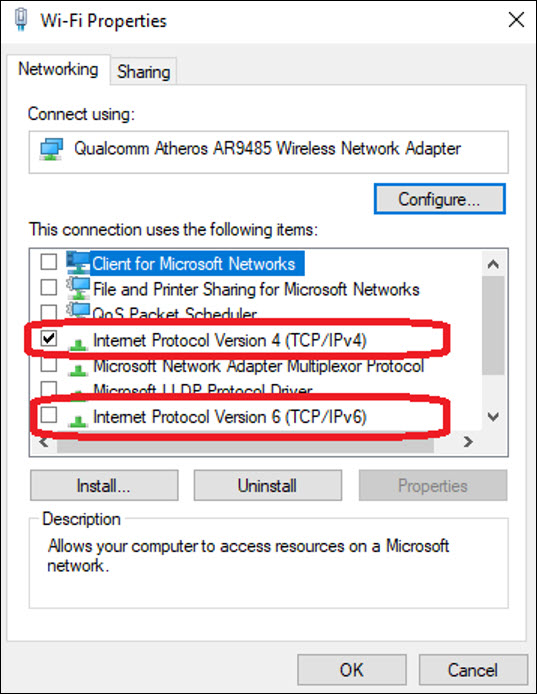
- Right-click on the network you use to connect to the internet and select Properties from the context menu.
- Step 2: Set up DNS for IPv4
- In the connection properties window, look to see if the line Internet Protocol Version 4 (TCP/IPv4) is checked. If so, click on that line once and then press the Properties button. This will open another window.
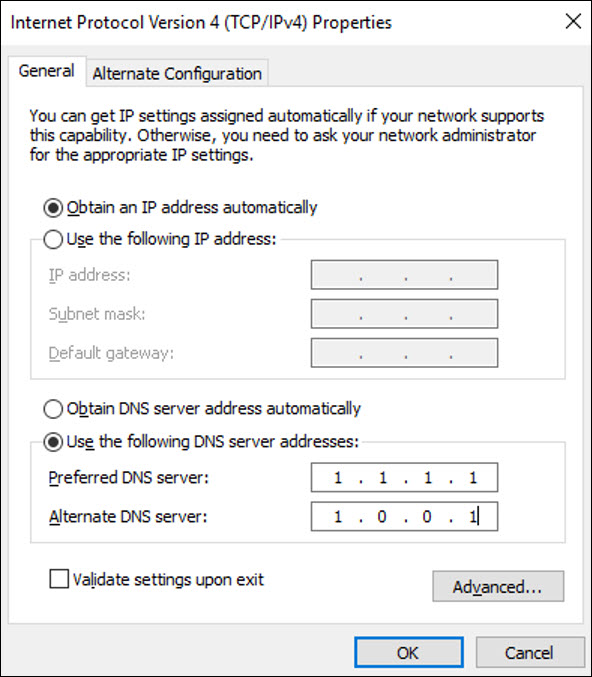
- If there are values in the DNS fields, write them down in case you need to rollback to your current settings.
- Click on the 'Use the following DNS server addresses' radio button.
- Enter 1.1.1.1 in the Preferred DNS server field.
- Enter 1.0.0.1 in the Alternate DNS server field.
- Click on the OK button and then click on Close in the connection properties window.
- Restart your browser to get it to use the Cloudflare DNS service.
- If the line Internet Protocol Version 6 (TCP/IPv6) is checked in the connection properties screen, click on the line and press the Properties button. This will open another window.
- Note down any current values in the DNS fields if there are any. You may need to return to these settings at a later date.
- Click on the Use the following DNS server addresses radio button.
- Enter 2606:4700:4700::1111 in the Preferred DNS server field.
- Enter 2606:4700:4700::1001 in the Alternate DNS server field.
- Click on OK to close the protocol properties window and then press the Close button in the connection properties window.
- Restart your browser to get it to use the Cloudflare DNS service.
Cloudflare DNS on macOS
Setting up the Cloudflare DNS on Macs is very straightforward.
- Open System Preferences.
- Perform a search for DNS Servers. Click on that entry in the results list.
- Click on the + symbol to add a new DNS record. Enter 1.1.1.1
- Click on the + symbol again and enter 1.0.0.1 this time.
- Click on OK and then click Apply.
- Restart your browser to get the new DNS settings active.
Cloudflare DNS on Android
At present, Android devices only use IPv4 addresses. You need to be connected to the network that you want to change the DNS settings for.
- From the top of the screen, swipe down to get the settings bar to expand. Tap on WiFi. Tap on More Settings at the bottom of the list of available networks.
- Long-press on the name of your current network. Tap Modify Network in the popup that appears.
- Tap on Advanced options in the next screen and then tap on IP settings and select Static.
- Scroll down to the fields DNS1 and DNS2. If these fields have the values in them, note them down in case you want to return to your original settings.
- For DNS1 enter 1.1.1.1 and in DNS2 enter 1.0.0.1.
- Tap on Save.
Cloudflare DNS on iOS
Just like Android, iOS only uses IPv4 addresses.
- Tap Settings in the Home screen. Select Wi-Fi from the Settings screen.
- In the Wi-Fi screen tap on the right-arrow next to the name of your internet connection.
- Tap Configure DNS and then Manual.
- If any DNS entries exist, note them down and then delete them.
- Tap + Add Server. Enter 1.1.1.1 for the address value.
- Tap + Add Server. Enter 1.0.0.1 for the address value.
- Tap Save.
If this does not fix the issue, check these options:
- Hard Refresh.
- Clear cache and cookies.
- Unplug & plug back in the card terminal power cable.
- Unplug & plug back in the wifi router power cable.
- Try switching from Wi-Fi to ethernet (or vice versa) when available.
If you are using your personal Pay Pal account for processing transaction on your website, you will
You are required by law to have a privacy statement on your website if you do e-commerce. This state
Imagine what your business would be like if a significant portion of your earnings automatically rec
Is this page helpful?
×Help us improve our articles